


In today’s world, masks have become an essential part of our daily routine. Not only do they protect us from harmful pollutants and germs, but they also add a touch of style to our outfits. However, not everyone knows how to make a mask that is both effective and stylish. That’s why we’ve created this step-by-step guide to help you make your own mask with ease. Whether you’re a beginner or an experienced sewer, this guide will walk you through the process of creating a mask that not only protects you but also adds a touch of glam to your outfit. So, let’s get started and learn how to make a mask like a pro!
Materials for Mask-Making
Essential Materials
To create a DIY mask, there are several essential materials that you will need. These materials can be easily found at home or in local stores, and they will provide the necessary protection and style for your mask. Here are the essential materials you will need:
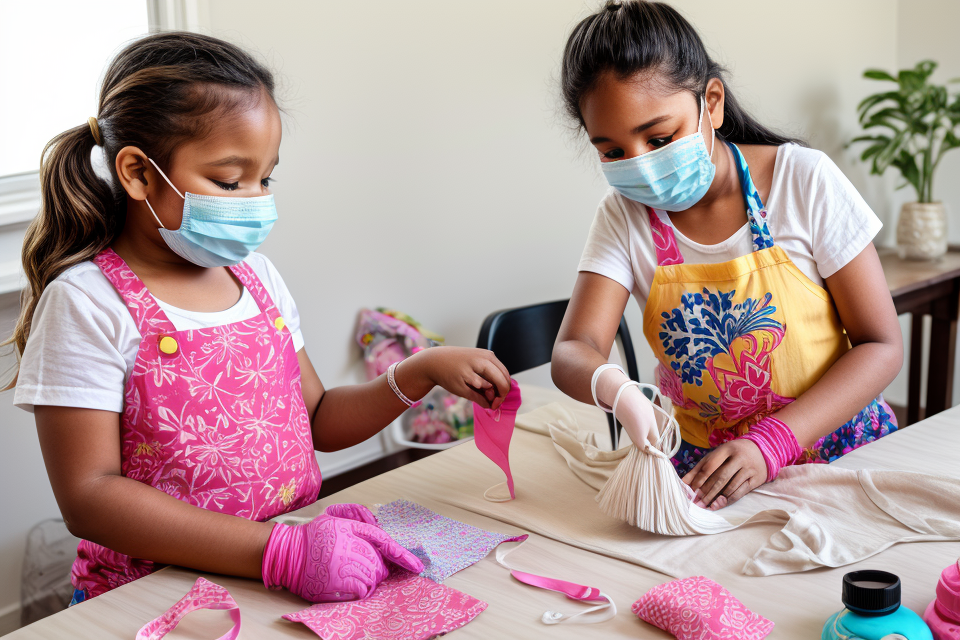
- 2 pieces of 8.5 x 11 inch paper towel (or cloth)
- 1 piece of elastic band (20-25 cm in length)
- 1 piece of string or thread (to tie the mask around the head)
- Scissors or a craft knife (to cut the paper towel or cloth)
- Needle and thread (to sew the mask)
- A ruler or measuring tape (to measure the mask)
The paper towel or cloth is the main material used to create the mask. It is important to choose a material that is breathable, absorbent, and easy to work with. The elastic band is used to hold the mask in place around the head, while the string or thread is used to tie the mask around the head for a more secure fit. The scissors or craft knife are used to cut the paper towel or cloth, while the needle and thread are used to sew the mask together. Finally, the ruler or measuring tape is used to measure the mask and ensure it fits properly.
With these essential materials, you can create a DIY mask that provides both protection and style. The next section will provide a step-by-step guide on how to create your own mask.
Optional Materials
In addition to the essential materials required for mask-making, there are several optional materials that can enhance the effectiveness and style of your homemade mask. These include:
- Nose wire: A thin, bendable wire that can be inserted into the top of the mask to provide a secure fit around the nose. This is particularly useful for masks with looser fits or for individuals with a broader nose.
- Filter fabric: A fine mesh or other filtration material that can be incorporated into the mask’s design to improve its ability to filter out airborne particles. This is particularly useful for masks designed for use in areas with high levels of air pollution or for individuals with respiratory sensitivities.
- Cushioning fabric: A soft, breathable fabric that can be used to line the inside of the mask for added comfort. This is particularly useful for masks worn for extended periods or for individuals with sensitive skin.
- Decorative trim: Ribbons, lace, or other decorative trim that can be used to add a personal touch to your mask. This is purely optional and should not compromise the effectiveness of the mask.
It is important to note that the use of these optional materials may require some adjustments to the mask-making process. For example, the inclusion of a nose wire may require a slightly different pattern or construction method, while the use of filter fabric may affect the type of fabric used for the mask’s outer layer. As with the essential materials, it is important to choose materials that are safe, effective, and suitable for your intended use.
Types of Masks
### H3 heading
When it comes to creating your own mask, the materials you choose are crucial to the effectiveness of your final product. The Centers for Disease Control and Prevention (CDC) recommends using materials that are breathable, easy to clean, and durable. Some popular options include cotton, silk, or linen. You can also use a sewing machine or hand sewing techniques to assemble your mask. To cut out the pattern, you will need a ruler or a cutting mat. You can add additional features like elastic loops or a nose wire for added functionality. When assembling your mask, make sure to follow the proper techniques to ensure a snug fit. You can also add personal style to your mask by decorating it with fabric markers, colored pencils, or other embellishments. By following these steps, you can create a mask that is both functional and stylish.
#### Step 1: Gather Materials
To create your own mask, you will need the following materials:
* 2 layers of 100% cotton fabric (such as quilting cotton or flannel)
* Sewing machine or needle and thread
* Scissors
* Cutting mat or ruler and a flat surface to cut on
* Optional: elastic loops or rubber bands for ties, fabric markers or colored pencils for decoration
#### Step 2: Cut Out the Pattern
To cut out the pattern for your mask, follow these steps:
1. Measure and cut out two identical rectangles of fabric, one for the outer layer and one for the inner layer. The outer layer should be slightly larger than the inner layer.
2. Use a ruler or a cutting mat to cut out the rectangles.
3. Cut out two small circles of fabric for the nose wire.
4. Cut out two rectangles of elastic or rubber bands for the ear loops.
#### Step 3: Assemble the Mask
To assemble the mask, follow these steps:
1. Lay the outer layer of fabric right side up.
2. Place the inner layer of fabric right side down on top of the outer layer.
3. Pin the layers together around the edges, leaving a small opening at the top.
4. Sew the layers together using a sewing machine or by hand. Be sure to leave the top opening unsewn.
5. Slip the nose wire through the top opening and poke the ends through the two small circles of fabric.
6. Sew the ear loops to the top of the mask.
7. Try on the mask to make sure it fits properly. If necessary, adjust the fit by adjusting the ear loops or nose wire.
By following these steps, you can create a functional and stylish mask that provides both protection and personal style.
Surgical Masks
Surgical masks are a type of disposable mask that are commonly used in medical settings to prevent the spread of infection. They are designed to be worn by healthcare professionals during surgical procedures and other medical treatments to protect both the patient and the healthcare worker from potential pathogens.
Surgical masks are made from a variety of materials, including polypropylene, polyethylene, and cellulose. These materials are designed to be breathable while still providing a high level of protection against airborne particles and droplets. The masks typically have a flat, rectangular shape with a bendable nose piece that allows for a comfortable fit over the nose and mouth.
One of the key features of surgical masks is their filter efficiency, which is the ability to capture and remove airborne particles from the air. Surgical masks are designed to filter out at least 95% of airborne particles, including bacteria, viruses, and other pathogens. This makes them an effective tool for preventing the spread of infectious diseases in medical settings.
Surgical masks are also designed to be disposable, meaning they should be used once and then disposed of properly. This helps to prevent the spread of infection by ensuring that the mask is not reused and that any contaminants on the mask are not transferred to other surfaces or individuals.
Overall, surgical masks are an important tool for preventing the spread of infection in medical settings. By providing a high level of protection against airborne particles and droplets, they help to ensure the safety of both patients and healthcare workers.
Cloth Masks
Cloth masks are a popular choice for DIY mask-making due to their simplicity and versatility. They can be made from a variety of materials, including cotton, linen, and silk, and can be easily customized to suit individual preferences. Here are some key features of cloth masks:
- Materials: The choice of material for a cloth mask will depend on personal preference and availability. Cotton is a popular choice as it is breathable and readily available. Linen and silk are also good options as they are natural materials that are soft on the skin.
- Design: Cloth masks can be designed in a variety of ways, from simple rectangles to more elaborate shapes. They can be sewn by hand or with a sewing machine, and can be decorated with embroidery, patches, or other embellishments.
- Filters: While cloth masks may not provide the same level of protection as medical-grade masks, they can still be effective at filtering out small particles. Multiple layers of fabric can be used to increase the filter capacity of the mask.
- Reusability: Cloth masks can be washed and reused, making them a cost-effective and environmentally friendly option. This also allows for easy customization and experimentation with different materials and designs.
Overall, cloth masks offer a practical and stylish solution for personal protection and fashion.
Respirator Masks
Respirator masks are designed to protect the wearer from airborne particles, viruses, and other harmful substances. They are commonly used in industries such as construction, manufacturing, and healthcare. Respirator masks are available in different types, including disposable and reusable models.
Disposable Respirator Masks
Disposable respirator masks are designed for single use and are made of paper or plastic. They are commonly used in industries where there is a risk of exposure to harmful substances, such as chemicals or viruses. Disposable respirator masks are easy to use and can be disposed of after use.
Reusable Respirator Masks
Reusable respirator masks are designed to be used multiple times and are made of materials such as silicone or rubber. They are commonly used in industries where there is a continuous risk of exposure to harmful substances, such as construction or manufacturing. Reusable respirator masks require proper care and maintenance to ensure they remain effective.
Both disposable and reusable respirator masks are available in different levels of protection, including particulate respirators and gas masks. Particulate respirators are designed to filter out airborne particles, such as dust or pollen, while gas masks are designed to protect against chemicals and gases.
When choosing a respirator mask, it is important to consider the level of protection needed and the type of mask that is appropriate for the task at hand. Proper use and maintenance of respirator masks are also essential to ensure their effectiveness in protecting the wearer from harmful substances.
Choosing the Right Materials
Factors to Consider
When choosing materials for your DIY mask, there are several factors to consider. Here are some of the most important ones:
- Breathability: A mask that is too tight or too loose can be uncomfortable to wear, so it’s important to choose a material that is breathable. Cotton and cotton-blend fabrics are good options, as they are lightweight and allow for good airflow.
- Water resistance: If you’re making a mask to use while swimming or other water activities, you’ll want to choose a material that is water-resistant. Neoprene, for example, is a good choice for this purpose.
- Filtration: The material you choose should be able to filter out particles in the air, such as pollen or smoke. A tight weave or dense fabric will be more effective at filtering out particles than a loose or open weave.
- Durability: You’ll want a material that is durable enough to withstand washing and wear. Denim, for example, is a good choice for a mask because it is thick and strong.
- Comfort: Finally, you’ll want to choose a material that is comfortable to wear. A soft and smooth fabric like silk or satin may be more comfortable than a rough or scratchy fabric like canvas.
Tips for Material Selection
When it comes to making your own mask, the material you choose is crucial to the effectiveness of the mask and your personal comfort. Here are some tips to keep in mind when selecting materials for your DIY mask:
- Breathability: It’s important to choose materials that are breathable, but still provide adequate protection. Mesh materials or those with small pores can allow for easy breathing while still keeping particles out.
- Washability: Since you’ll be wearing the mask multiple times, it’s important to choose materials that can be easily washed in water without deteriorating.
- Durability: The material should be able to withstand multiple washes and wear, as well as folding and storing.
- Compatibility: Consider if the material is compatible with any filters or other materials you plan to use with the mask.
- Comfort: Choose a material that is soft and comfortable against your skin, as you’ll be wearing the mask for extended periods of time.
- Style: Consider the style and color of the material you choose, as this can add a personal touch to your mask and make it more fashionable.
By keeping these tips in mind, you can select the best materials for your DIY mask and ensure it provides effective protection while still being comfortable to wear.
Creating Your Mask
Step 1: Cutting the Material
Cutting the material is the first step in creating your DIY mask. The type of material you choose will depend on your personal preference and the level of protection you require. Some popular materials for DIY masks include cotton, linen, and polyester.
To cut the material, you will need a pair of scissors or a craft knife. You should also have a ruler or a measuring tape on hand to ensure that your mask is the correct size.
Before cutting the material, you should determine the size of the mask you want to create. Most masks are designed to cover the nose and mouth, so you should measure the distance from your nose to your chin to determine the length of the mask. The width of the mask should be slightly wider than the distance from your cheekbones to your ears.
Once you have determined the size of the mask, you can begin cutting the material. Cut out two identical pieces of material for the front and back of the mask. If you are using a pattern, you can use it as a guide to ensure that the pieces are the correct size.
It is important to be careful when cutting the material to avoid making mistakes or creating holes in the fabric. You can use pins to hold the material in place while you cut it, or you can use a cutting mat to protect your work surface.
With the material cut, you can move on to the next step in the DIY mask-making process: creating the mask frame.
Step 2: Assembling the Mask
Assembling the mask is the second step in creating your own face mask. This process involves bringing together all the components of your mask, such as the fabric, filter, and nose wire, to create a complete and functional mask.
Here are the steps to follow:
- Take the fabric and filter and place them on a flat surface. The fabric should be placed on top of the filter.
- Carefully place the nose wire onto the top edge of the fabric, ensuring that it is centered.
- Use pliers to twist the wire at both ends, creating a small loop. This will help to keep the wire in place and prevent it from poking through the fabric.
- Hold the twisted wire in place by pinning it to the fabric with a straight pin. Make sure the pin is not too close to the edge of the fabric, as this could puncture your skin when you wear the mask.
- Take the elastic bands and attach them to the ear loops of the mask. This will ensure that the mask stays in place on your face.
- Check the fit of the mask on your face, making any necessary adjustments to the ear loops or nose wire.
- Once you are satisfied with the fit, you can begin wearing your homemade mask.
It is important to note that this step should be done with care, as the pliers and straight pins can be sharp and cause injury. Make sure to follow all safety precautions and use appropriate tools to avoid accidents.
With these simple steps, you can create a functional and effective mask that provides both protection and style.
Step 3: Adding Filters or Valves
Adding filters or valves to your mask can provide additional protection and convenience. Filters can capture small particles and droplets, while valves can allow for easier breathing and speaking.
There are different types of filters and valves available, each with its own unique features and benefits. For example, some filters are designed to capture larger particles, while others are specifically engineered to capture smaller droplets. Some valves are designed to be more breathable, while others are designed to be more durable.
To add filters or valves to your mask, you will need to follow the specific instructions provided with the filter or valve you choose. In general, filters can be inserted into the mask’s outer layer, while valves can be attached to the mask’s edges or clipped onto the mask’s elastic straps.
It is important to note that adding filters or valves to your mask may change the mask’s fit and effectiveness. Be sure to test your mask after adding filters or valves to ensure that it still fits properly and provides adequate protection.
Step 4: Final Adjustments
Pinning and Sewing the Mask
Once you have trimmed the excess fabric, it’s time to pin and sew the mask together. Begin by pinning the edges of the mask to the appropriate shape. For example, if you are making a triangle mask, pin the corners of the mask to the respective points on the triangle shape. Make sure to use sharp pins to secure the fabric in place.
After pinning the edges, it’s time to sew the mask together. You can use a sewing machine or do it by hand. If using a sewing machine, use a straight stitch to sew along the edges of the mask. If doing it by hand, use a needle and thread to sew the edges together. Be sure to sew along the entire perimeter of the mask, ensuring that all edges are securely sewn together.
Adding Elastic or Ribbon
Now that the mask is sewn together, it’s time to add elastic or ribbon to the edges. This will allow the mask to stretch and fit snugly around your face. To add elastic, cut two lengths of elastic to the desired size. Sew one end of the elastic to each side of the mask, ensuring that the elastic is securely attached. If using ribbon, tie a knot at each end of the ribbon and attach it to the mask in the same way as the elastic.
Adding a Filter Pocket
Finally, you may want to add a filter pocket to your mask. This can be done by cutting a small square of mesh or nylon material and sewing it onto the upper part of the mask. This will allow you to insert a filter, such as a coffee filter or a piece of tissue, to further enhance the protection of your mask.
Once you have completed these final adjustments, your mask is ready to wear. Be sure to wash your hands before handling the mask and avoid touching your face while wearing it. Your homemade mask is now ready to provide you with both protection and style.
Selecting the Right Materials
Choosing the right materials for your mask is crucial to ensure both style and protection. There are various options available, each with its own unique properties.
Option 1: Fabric Masks
Fabric masks are a popular choice due to their versatility and affordability. They can be made from materials such as cotton, polyester, or linen, and can be easily customized with various patterns and designs. To make a fabric mask, you will need:
- 2 pieces of fabric (1 for the outside and 1 for the lining)
- Thread and needle
- A face mask pattern (available online)
Option 2: Surgical Masks
Surgical masks are designed to provide a higher level of protection and are often used in medical settings. They are made from a non-woven fabric and are designed to filter out small particles and droplets. To use a surgical mask, simply follow the instructions provided by the manufacturer.
Option 3: N95 Respirator Masks
N95 respirator masks are designed to provide the highest level of protection against airborne particles and are commonly used in industries such as construction and mining. They are designed to filter out at least 95% of airborne particles and are recommended for those working in high-risk environments. To use an N95 respirator mask, follow the instructions provided by the manufacturer.
No matter which option you choose, it is important to ensure that your mask fits properly and covers your nose and mouth completely. This will help to prevent the spread of COVID-19 and other respiratory illnesses.
Choosing the right materials for your mask is crucial to ensure both style and protection. Here are some tips to help you make an informed decision:
- Fabric: Look for breathable, yet protective fabrics such as cotton, linen, or silk. These materials are easy to work with and can be sewn into a variety of styles.
- Filter: For added protection, consider using a filter layer made from non-woven fabric or a polypropylene-based disposable filter. This layer can be sandwiched between two layers of fabric to provide an extra barrier against particles.
- Elastic: Use durable, yet flexible elastic material to secure the mask around your ears or head. This ensures a snug fit and reduces the risk of air leaks.
Measuring and Cutting the Material
To ensure a perfect fit, measure your face and adjust the mask pattern accordingly. Here’s a step-by-step guide:
- Measure the distance from the top of your nose to the bottom of your chin. This will give you the length of the mask.
- Measure the width of your face just below your ears. This will help you determine the width of the mask.
- Add a few inches to both measurements to allow for sewing and stretching.
- Cut out the mask pattern using these measurements.
Assembling the Mask
Once you have your pattern, it’s time to assemble your mask. Follow these steps:
- Sew the sides of the mask together, leaving the top open.
- Insert the filter layer, if using, and sandwich it between two layers of fabric.
- Secure the elastic to the mask by sewing it onto the top edge, leaving enough length to wrap around your ears or head.
- Try on the mask and adjust the elastic for a snug fit.
Finishing Touches
Now that your mask is complete, you can add some personal touches to make it uniquely yours. Consider adding:
- Embellishments: Embellish your mask with sequins, beads, or other decorative elements to add some style.
- Custom Designs: Use fabric paint or applique to create custom designs or patterns on your mask.
- Ventilation: To ensure good airflow, add small holes around the edges of the mask or use a mesh fabric.
With these steps, you’ll be well on your way to creating a stylish and protective mask that suits your needs.
Choosing the right materials for your mask is crucial to ensure both style and protection. Here are some factors to consider when selecting materials:
- Durability: The material should be sturdy enough to withstand frequent wear and tear, while also being flexible enough to mold to your face.
- Breathability: A breathable material will allow you to wear your mask for extended periods without feeling uncomfortable.
- Washability: The material should be machine-washable for easy maintenance and hygiene.
- Style: Select a material that complements your personal style and matches your outfit.
There are various materials available for making masks, including cotton, linen, silk, and synthetic fabrics like polyester. Each material has its unique benefits and drawbacks, so it’s essential to choose the one that best suits your needs.
Cutting the Mask
Once you’ve selected your materials, it’s time to cut the mask. The basic shape of a mask consists of a rectangular piece of fabric with holes for the eyes and mouth. Measure the width and length of your face to determine the size of the mask.
Cut the fabric into a rectangular shape, leaving a margin for sewing the edges. Cut two identical pieces of fabric for the outer layer and one piece for the lining.
Pinning and Sewing the Mask
Pin the layers of the mask together along the sides and bottom, leaving the top open. Sew the mask using a sewing machine or by hand.
If you’re using a sewing machine, use a straight stitch and make sure to use a needle that matches the thickness of the fabric. If you’re sewing by hand, use a needle that is thick enough to handle the fabric.
If you’re adding filters to your mask, insert them between the layers before sewing the mask shut.
Adding Style and Functionality
There are various ways to add style and functionality to your mask. You can add elastic loops or ties to the top of the mask to keep it securely in place. You can also add filters or additional layers of fabric for added protection.
Experiment with different materials, designs, and styles to find the perfect mask that suits your needs. With a little creativity and attention to detail, you can create a stylish and functional mask that provides both protection and personal expression.
Choosing the Right Materials for Your Mask
When it comes to creating your own mask, the materials you choose are crucial to the effectiveness of your final product. There are a variety of materials that can be used to make a mask, each with its own benefits and drawbacks.
Pros and Cons of Different Materials
Cotton
Cotton is a popular choice for mask-making because it is soft, breathable, and easy to work with. However, it is also prone to tearing and may not provide as much protection as other materials.
Flannel
Flannel is another popular choice for mask-making. It is warm and cozy, making it a great option for colder months. However, it is also heavier and may be more difficult to work with than cotton.
Surgical Masks
Surgical masks are a medical-grade option for mask-making. They are designed to provide maximum protection and are often used in medical settings. However, they can be expensive and may not be as comfortable as other materials.
DIY Materials
There are a variety of DIY materials that can be used to make a mask, including t-shirt material, bedsheets, and even old t-shirts. These materials can be easily obtained and are often more affordable than medical-grade masks. However, they may not provide as much protection and may be more difficult to work with.
Tips for Choosing the Right Materials
When choosing materials for your mask, consider the following:
- Your personal preferences: Do you want a soft, breathable material or a warm, cozy material?
- The intended use of the mask: Will you be using the mask for protection or for style?
- Your budget: How much are you willing to spend on materials?
Once you have chosen your materials, it’s time to move on to the next step: cutting and shaping your mask.
Fabric masks are a popular choice due to their versatility and affordability. They can be made from materials such as cotton, polyester, or a blend of both. The key is to choose a tightly woven fabric that will filter out small particles.
Surgical masks are designed to provide maximum protection and are often used in medical settings. They consist of three layers: a fluid-resistant outer layer, a filter layer, and a breathable inner layer.
N95 respirator masks are designed to filter out 95% of airborne particles, making them ideal for those in high-risk environments or with compromised immune systems. These masks must fit snugly to the face to be effective.
Cutting the Mask to Size
Once you have selected your materials, it’s time to cut the mask to size. Measure the length and width of your face, then add a couple of inches for a snug fit. Cut the material to size, leaving enough excess to tie the mask behind the ears.
Sewing the Mask Together
Using a sewing machine or hand sewing, sew the sides of the mask together, leaving the top open. If using a fabric mask, consider adding filters to the inside for added protection. If using a surgical or N95 mask, simply follow the manufacturer’s instructions for assembly.
Adding Style to Your Mask
With the basic mask complete, it’s time to add your personal touch. Consider using colorful fabrics, unique patterns, or even adding beads or sequins for a pop of glamour.
Testing Your Mask
Before putting your mask to use, be sure to test it for proper fit and effectiveness. Place a piece of tissue paper between the mask and your face, then breathe deeply. If the tissue paper stays in place, your mask is working as intended.
With your DIY mask complete, you can now enjoy both protection and style while out in public. Remember to wash your mask regularly and replace it when it becomes damaged or no longer effective.
Gathering Materials
To make your own mask, you will need a few simple materials. Depending on your preference, you can choose materials that are eco-friendly, breathable, or even stylish. Some options include:
- Fabric: You can use cotton, linen, or other natural fabrics that are breathable and comfortable to wear. You can also choose materials with patterns or prints to add some style to your mask.
- Elastic: Elastic bands or ribbons are needed to secure the mask around your head. You can use rubber bands or cotton strings, depending on your preference.
- Nose wire: A nose wire is optional but can help the mask fit more snugly around your nose. You can use a bent paperclip or a piece of wire for this.
Make sure to wash your hands before handling the materials to avoid contamination.
Cutting the Mask
Once you have gathered your materials, you can start cutting the mask. The basic shape of a mask is a rectangle with a nose cutout and loops for the elastic bands. You can use scissors or a craft knife to cut the fabric.
For the nose cutout, measure the width of your nose and cut the fabric to fit. You can also use a template or trace your hand to get the right size.
For the loops, measure the circumference of your head and add a few inches for comfort. Cut the elastic to this length and attach it to the top of the mask.
If you want to add more style to your mask, you can experiment with different shapes and designs. You can add lace, ruffles, or other embellishments to make your mask stand out.
Assembling the Mask
Once you have cut the mask, you can assemble it. Place the nose wire in the cutout and adjust it to fit your nose. Then, loop the elastic bands through the loops and tie them behind your head.
If you have trouble breathing through the mask, you can try using a filter or a piece of tissue paper inside. This will help you breathe more easily while still providing protection.
Finishing Touches
Once you have assembled the mask, you can add any finishing touches. You can add more elastic bands to make it fit more snugly, or you can add a chain or a brooch to make it more stylish.
Remember to wash your mask regularly to keep it clean and hygienic. You can also store it in a plastic bag or a mask case to prevent damage or contamination.
With these simple steps, you can make your own mask and protect yourself from germs while also expressing your personal style.
Before you start making your mask, it’s important to gather the necessary materials. You will need two pieces of cloth, preferably cotton or cotton-blend fabric, that are at least 10 inches by 10 inches in size. You will also need some scissors, a ruler, a needle and thread, and a pen or marker. If you want to add some extra protection, you can also consider adding a layer of non-woven fabric between the two layers of cotton.
Once you have all of your materials, the first step is to cut the two pieces of cloth into the shape of the mask. Use the ruler to measure and mark the dimensions of the mask on the fabric. Then, use the scissors to cut the fabric along the marked lines.
Next, take one of the pieces of fabric and place it on a flat surface. Place the other piece of fabric on top of it, aligning the edges. Use the needle and thread to sew the two pieces of fabric together along the edges, leaving a small opening at the bottom for your nose and mouth.
Once you have sewn the two pieces of fabric together, you can insert a layer of non-woven fabric between the two layers of cotton if you choose to do so. This will add an extra layer of protection to your mask.
Finally, use the needle and thread to sew the opening shut, being careful not to sew your nose and mouth closed. Once you have sewn the opening shut, your mask is complete and ready to wear.
- 1 layer of interfacing (such as fusible fleece or Pellon)
- Needle and thread
- Hand sewing needle
- Sewing machine (optional)
- Iron
- Rotary cutter or X-Acto knife
- Ruler
- Cutting mat
Here are the steps to create your mask:
- Prepare the Fabric: Cut out two 10-inch squares of cotton fabric for the outer layers of the mask. Cut out one 8-inch square of interfacing for the inner layer.
- Iron the Interfacing: Fuse the interfacing to the wrong side of one of the 10-inch squares of cotton fabric, following the manufacturer’s instructions. This will provide structure and support to the mask.
- Cut the Mask: Cut the mask out of the ironed cotton fabric and the other 10-inch square of cotton fabric. You should now have two outer layers of the mask and one inner layer.
- Add Elastic: Cut 12 inches of elastic and sew it onto the mask’s outer layers, placing it 1/2 inch from the top of the mask. This will help the mask stay securely on your face.
- Pin and Sew: Pin the outer layers together, aligning the edges. Sew around the edges, leaving the bottom open. Slip the mask onto your face, adjust the elastic, and tie it behind your head.
- Add a Filter: If desired, you can add a filter to the bottom of the mask. To do this, cut a piece of tissue paper or an old cotton T-shirt into a rectangle that is slightly smaller than the bottom opening of the mask. Place it in the bottom of the mask, and sew it in place.
Your mask is now complete!
Before you start making your mask, it’s important to gather the necessary materials. Here’s a list of what you’ll need:
- 2 layers of 100% cotton fabric (you can use old t-shirts or other cotton clothing items)
- Cutting mat (optional)
- Pins (optional)
Once you have all the materials, you can begin by cutting the fabric into the shape of the mask. You can use a pattern or trace your hand onto the fabric to create the shape. It’s important to use 2 layers of fabric to ensure the mask is thick enough to provide adequate protection.
After cutting the fabric, you can sew the sides of the mask together using the thread and needle. Make sure to sew the inside of the mask as well, to ensure there are no gaps. If you’re having trouble sewing the mask, you can use pins to hold the fabric in place while you sew.
Once the mask is sewn, you can add elastic to the sides or back of the mask to make it easier to wear. Simply thread the elastic through the fabric and tie it in a knot. You can adjust the length of the elastic to ensure a comfortable fit.
And that’s it! You’ve now made your own mask that provides protection and style. Be sure to wash the mask regularly to ensure it stays clean and effective.
When it comes to creating your own mask, the materials you choose are crucial to the effectiveness of your protection. The Centers for Disease Control and Prevention (CDC) recommends using masks made of two or more layers of cotton fabric, or synthetic fabrics like polyester or polypropylene. These materials are effective at blocking both large droplets and smaller aerosol particles.
However, not all materials are created equal. A study published in the journal Aerosol Science and Technology found that masks made of natural fibers like cotton and linen were less effective at blocking particles than those made of synthetic fibers. This is because natural fibers are more porous, allowing more particles to pass through.
To ensure the best possible protection, it’s important to choose materials that are both breathable and effective at blocking particles. This can be achieved by using a combination of cotton and synthetic fabrics, or by using a mask with multiple layers of protection.
Cutting and Shaping Your Mask
Once you’ve chosen your materials, it’s time to cut and shape your mask. The CDC recommends using a mask that fits snugly over your nose and mouth, with no gaps around the edges. This will help to prevent both large droplets and smaller aerosol particles from escaping.
To ensure a proper fit, you can use a mask pattern or template to guide your cutting and shaping. This will help to ensure that your mask is the correct size and shape for your face.
You can also add features like ties or loops to help secure your mask in place. This will help to prevent it from slipping or shifting while you’re wearing it.
While protection is the primary purpose of a mask, that doesn’t mean you can’t add some style to your creation. In fact, many people find that wearing a mask is a great opportunity to express their personal style.
To add some flair to your mask, you can experiment with different colors, patterns, and materials. You can also add embellishments like buttons, beads, or sequins to give your mask some extra personality.
Remember, though, that your mask should still be effective at protecting you and those around you. So while you can add some style to your mask, it’s important to prioritize protection over fashion.
Choosing the Right Materials
When creating your mask, it is important to choose the right materials to ensure both protection and style. Some popular materials for DIY masks include:
- Fabric: Fabric is a versatile and easily accessible material for making masks. Popular fabrics for masks include cotton, linen, and silk.
- Sewing patterns: Sewing patterns can be used to create custom masks with specific designs or shapes.
- Foam: Foam can be used to create unique and stylish masks that are also comfortable to wear.
Designing Your Mask
Once you have chosen your materials, it’s time to design your mask. Here are some tips for designing a mask that is both stylish and functional:
- Consider the shape: The shape of your mask can affect both the style and the function. Some popular shapes include triangular, rectangular, and circular.
- Choose colors and patterns: Choose colors and patterns that complement your personal style and the occasion you will be wearing the mask for.
- Add accessories: Accessories such as ribbons, lace, or beads can add a touch of glamour to your mask.
Sewing Your Mask
Once you have designed your mask, it’s time to start sewing. Here are some tips for sewing a mask:
- Cut out the pieces: Cut out the pieces for your mask using your chosen materials and sewing pattern.
- Sew the pieces together: Sew the pieces together according to your sewing pattern.
- Add elastic: Add elastic to the back of your mask to make it easier to wear.
By following these steps, you can create a stylish and functional DIY mask that will keep you protected and looking great.
Cotton is a popular choice for mask-making because it is soft, breathable, and easily accessible. However, it is also one of the least effective materials for filtering out particles.
Surgical masks are designed to be worn by medical professionals during surgery, but they can also be used by the general public. These masks are made from a combination of paper and plastic, and are more effective at filtering out particles than cotton masks. However, they are also more expensive and may not be as comfortable to wear.
Filter Paper
Filter paper is a type of material that is specifically designed to filter out particles. It is often used in air purifiers and other devices that require high-quality filtration. However, it can be difficult to work with and may not be as comfortable to wear as other materials.
Finding the Right Materials for Your Needs
When choosing materials for your mask, it is important to consider your personal needs and preferences. If you are looking for a comfortable, breathable mask that is easy to wear, cotton may be the best choice for you. If you are looking for a more effective mask that can filter out a higher percentage of particles, surgical masks or filter paper may be better options.
Regardless of which materials you choose, it is important to make sure that your mask fits properly and is comfortable to wear. A poorly fitting mask can be less effective at filtering out particles and may be more difficult to wear for extended periods of time.
- 2 layers of 100% cotton fabric (such as t-shirt material)
- 1 layer of interfacing (optional)
- Sewing machine or hand needle and thread
- Cutting mat or ruler
- Marker or pencil
Once you have all the materials, follow these steps to create your mask:
- Lay one of the layers of cotton fabric flat on a surface and place the other layer on top of it, aligning the edges.
- If using interfacing, place it between the two layers of cotton fabric.
- Use a marker or pencil to draw a circle around the outer edge of the fabric. This will be the outer edge of your mask.
- Cut along the circle line using scissors or a cutting mat/ruler.
- If using a sewing machine, sew the sides of the mask together along the curved edge, leaving the top and bottom unsewn.
- If sewing by hand, use a needle and thread to sew the sides of the mask together along the curved edge, leaving the top and bottom unsewn.
- Once the sides are sewn, tie the top and bottom strings to create a loop that goes around your head.
- You can add additional features to your mask, such as a filter pocket or adjustable ear loops, by following the instructions for those specific features.
With these steps, you should now have a functional and stylish mask that you can wear to protect yourself and others from harmful particles in the air.
- 2 layers of 100% cotton fabric (cut to the desired size)
- Elastic ear loops or a metal nose wire
- Thread and needle (optional)
- A ruler or measuring tape
Once you have your materials, follow these steps to create your mask:
- Lay one layer of the cotton fabric on a flat surface, and place the other layer on top of it.
- Using scissors, cut out the shape of the mask, leaving about 1 inch of excess fabric around the edges.
- Use the ruler or measuring tape to measure the length and width of the mask. Cut out two identical pieces of fabric for the ear loops.
- Place the ear loops on the sides of the mask, and use the needle and thread to sew them in place.
- If you’re using elastic ear loops, attach them to the mask using a ladder stitch.
- If you’re using a metal nose wire, bend it into the shape of an “L,” and attach it to the top of the mask using a wire coat hanger or pliers.
- Once you’ve finished sewing the mask, wash it in cold water and let it air dry.
And that’s it! You now have a homemade mask that provides protection and style.
Cotton is a popular choice for mask-making because it is soft, breathable, and readily available. However, it is not as effective at blocking particles as other materials, and it can also absorb moisture, which can make it less comfortable to wear.
Surgical masks are designed to be worn by medical professionals during surgery and other medical procedures. They are made from a thin, paper-like material that is effective at blocking particles, but they can be expensive and may not be as comfortable to wear as other materials.
Silk
Silk is a luxurious fabric that is known for its softness and durability. It is also effective at blocking particles, making it a great choice for those who want a high level of protection. However, silk can be expensive and may not be as breathable as other materials.
DIY Fabric
If you want to create a mask that is customized to your needs, you can use DIY fabric to make your own mask. There are a variety of fabrics that you can use, including cotton, silk, and synthetic materials. The benefit of using DIY fabric is that you can choose the material that works best for you based on your needs and preferences.
Choosing the Right Materials for Your Mask
When choosing the materials for your mask, it is important to consider your personal needs and preferences. If you want a high level of protection, you may want to choose a material that is effective at blocking particles, such as surgical masks or silk. If you want a mask that is breathable and comfortable to wear, you may want to choose a softer material like cotton or DIY fabric.
Regardless of the material you choose, it is important to make sure that your mask fits snugly over your nose and mouth to ensure maximum protection.
Before you start making your mask, it’s important to gather the necessary materials. This includes:
- 2 layers of 100% cotton fabric (1 for the outside and 1 for the lining)
- Elastic thread
To begin, lay out the 2 layers of fabric on a cutting mat. Measure and cut the fabric according to the dimensions of your face. Then, use the scissors to create small holes around the edges of the fabric for the elastic thread.
Next, use the needle and thread to sew the layers of fabric together along the edges, leaving a small opening at the bottom for the elastic thread. Slip the elastic thread through the opening and tie it in a knot, ensuring that it is tight but not too tight.
Once the mask is sewn, you can add any personal touches such as embellishments or designs. You can also choose to add filters or other add-ons for additional protection.
With your new DIY mask, you can now enjoy protection and style while staying safe and fashionable during these times.
- Fabric: Select a breathable fabric such as cotton or linen. Avoid using synthetic materials like polyester as they can make it harder to breathe.
- Filter: Incorporate a filter layer made of a non-woven fabric, such as polypropylene, to provide an additional layer of protection.
- Elastic: Use a durable and stretchy elastic to secure the mask around your ears or head. This ensures a snug fit and reduces the risk of air leaks.
Once you have gathered your materials, follow these steps to cut the mask:
- Lay the filter fabric on a flat surface, with the non-woven side facing up.
- Place the breathable fabric on top of the filter fabric, with the right side facing up.
- Cut out the mask shape according to your preference or a pre-made pattern. Ensure that the mask covers your nose and mouth and extends to the ears or head for a secure fit.
- Cut two lengths of elastic to the desired length for your ears or head.
Now that you have the cut pieces, assemble the mask by following these steps:
- Pin the edges of the breathable fabric together, leaving a small opening for the elastic.
- Insert the elastic through the opening and secure it around your ears or head.
- Adjust the elastic to ensure a snug fit, then secure the opening by sewing or using fabric glue.
- Repeat the process for the other ear or head.
Your DIY mask is now complete, providing both style and protection during these challenging times.
- Thread clippers
-
Marking pen
-
Choose your fabric: Select two layers of 100% cotton fabric that you like. These will be the outer layers of your mask. You may want to choose a light-colored fabric for the outside of the mask and a darker color for the lining.
- Cut your fabric: Use a rotary cutter or X-Acto knife to cut the two layers of fabric into the shape of a triangle. You can use a ruler and a marking pen to make straight lines, or you can freehand the shape. Cut the interfacing into a rectangle that is slightly larger than the two layers of fabric.
- Iron your interfacing: Iron the interfacing onto the wrong side of one of the layers of fabric. This will help the fabric stay in place and provide extra structure to the mask.
- Pin and sew your layers together: Pin the two layers of fabric together, wrong sides facing each other. Sew around the edges of the mask, leaving the bottom open.
- Add elastic: Cut a piece of elastic to fit around your head. Sew the elastic onto the inside of the mask, attaching it to the top of the triangle and leaving enough length to go around your head.
- Add a filter pocket: If desired, add a filter pocket to your mask. Cut a small rectangle of the same fabric and interfacing, and sew it onto the inside of the mask near the bottom. This will give you a place to insert a filter if you want to use one.
- Iron your mask: Iron the mask to smooth out any wrinkles and to set the shape.
And that’s it! You now have a homemade mask that you can wear to protect yourself and others from airborne particles. Plus, you can customize the design to match your personal style.
When it comes to creating your own mask, the materials you choose are crucial to the effectiveness of your mask. The Centers for Disease Control and Prevention (CDC) recommends using materials that are breathable, yet still provide a barrier between your face and the outside world. Some materials that are great for homemade masks include:
- 100% cotton fabric
- 100% silk fabric
- 100% linen fabric
- Canvas fabric
- Flannel fabric
It’s important to avoid materials that are made from synthetic fibers, such as polyester or nylon, as these materials can be difficult to breathe through and may not provide the same level of protection as natural fibers.
Once you have your materials, it’s time to cut and shape your mask. Most masks are made in a rectangular shape, with ties or loops that go around the ears. To make a rectangular mask, you will need to cut two pieces of fabric that are the same size. You can then use scissors or a craft knife to cut the corners of the fabric so that it has a more fitted shape.
If you want to add filters to your mask, you can cut small pieces of cotton or other breathable material to fit inside the mask. These filters can help to further protect you from airborne particles.
Adding Ties or Loops
Once you have your mask shaped to your liking, it’s time to add ties or loops. This will allow you to secure the mask around your ears and keep it in place while you wear it. You can use ribbon, string, or even strips of fabric to create ties or loops. Simply tie the ties or loops around your ears and adjust them as needed to create a secure fit.
Pinning and Sewing Your Mask
Finally, it’s time to pin and sew your mask together. Use pins to hold the two pieces of fabric together, and then use a sewing machine or by hand to sew the pieces together. If you’re sewing by hand, make sure to use strong thread and take your time to ensure a secure seam.
And that’s it! With just a few simple steps, you can create your own mask that provides both protection and style.
Before you start making your mask, it’s important to gather the necessary materials. This will vary depending on the type of mask you want to make, but generally, you will need:
- A fabric mask or a surgical mask
- A pair of scissors
- A needle and thread (for fabric masks)
- A rubber band (for fabric masks)
- A marker (for fabric masks)
- Hand sanitizer
It’s also important to make sure you have a clean workspace and wash your hands before and after making your mask.
Once you have your materials, you can begin by cutting out the mask according to the manufacturer’s instructions. If you’re making a fabric mask, you’ll need to cut out two layers of fabric and sew them together around the edges. Be sure to use a non-stretchy fabric, such as cotton or flannel, for the best results.
Next, you’ll need to add the elastic ear loops to the mask. To do this, thread the elastic through the holes on either side of the mask and tie them in a knot. Make sure the ear loops are not too tight or too loose, as this can affect the fit of the mask.
If you’re using a surgical mask, you can skip the sewing step and move on to the next one.
Once your mask is complete, you should wash your hands again and put on the mask. Make sure it covers your nose and mouth and fits snugly around your face. You can adjust the ear loops as needed to get a good fit.
With your mask on, you’re now ready to practice good hygiene and protect yourself from illness. Remember to wash your hands frequently, cover your mouth and nose when coughing or sneezing, and avoid touching your face.
When it comes to creating your own mask, the materials you choose can make a big difference in the effectiveness of your protection and the style of your mask. Here are some tips for choosing the right materials:
- Fabric: Look for tightly woven fabrics like cotton or polyester, which will help prevent small particles from passing through the mask.
- Nose wire: A nose wire can help keep the mask in place and prevent air from leaking out of the top of the mask.
- Elastic: The elastic bands used to hold the mask in place should be stretchy yet firm, so they don’t break easily.
- Filter: If you want to add an extra layer of protection, consider adding a filter to your mask. There are many different types of filters available, including activated carbon filters and HEPA filters.
Once you have your materials, it’s time to start creating your mask. Follow the steps below to make a simple mask:
- Cut out two pieces of fabric that are the same size.
- Fold each piece of fabric in half, so that you have a triangle shape.
- Sew the two shorter sides of the triangle together, leaving the top open.
- Insert a filter (if using) and a nose wire into the top of the mask.
- Sew the top of the mask closed.
- Tie the elastic bands around the back of your head, attaching them to the mask.
By following these simple steps, you can create a mask that not only provides protection, but also adds a touch of style to your outfit.
- Breathability: It is important to choose materials that allow for proper airflow while still providing adequate protection. Cotton and other natural fibers are generally considered to be more breathable than synthetic materials.
- Durability: The materials should be able to withstand frequent washing and wear without losing their shape or effectiveness.
- Comfort: The materials should be soft and comfortable against the skin to prevent irritation or discomfort during wear.
- Style: The materials should align with your personal style and preferences, as this is a crucial aspect of DIY mask-making.
Common materials used for mask-making include cotton, cotton blends, silk, and synthetic fabrics such as polyester and nylon. It is also possible to use upcycled materials, such as old t-shirts or scarves, to create a unique and sustainable mask.
Cutting and Shaping the Mask
Once you have selected your materials, it’s time to cut and shape the mask. Here are some tips for cutting and shaping your mask:
- Cutting: Use scissors or a craft knife to cut the materials into the desired shape and size. It’s important to ensure that the mask covers the nose and mouth and fits snugly around the contours of your face.
- Shaping: Use a hot iron or a hair straightener to shape the mask into the desired shape. This step is important to ensure that the mask fits properly and looks professional.
Adding Filters and Additional Features
To enhance the protection and functionality of your mask, you can add filters and additional features such as ties or loops for wearing glasses. Here are some tips for adding filters and additional features:
- Filters: You can add filters to your mask using materials such as cotton or paper. These filters can be inserted into the mask to provide an extra layer of protection.
- Additional features: You can add loops or ties to your mask to make it easier to wear glasses or sunglasses. You can also add pockets for filters or other accessories.
With these steps, you can create a customized and stylish mask that provides both protection and style.
When creating your mask, it is important to choose the right materials to ensure both protection and style. The materials you choose will also depend on your personal preferences and skill level.
Here are some popular materials to consider:
- Fabric: You can use a variety of fabrics, such as cotton, polyester, or silk, to create your mask. Choose a breathable fabric that is easy to work with and won’t irritate your skin.
- Sewing thread: Use a strong sewing thread that can withstand washing and wear. This will ensure that your mask stays intact even after multiple uses.
- Elastic bands: Elastic bands are necessary to keep the mask securely in place on your face. Choose bands that are comfortable and won’t cause any irritation.
Measuring and Cutting the Materials
Before you start sewing your mask, measure your face to determine the size and shape of the mask you need. Use a ruler or a piece of string to measure the length and width of your face, from the top of your forehead to the bottom of your chin.
Once you have your measurements, cut out the materials you have chosen. For a basic mask, you will need two rectangular pieces of fabric, one for the top and one for the bottom. Cut the top piece to be slightly larger than the bottom piece, to allow for a secure fit around your nose and chin.
Now that you have your materials and have cut them to size, it’s time to assemble your mask. Begin by sewing the two rectangular pieces together along the sides, leaving the top and bottom edges open.
Next, insert the elastic bands into the top and bottom edges of the mask. Sew the top and bottom edges together, making sure to leave a small opening for your face.
Finally, test your mask by wearing it and adjusting the elastic bands as needed. Make sure the mask fits securely on your face and doesn’t slip off easily. If necessary, repeat the process until you are satisfied with the fit and style of your mask.
When it comes to creating your own mask, the materials you choose can make all the difference in terms of both protection and style. Here are some key considerations to keep in mind when selecting materials for your mask:
- Fabric: Depending on your needs, you may want to choose a lightweight, breathable fabric like cotton or a heavier, more protective fabric like denim. Look for materials that are comfortable to wear and easy to work with.
- Filters: If you’re looking for added protection, consider adding a filter to your mask. You can use materials like coffee filters, tissue paper, or even vacuum bags to create a filter that fits over your mask. Just be sure to test the filter to ensure it fits snugly and doesn’t let any air through.
- Elastic: To keep your mask securely in place, you’ll need some form of elastic. You can use a piece of string, ribbon, or even rubber bands to create a stretchy band that fits comfortably around your head.
Once you’ve selected your materials, it’s time to start crafting your mask. Keep reading for step-by-step instructions on how to create your own DIY mask.
When it comes to creating your own mask, the materials you choose can make a big difference in the effectiveness of your protection and the style of your mask. Here are some key considerations when choosing materials for your mask:
Fabric
One of the most important factors to consider when choosing materials for your mask is the type of fabric you will use. There are many different types of fabric available, each with its own unique properties. Some popular options include:
- Cotton: This is a lightweight, breathable fabric that is great for warm weather or for people who want a more relaxed fit.
- Flannel: This is a thicker, warmer fabric that is ideal for colder weather or for people who want a more snug fit.
- Satin: This is a smooth, silky fabric that is often used for its luster and drape.
- Sustainable materials: For those who are environmentally conscious, there are also options to use sustainable materials such as bamboo or hemp.
Filters
Another important consideration when choosing materials for your mask is the type of filter you will use. The filter is what will actually capture the droplets and particles that can transmit viruses, so it’s important to choose a filter that is effective and safe. Some popular options include:
- Cotton balls or swabs: These can be used as a simple filter, but they should be changed frequently and disposed of properly.
- Meltblown fabric: This is a non-woven fabric that is specifically designed to filter out small particles.
- Electrostatic filters: These filters use an electrostatic charge to attract and capture particles, making them very effective at filtering out viruses.
Shape
Finally, the shape of your mask can also affect its effectiveness and style. Some popular shapes include:
- Triangular: This is a simple, classic shape that is easy to make and wear.
- Rectangular: This shape is often used for masks that are designed to be more protective, as it covers more of the face.
- Tie-dye: For those who want a more creative and colorful mask, tie-dye is a fun and easy way to add some style.
Overall, the key to choosing the right materials for your mask is to consider your personal preferences and needs. Whether you’re looking for a lightweight, breathable fabric or a more protective filter, there are many options available to help you create a mask that is both effective and stylish.
- A piece of fabric (such as cotton or cotton-flannel blend)
-
Optional: additional materials like buttons, lace, or embroidery floss for decoration
-
Cut the fabric to the desired size and shape for your mask. You can either use a pre-made mask pattern or freehand it. Make sure the fabric is large enough to cover your nose and mouth, and ties can be secured behind your ears.
- Hem the edges of the fabric by folding them twice and sewing them in place. This will prevent fraying and ensure a professional finish.
- Sew the sides of the mask together using a sewing machine or by hand. If you’re using elastic bands for the ear loops, you can skip this step.
- If you’re adding any additional materials (such as buttons or lace), sew them onto the mask at this stage.
- Test your mask to make sure it fits properly and covers your nose and mouth. If necessary, adjust the size or shape of the mask.
By following these steps, you can create a functional and stylish mask that protects you and others from the spread of germs.
Step 1: Cut the Fabric
Measure the dimensions of your mask according to the Centers for Disease Control and Prevention (CDC) guidelines. The mask should cover your nose and mouth and fit snugly against your face.
For the outer layer, cut a rectangle that is 8 inches wide and 6 inches tall. For the inner layer, cut a rectangle that is 8 inches wide and 6 inches tall.
For the interfacing, cut a rectangle that is 8 inches wide and 6 inches tall.
Step 2: Sew the Mask
Pin the interfacing to the wrong side of the outer layer of fabric. Sew around the edges of the interfacing, leaving a small opening to turn the mask right side out.
Pin the interfacing to the wrong side of the inner layer of fabric. Sew around the edges of the interfacing, leaving a small opening to turn the mask right side out.
Clip the corners of the mask to reduce bulk. Turn the mask right side out through the opening, and press the edges flat.
Step 3: Add Elastic
Measure the circumference of your head, and add 2 inches to determine the length of elastic you will need. Cut two pieces of elastic to the desired length.
Sew one end of the elastic to the top of the mask, and sew the other end to the bottom of the mask.
Step 4: Add Style
To add style to your mask, you can use various techniques such as embroidery, applique, or patchwork. Let your creativity flow and have fun with it!
Remember, the most important thing is to protect yourself and others from the spread of COVID-19.
Before you start making your mask, it’s important to gather the necessary materials. You will need two pieces of cloth, scissors, a needle, and thread. You can also add elastic to the sides of the mask to make it easier to wear.
To begin, take one of the pieces of cloth and fold it in half, then in half again to create a triangle. Cut along the sides of the triangle to create two smaller triangles. This will be the top of your mask.
Next, take the other piece of cloth and fold it in half to create a rectangle. Cut this rectangle in half along the fold to create two equal-sized rectangles. These will be the sides of your mask.
Take one of the rectangles and place it on top of one of the smaller triangles. Align the edges and sew them together along the sides. Do the same with the other triangle and rectangle.
Once you have sewn the two sides onto the top of the mask, take the needle and thread and sew a small line of stitches across the top of the mask, about an inch below the top edge. This will help keep the mask in place on your face.
If you want to add elastic to the sides of the mask, cut two pieces of elastic to the desired length and sew them onto the sides of the mask. This will make it easier to put on and take off the mask.
Your mask is now complete! You can add embellishments or designs to the mask to add your own personal style.
When it comes to creating your own mask, the materials you choose can make a big difference in the effectiveness of your protection and the style of your mask. Here are some things to consider when choosing materials for your mask:
- Fabric: The fabric you choose for your mask will be the most important factor in determining its effectiveness. Look for tightly woven materials like cotton or polyester, as these will be the most effective at blocking out particles.
- Filter: A filter can be added to your mask to increase its effectiveness in blocking out particles. Look for filters that are specifically designed for use in masks, and be sure to replace them regularly.
- Elastic: The elastic you use to hold your mask in place will also impact its effectiveness. Look for elastic that is stretchy but still secure, and avoid using materials like rubber bands or hair ties, which can be less effective.
With these considerations in mind, you can choose the materials that will work best for your mask. Whether you’re looking for protection or style, there are plenty of options available to suit your needs.
- 2 pieces of 8.5 x 11 inch paper towel
- 1 piece of 8.5 x 11 inch cardstock
- 1 pair of scissors
- 1 pencil
- 1 ruler
-
Markers or colored pencils (optional)
-
Using the ruler, measure 1 inch from the top and bottom of the paper towel and make a mark.
- Using the scissors, cut along the marks to create a strip that is 1 inch wide and as long as the paper towel.
- Repeat this process with the cardstock, making sure to use the ruler to measure and make marks for cutting.
Step 3: Fold and Cut the Cardstock
- Fold the cardstock in half vertically and horizontally, creating a square.
- Using the ruler, make a mark at the center of the square.
- Using the scissors, cut along the marks to create a square that is slightly smaller than the paper towel.
- Repeat this process with the paper towel, making sure to use the ruler to measure and make marks for cutting.
Step 4: Assemble the Mask
- Take the square piece of cardstock and place it on top of the paper towel square.
- Use the pencil to trace the shape of the cardstock onto the paper towel.
- Cut out the shape using the scissors.
- Use the markers or colored pencils to decorate the mask as desired.
Step 5: Wear and Enjoy
-
Wear the mask for protection and style.
-
Using the ruler, measure 3 inches from the bottom of the paper towel and make a mark.
- Using the ruler, measure 3 inches from the left side of the paper towel and make a mark.
- Using the scissors, cut along the marks to create a square.
- Fold the paper towel in half along the diagonal and use it as a guide to cut out a triangle from the cardstock.
- Use the pencil to trace the triangle onto the paper towel.
-
Cut out the triangle along the traced line.
-
Place the paper towel square on top of the cardstock triangle, aligning the edges.
- Use the scissors to cut along the edges of the paper towel, stopping 1/4 inch from the edges.
- Use the ruler to measure and mark the corners of the cardstock triangle.
- Use the scissors to cut along the marked lines, creating flaps at the corners.
- Use the scissors to cut a small slit in the center of the top of the mask.
- Use the pencil to mark the position of the flaps on the inside of the mask.
- Use the scissors to cut along the marked lines, cutting out the flaps.
- Use the scissors to cut out the slit.
Step 4: Decorate Your Mask
- Use markers or colored pencils to decorate your mask.
- Consider adding eye holes, a nose, or a mouth to your mask for a more personalized look.
Step 5: Wear Your Mask
- Wear your mask over your nose and mouth to protect yourself and others from COVID-19.
- Experiment with different decorations and styles to make your mask reflect your personal style.
Remember, while DIY masks can be a fun and creative way to protect yourself and others, they should only be used as a last resort if you are unable to obtain a commercial mask. It is important to continue practicing physical distancing and washing your hands frequently to prevent the spread of COVID-19.
Before you start making your mask, it’s important to gather the necessary materials. This includes a variety of fabrics, threads, scissors, needles, and a sewing machine. Depending on your design, you may also need additional materials such as elastic or wire for shaping the mask.
Once you have all of your materials, the first step is to trace the shape of your mask onto the fabric. This can be done by cutting out a template or by drawing the shape by hand. Be sure to leave enough room for the fabric to stretch and fit comfortably over your face.
Next, you will need to choose your thread and needle. The type of thread you use will depend on the type of fabric you are using. For example, cotton thread is ideal for cotton fabrics, while polyester thread is better for synthetic fabrics. You may also want to use a thread that matches the color of your fabric for a more seamless look.
With your materials and tools ready, you can begin sewing your mask. Start by sewing the fabric together along the edges, using small stitches to create a seam. Once you have sewn the edges together, you can use elastic or wire to shape the mask to your face.
Be sure to test your mask to ensure that it fits comfortably and securely over your face. You may need to adjust the shape or size of the mask to achieve the perfect fit. Once you are satisfied with the fit, you can add any additional features such as ties or filters.
Overall, creating your own mask is a simple and effective way to protect yourself and express your personal style. With a little creativity and patience, you can create a unique and functional mask that meets your needs.
Cotton is a popular choice for mask-making because it is soft, breathable, and easily accessible. However, it is also prone to tearing and may not provide as much protection as other materials.
Flannel is another popular choice for mask-making because it is warm and cozy, making it perfect for colder months. It is also a durable material that can withstand more wear and tear than cotton. However, it may not be as breathable as cotton.
Surgical masks are a medical-grade option for mask-making. They are designed to provide maximum protection and are often used in medical settings. However, they can be expensive and may not be as comfortable as homemade masks made from soft materials.
Scarf Fabric
Scarf fabric is a versatile material that can be used to make a variety of mask styles. It is also a great option for those who want to add a pop of color or pattern to their mask. However, it may not provide as much protection as other materials.
- The level of protection you need (e.g. cotton for light protection, surgical masks for maximum protection)
- The season (e.g. flannel for colder months, cotton for warmer months)
- Your personal style (e.g. scarf fabric for a pop of color)
Once you have chosen your materials, it’s time to move on to the next step: creating your mask.
- Fabric: Cotton, polyester, and satin are popular choices for mask-making. Cotton is breathable and comfortable, while polyester is durable and washable. Satin adds a touch of glamor and is ideal for formal occasions.
- Shape: Masks can come in various shapes, including rectangular, triangle, and circular. Consider your face shape and personal style when selecting a shape.
- Filter: For added protection, you can include a filter pocket in your mask. This allows you to insert a filter, such as a piece of tissue or a coffee filter, to trap droplets.
Once you have selected your materials, it’s time to cut the mask. Here’s a simple step-by-step guide:
- Measure the length and width of the fabric based on the shape you have chosen.
- Cut the fabric according to the measurements.
- Hem the edges to prevent fraying.
- Cut out the filter pocket, if desired.
Now it’s time to assemble the mask. Follow these steps:
- Pin the fabric together along the sides and bottom, leaving the top open.
- Sew the sides and bottom using a sewing machine or by hand.
- Turn the mask right-side out and press it flat.
- Sew the top of the mask closed, leaving a small opening for your head.
- Insert a filter, if desired, and seal the filter pocket.
- Wear your mask, ensuring it covers your nose and mouth.
Style Your Mask
A mask can be both functional and fashionable. Here are some tips to style your mask:
- Color: Choose a color that complements your outfit or personal style.
- Pattern: Add a pop of pattern with a print or stripe.
- Accessories: Pair your mask with a coordinating scarf or hat for added style.
With these tips, you can create a DIY mask that not only protects you but also reflects your personal style.
- 2 layers of 100% cotton fabric (you can use old t-shirts or other lightweight fabric)
- Cutting mat or ruler and a surface to cut on
- Marker or pen
Once you have your materials, you can begin by cutting out the shape of your mask. You’ll want to make sure the fabric is large enough to cover your nose and mouth, as well as your cheeks and chin. You can either use a ruler and a cutting mat or freehand the shape using a marker or pen.
Next, you’ll need to add the elastic. You can either use pre-made elastic or cut your own from an old pair of tights or pantyhose. The elastic should be the same width as your mask and should be long enough to wrap around your head twice.
To attach the elastic to your mask, you can either sew it on or use fabric glue. If you’re using a sewing machine, you can use a zigzag stitch to attach the elastic to the edges of your mask. If you’re using fabric glue, you can apply a line of glue along the edge of your mask and then press the elastic onto the glue.
Once your mask is complete, you can wear it by wrapping the elastic around your head and tying it behind your neck. Your mask should fit snugly over your nose and mouth, with a small gap at the bottom for breathing.
That’s it! You’ve now made your own mask that will not only keep you protected, but also add a touch of style to your outfit.
Once you have all of your materials, follow these steps to create your mask:
- Lay the two layers of cotton fabric on top of each other, with the interfacing in between.
- Use the rotary cutter or x-acto knife to cut out the shape of the mask, following the contours of your face. Make sure to cut out two identical masks.
- Use the ruler and marker or pen to draw a straight line across the middle of each mask, from ear to ear. This will be the line where the two sides of the mask come together.
- Use the scissors to cut along the line on one of the masks, from ear to ear.
- Open up the mask and press the two sides together along the cut line, using the iron and ironing board. Make sure to use the interfacing side of the fabric as the outside of the mask.
- Repeat steps 4-5 for the second mask.
- Use the scissors to cut around the edges of the masks, leaving about 1/2 inch of fabric around the edges.
- Use the needle and thread to sew the edges of the masks together, leaving the bottom edge open.
- Slip the mask on and tie the bottom string behind your head to secure it in place.
With these simple steps, you can create your own mask that not only provides protection, but also adds a touch of style to your outfit.
- 2 layers of 100% cotton fabric (or other breathable fabric)
- Optional: elastic band or string for tying the mask around your head
Follow these steps to make your mask:
- Cut the fabric into a rectangular shape that is large enough to cover your face and nose. The fabric should be doubled for added protection.
- Use the thread and needle to sew the edges of the fabric together, creating a tube that fits around your face. Make sure to leave a small opening at the bottom for your nose and mouth.
- Cut the elastic band or string to the desired length for tying around your head.
- Insert the elastic band or string into the opening at the bottom of the mask, and tie it around your head to secure the mask in place.
- If desired, add decorative elements such as ribbons or buttons to the mask for added style.
With these simple steps, you can create a mask that provides protection and style.
When it comes to creating your own mask, the materials you choose can make a big difference in the effectiveness of your mask and how comfortable it is to wear. Here are some factors to consider when choosing materials for your mask:
- Breathability: It’s important to choose materials that are breathable, so you don’t feel like you’re suffocating while wearing your mask. This is especially important if you plan to wear your mask for an extended period of time.
- Durability: You’ll want to choose materials that are durable and can withstand multiple washes, so your mask can be used again and again.
- Fit: The fit of your mask is crucial to its effectiveness. Your mask should fit snugly over your nose and mouth, with no gaps.
- Style: While function is important, you can also choose materials that match your personal style. A mask with a fun pattern or color can add a pop of personality to your outfit.
With these factors in mind, here are some materials you can use to make your own mask:
- Fabric: Cotton, cotton blends, and other breathable fabrics are great options for your mask. You can choose a solid color or a pattern, depending on your preference.
- Surgical masks: Surgical masks are designed to be breathable and effective at blocking viruses and other particles. If you prefer a disposable mask, you can purchase surgical masks in bulk.
- Eco-friendly materials: If you’re looking for a more eco-friendly option, you can use materials like bamboo or hemp. These materials are breathable and durable, and they’re also sustainable and biodegradable.
Once you’ve chosen your materials, it’s time to cut and shape your mask. Here’s a step-by-step guide:
- Cut your fabric: Measure and cut your fabric to the desired size for your mask. You can use a template or pattern to ensure that your mask fits your face properly.
- Shape your mask: Once you’ve cut your fabric, shape it to fit your face. You can use scissors or a craft knife to shape your mask.
- Add elastic: Once your mask is shaped, add elastic to the edges so that it can be worn over the ears. You can use pre-made elastic or cut your own from a flexible material like bamboo.
- Add a filter: If desired, you can add a filter to your mask. A filter can be made from a piece of tissue or another soft material, and it can be inserted into the top of your mask to help filter out particles.
With your mask complete, you’re ready to put it on and start protecting yourself and others from harmful particles.
Choosing the right materials for your mask is crucial to ensure both style and protection. Here are some options to consider:
Fabric masks are a popular choice due to their accessibility and versatility. You can use cotton, linen, or other breathable fabrics. Cut the fabric into the desired shape and size, and add elastic or rubber bands for a secure fit. For added protection, consider using a filter layer such as a non-woven fabric or a coffee filter.
Surgical masks are designed to filter out airborne particles and provide protection for both the wearer and others. These masks are disposable and should be discarded after use. They are available in various sizes and designs, so it’s essential to choose one that fits comfortably and securely.
Option 3: DIY Filters
If you prefer to use a fabric mask, you can create your own filter layer using materials such as vacuum cleaner bags, coffee filters, or even a layer of tissue paper. Simply cut the material into a shape that fits your mask, and place it between the mask’s fabric layers.
Designing Your Mask
Once you have selected your materials, it’s time to design your mask. Consider the following factors:
Fit
A well-fitting mask is essential for both style and protection. Make sure your mask covers your nose and mouth and fits snugly around the edges. If you’re using a fabric mask, you can use elastic or rubber bands to secure it. If you’re using a surgical mask, follow the manufacturer’s instructions for proper wear.
Style
Your mask is an accessory, so make it your own! Choose a design that reflects your personality or mood. You can add embellishments such as buttons, lace, or even glitter. Get creative and have fun with it!
Functionality
Remember that your mask is not only a fashion statement but also a protective measure. Choose materials that are breathable and comfortable to wear, and consider adding a filter layer for added protection.
Assembling Your Mask
With your materials and design in hand, it’s time to assemble your mask. Follow these steps:
Step 1: Cut the Fabric
If you’re using a fabric mask, cut the fabric to the desired shape and size. You can use a pattern or freehand it. Make sure the edges are smooth and even.
Step 2: Add the Filter Layer
If you’re using a filter layer, place it between the fabric layers. This will help prevent airborne particles from entering your mask.
Step 3: Secure the Edges
If you’re using elastic or rubber bands, attach them to the edges of the mask. This will help keep it in place and prevent air leaks.
Step 4: Test Your Mask
Before wearing your mask, test it to make sure it fits properly and doesn’t restrict your breathing. You can also check for any gaps or air leaks around the edges.
With these steps, you’re ready to create your own DIY mask for protection and style!
When creating your mask, it is important to choose the right materials to ensure both protection and style. The following materials are recommended:
- 2 pieces of 8.5 x 11 inch tissue paper
- 1 piece of 8.5 x 11 inch cardboard
- A ruler
- A pen or pencil
- String or elastic band (optional)
Cutting the Tissue Paper
The first step in making your mask is to cut the tissue paper. Use the scissors to cut two squares of tissue paper that measure 8.5 x 8.5 inches. This will be the main body of your mask.
Next, cut two smaller squares of tissue paper that measure 4 x 4 inches. These will be used to create the pleats on the sides of your mask.
Creating the Pleats
Take one of the smaller squares of tissue paper and fold it in half diagonally. Then, fold it in half again, this time along the vertical axis. Finally, fold it in half again, this time along the horizontal axis. This will create a smaller square with four corners and four pleats.
Repeat this process with the second smaller square of tissue paper.
Now that you have your two squares of tissue paper with pleats, it’s time to assemble the mask. Place one of the smaller squares of tissue paper on top of one of the larger squares of tissue paper. Make sure the pleats are facing outwards.
Next, use the ruler and pen or pencil to draw a line down the middle of the mask, from top to bottom. This will be the center line of your mask.
Take the second larger square of tissue paper and place it on top of the first square, lining up the edges. Make sure the pleats are facing outwards.
Use the ruler and pen or pencil to draw a line down the middle of the mask, from top to bottom. This will be the center line of your mask.
Decorating Your Mask
Once you have assembled your mask, you can decorate it to add style and personality. You can use markers, paint, or even fabric to add designs and patterns to your mask.
If you want to add a string or elastic band to your mask, you can use it to tie the mask around your head and keep it in place.
With your mask complete, you can now wear it to protect yourself and show off your style.
- Fabric: A tightly woven cotton or linen fabric is a good choice for a mask. These materials are breathable, durable, and easy to work with.
- Filter: A filter should be placed in the center of the mask to help block out small particles and droplets. A coffee filter or a layer of tissue paper works well for this purpose.
- Elastic: Elastic bands or ribbon should be used to secure the mask around your head. This will ensure that the mask fits snugly over your nose and mouth.
- Style: Consider the style of your mask when choosing materials. For example, if you want a more casual, everyday mask, a t-shirt or scarf can be used. If you want a more formal or stylish mask, a dress fabric or scarf can be used.
By choosing the right materials, you can create a mask that not only protects you, but also reflects your personal style.
- Fabric: Look for lightweight, breathable fabrics such as cotton or cotton-blend materials. These fabrics are comfortable to wear and allow for easy breathing. Avoid synthetic materials like polyester or nylon, as they can make the mask too hot to wear.
- Fit: Make sure the fabric you choose has a good fit around your face. Tight-fitting masks can be uncomfortable and may be difficult to breathe through. On the other hand, masks that are too loose may not provide enough protection.
- Lining: Consider adding a lining to your mask to add an extra layer of protection. This can be a layer of tissue paper or a thin, breathable material like silk or lace.
- Nose wire: Some masks come with a nose wire to help mold the mask to the shape of your face. This can help prevent air from leaking out of the sides of the mask. If your mask doesn’t come with a nose wire, you can make one from a bendable wire or thin plastic.
Once you have selected your materials, it’s time to assemble your mask. Here are the steps to follow:
- Cut out two identical mask shapes from your fabric.
- Hem the edges of the mask by folding them twice and sewing them in place.
- Add a nose wire by sewing a wire or plastic along the top edge of the mask.
- Place the two mask pieces together, with the right sides facing each other.
- Sew the two pieces together along the sides and bottom.
- Turn the mask right side out and insert the lining if you have one.
- Sew the lining in place.
- Your mask is now complete!
Styling Your Mask
Now that you have a functional mask, it’s time to add some style. Here are some tips to help you create a unique look:
- Embellishments: Add some personality to your mask with embellishments like beads, sequins, or buttons. These can be sewn onto the mask or attached with safety pins.
- Patterns: Choose a bold print or colorful design to make your mask stand out.
- Ties: Experiment with different mask ties, such as ribbons or strings, to add some flair.
- Fabric: Consider using a variety of fabrics to create a unique texture or pattern.
With these tips, you can create a mask that not only provides protection but also reflects your personal style.
When it comes to creating your own mask, the materials you choose are crucial to the effectiveness of your protection. In this section, we will discuss the different materials you can use and their benefits.
1. Cotton Fabric
Cotton fabric is a popular choice for homemade masks because it is soft, breathable, and easy to work with. However, it is not as effective at blocking small particles as other materials.
2. Flannel Fabric
Flannel fabric is another popular choice for homemade masks. It is warmer than cotton and provides more protection against small particles. However, it can be more difficult to work with and may be less comfortable for some wearers.
3. Surgical Masks
Surgical masks are designed to provide maximum protection against small particles and are a good option for those who want the highest level of protection. However, they can be more expensive and may not be as comfortable as homemade masks.
- Consider your personal preferences and needs when choosing materials.
- Look for materials that are breathable, comfortable, and easy to work with.
- Consider the level of protection you need and choose materials accordingly.
By choosing the right materials, you can create a mask that provides effective protection while also being comfortable to wear.
- Fabric: Common materials for masks include cotton, linen, and silk. Each has its own benefits and drawbacks. Cotton is a popular choice because it is affordable and easy to work with, but it may not be as effective at blocking particles as other materials. Linen is a durable and breathable option, but it may be more difficult to work with. Silk is a soft and luxurious option, but it may not be as effective at blocking particles as other materials.
- Filters: To enhance the protection of your mask, you can add filters made from materials like activated carbon or HEPA filters. These filters can help to block small particles and improve the overall effectiveness of your mask.
- Elastic: The elastic band used to hold the mask in place is an important consideration. It should be comfortable and secure, but not too tight as to cause discomfort or restrict breathing.
Once you have chosen your materials, it’s time to start making your mask. Follow the next section for a step-by-step guide on how to create your own mask.
To make your own mask, you will need a few basic materials. These may include:
- 1 layer of interfacing (such as Pellon Shape-Flex or Wonder Under)
- Needle and thread (optional)
- Thread (optional)
You may also want to consider adding features such as filters or a nose wire. These can be purchased online or at a craft store.
Measuring and Cutting the Fabric
Before you begin sewing your mask, you will need to measure and cut the fabric to the correct size. This will depend on the size of your face and the type of mask you are making. For example, a simple mask that covers the nose and mouth may only require a single layer of fabric, while a mask with multiple layers or a filter may require more fabric.
To measure your face, place a piece of string or yarn around the perimeter of your face, starting at the top of your forehead and ending at the bottom of your chin. This will give you an idea of the size of the mask you will need to make.
Once you have measured your face, you can cut the fabric to the appropriate size. For a simple mask, you may only need to cut one layer of fabric. For a mask with multiple layers or a filter, you will need to cut several pieces of fabric to the correct size.
Sewing the Mask
Once you have cut the fabric to the correct size, you can begin sewing the mask. This can be done by hand or with a sewing machine. If you are using a sewing machine, you may want to consider using a zigzag stitch to add extra strength to the seams.
To sew the mask, you will need to start by sewing the two layers of cotton fabric together. This can be done by sewing around the edges of the fabric, leaving a small opening at the bottom. Once the two layers are sewn together, you can turn the mask right side out and press it.
If you are adding features such as filters or a nose wire, you will need to sew these onto the mask after it has been constructed. This can be done by hand or with a sewing machine.
Finishing the Mask
Once the mask has been constructed, you can finish it by adding any additional features and attaching a cord or ties. This will allow you to secure the mask around your ears or neck.
If you are using a sewing machine, you may want to consider using a zigzag stitch to add extra strength to the seams. This will help ensure that the mask is durable and long-lasting.
Once the mask is complete, you can wear it to protect yourself and others from the spread of germs. Remember to wash the mask regularly to maintain its effectiveness.
To begin, place the two layers of fabric right sides together and use scissors to cut them into the desired shape and size. If you prefer a more tailored fit, you can use needle and thread to sew the fabric together along the edges.
Next, attach the elastic ear loops or metal nose wire to the top of the mask. This will help keep it securely in place on your face.
Now that your mask is complete, it’s important to wash it before use. This will help remove any dirt or debris that may be present on the fabric. You can wash your mask in cold water and let it air dry.
Once your mask is washed and dried, it’s ready to wear. Simply place it over your nose and mouth and secure it in place with the elastic ear loops or metal nose wire. You can also add a filter to the mask for added protection.
Remember, wearing a mask is an important way to protect yourself and others from the spread of viruses and other illnesses. By following this step-by-step guide, you can create a custom mask that not only provides protection, but also adds a touch of style to your outfit.
Fabric masks are a popular choice due to their breathability and versatility. They can be made from a variety of materials, including cotton, linen, and silk. These masks are relatively easy to make and can be customized to match your personal style.
Surgical masks are designed to provide a higher level of protection than fabric masks. They are made from a non-woven fabric that is specifically engineered to filter out airborne particles. While they may not be as fashionable as fabric masks, they are an effective option for those looking for maximum protection.
Option 3: DIY Masks
For those who want to get creative, DIY masks offer endless possibilities. You can use a variety of materials, such as scarves, socks, and even T-shirts, to create a unique mask that reflects your personal style. The key is to choose materials that are breathable and washable to ensure long-term use.
No matter which option you choose, it’s important to ensure that your mask fits snugly over your nose and mouth to provide maximum protection.
-
Iron (optional)
-
Cut the fabric: Lay the two layers of fabric on top of each other, with the right sides facing together. Use a cutting mat or ruler to cut the fabric into the shape of a mask. You can also use a template to guide you.
- Sew the edges: Sew the edges of the mask together, leaving a small opening at the bottom for turning.
- Turn the mask inside out: Use your fingers or a turning tool to turn the mask inside out, so that the right side of the fabric is on the inside.
- Sew the opening: Use a needle and thread to sew the opening closed.
- Iron the mask: If desired, use an iron to press the mask and make it smooth and flat.
- Wash the mask: Before wearing, wash the mask in cold water and let it air dry.
That’s it! You now have a homemade mask that is both stylish and functional. Remember to wear it over your nose and mouth when in public to help prevent the spread of germs.
- 2 layers of 100% cotton fabric (one for the outside and one for the inside)
- Elastic thread or string
- Optional: decorative materials such as fabric paint, beads, or buttons
Once you have gathered your materials, you can begin the mask-making process. The steps are as follows:
- Cut the fabric: Cut one layer of cotton fabric into a rectangular shape that will cover your face. The fabric should be slightly larger than your face so that it can be secured around your ears.
- Hem the edges: Use scissors to hem the edges of the fabric. This will prevent fraying and ensure a neat finish.
- Sew the sides: Using needle and thread, sew the sides of the fabric together to create a tube. Make sure to leave the top open so that you can place your head through the tube.
- Add elastic: Use elastic thread or string to create loops that will go around your ears. Sew these loops onto the top of the mask, one on each side.
- Decorate (optional): If you want to add decorative elements to your mask, you can do so at this stage. Use fabric paint, beads, or buttons to add a personal touch.
- Wear your mask: Once you have finished making your mask, put it on and adjust the elastic loops so that it fits securely around your ears.
Before you start making your mask, it’s important to gather the necessary materials. You will need two pieces of cloth, elastic, and a needle and thread. The cloth should be made of a breathable fabric such as cotton or linen, and the elastic should be thick and durable.
Once you have gathered your materials, the first step is to measure the size of your face. To do this, stretch a piece of string or thread from one side of your face to the other, passing over the top of your head. Then, measure the length of the string with a ruler or tape measure. This will give you the length of the mask.
Next, you will need to cut out the two pieces of cloth for your mask. Cut one piece of cloth into a rectangle that is the same length as your face measurement, and the other piece into a smaller rectangle that will be used to cover the area around your nose and mouth.
Once you have cut out the pieces of cloth, you can start sewing your mask. First, sew the two pieces of cloth together along the sides and bottom, leaving the top open. Then, insert the elastic into the top hem of the mask, and sew it in place.
After you have finished sewing your mask, you can try it on to make sure it fits properly. If the mask is too loose or too tight, you can adjust the elastic or the size of the mask.
Now that you have created your mask, you can add your own personal style to it. You can choose different colors and patterns for the outside of the mask, and add embellishments such as beads or sequins.
By following these steps, you can create a mask that not only provides protection, but also reflects your unique style.
- A fabric mask pattern or a piece of cloth
- Optional: fabric paint, beads, or other embellishments
Once you have gathered your materials, follow these steps to create your mask:
- Cut out the mask pattern or a piece of cloth to the desired size. Make sure it covers your nose and mouth and fits comfortably on your face.
- If you are using a pattern, follow the instructions to assemble the mask. If you are using a piece of cloth, hem the edges by folding them twice and sewing them in place.
- If you want to add any embellishments, such as fabric paint or beads, do so now.
- Once the mask is complete, try it on to make sure it fits properly and feels comfortable.
With your mask complete, you can now move on to the next step in the guide: choosing a style. Whether you prefer a classic look or something more creative, there are endless options to choose from.
-
Fabric markers or paint (optional)
-
Cut the two layers of cotton fabric to the desired size. The Centers for Disease Control and Prevention (CDC) recommends using masks that fit snugly over the nose and mouth, have multiple layers of fabric, and are made of breathable material.
- Sew the two layers of fabric together along the edges, leaving the bottom edge open.
- Insert a metal nose wire or elastic ear loops into the top edge of the mask. This will help the mask stay in place on your face.
- If you want to add a personal touch to your mask, you can use fabric markers or paint to decorate it. Just be sure to follow the instructions on the packaging and let the materials dry completely before wearing the mask.
- Once you’ve finished making your mask, try it on to make sure it fits properly and feels comfortable. If necessary, adjust the nose wire or ear loops to ensure a snug fit.
With these simple steps, you can create a stylish and effective mask to protect yourself and others from the spread of illness.
- Sewing machine
- Needles and thread
- Hand sewing needle and thread
- Pins
To get started, follow these steps:
- Lay the interfacing on a flat surface and place the cotton fabric on top of it. Make sure the interfacing is centered on the fabric.
- Use the rotary cutter or X-Acto knife to cut out the shape of the mask. Make sure to add seam allowances to the sides and bottom of the mask.
- Use the ruler to cut out the elastic from the 1/2 inch elastic. The elastic should be 3 inches longer than the circumference of your head.
- Sew the elastic onto the top of the mask, making sure to stretch it evenly.
- Sew the sides and bottom of the mask together, leaving the top open.
- Turn the mask right side out and press it with a hot iron.
- Use pins to attach the cotton fabric to the interfacing.
- Use a hand sewing needle and thread to close the openings at the top of the mask.
- Use a marker or pen to write the word “mask” on the mask.
- Wear your homemade mask and feel confident in your ability to protect yourself and others.
When it comes to creating your own mask, the materials you choose are crucial to the effectiveness of your mask. The Centers for Disease Control and Prevention (CDC) recommends using materials that are breathable, washable, and have multiple layers. Some popular materials for homemade masks include cotton, flannel, and other natural fabrics.
It’s important to avoid using materials that are non-breathable, such as plastic or paper, as these can make it difficult to breathe and may not be effective at blocking particles. Additionally, materials that are not washable, such as disposable masks, should be avoided as they cannot be cleaned and reused.
Once you have chosen your materials, it’s time to cut and shape your mask. A simple way to do this is to cut out two identical rectangles of fabric, with one being slightly larger than the other. The larger rectangle will be the outer layer of your mask, while the smaller rectangle will be the inner layer.
To shape your mask, simply fold the larger rectangle in half and sew along the sides and bottom. This will create a pocket for the smaller rectangle, which can be inserted and sewn in place to create a snug fit around your nose and mouth.
Adding Filter Pockets
Filter pockets are a great addition to any homemade mask, as they provide an extra layer of protection. To add filter pockets, simply cut two small rectangles of non-breathable material, such as cotton or flannel, and sew them onto the inside of your mask, one on each side. These pockets can be filled with a layer of folded cotton or tissue, which will act as a filter for particles.
Pleating and Tying Your Mask
To create a more effective seal around your nose and mouth, you can pleat your mask. To do this, simply fold the mask along the sides and bottom, creating small pleats. These pleats will help the mask conform to the shape of your face and create a tighter seal.
Once you have pleated your mask, tie it behind your head using a loop or a simple knot. This will help keep your mask in place and prevent it from slipping.
Final Thoughts
Creating your own mask can be a fun and rewarding project, and it’s a great way to protect yourself and others from respiratory illnesses. By choosing the right materials, cutting and shaping your mask properly, adding filter pockets, and pleating and tying it correctly, you can create a mask that is both effective and stylish. So why not give it a try today?
- Thread bobbin
- Ruler or measuring tape
- Marker or fabric pen
You can also add your own personal touch by using different fabrics, colors, and designs.
- Cut out 2 identical rectangles of fabric, measuring 7 inches by 4 inches.
- Hem the edges of the rectangles by folding them twice and sewing them in place.
- Sew the 2 rectangles together along the sides and bottom, leaving the top open.
- Cut a piece of elastic measuring 20 inches by 1/4 inch.
- Thread the needle with the thread bobbin and sew the elastic onto the top of the mask, attaching it to the hem.
- Sew the elastic to the mask, making sure it is even and secure.
- Cut a small piece of cotton batting or foam, and place it in the middle of the mask for added comfort.
- Use a marker or fabric pen to write your name on the mask, so you can easily identify it when you wear it.
That’s it! You now have a homemade mask that provides protection and style. Remember to wash your mask regularly to maintain its effectiveness.
Before you start making your mask, it’s important to gather the necessary materials. You will need two pieces of cloth, a pair of scissors, a needle, and some thread. You can also add your own personal touch by choosing fabrics that match your outfit or reflect your style.
- Cut one of the pieces of cloth into a rectangular shape, approximately 7.5 inches by 5 inches. This will be the front of your mask.
- Cut the second piece of cloth into a smaller rectangular shape, approximately 6.5 inches by 4.5 inches. This will be the back of your mask.
- Sew the two rectangles together along the sides and bottom, leaving the top open.
- Insert the needle and thread through the top opening, and sew a straight line from one side to the other. This will create a hole for your nose.
- Turn the mask inside out, and sew a rectangle shape around the hole you just created. This will create a pocket for your nose.
- Insert the needle and thread through the pocket, and sew a straight line from one side to the other. This will create a pocket for your ears.
- Turn the mask right side out, and you’re done!
Your mask is now complete, and you can wear it to protect yourself and others from the spread of germs. Remember to wash your mask regularly, and replace it if it becomes damaged or dirty.
Before you start making your mask, it’s important to gather the necessary materials. You will need two pieces of cloth, elastic, and a needle and thread. The cloth should be made of a tightly woven fabric such as cotton or polyester. The elastic should be used to hold the mask in place around your ears. The needle and thread will be used to sew the mask together.
Once you have gathered your materials, you can begin by cutting the cloth into the shape of the mask. This can be done by tracing the shape of a mask onto the cloth and then cutting it out. It’s important to make sure that the mask is large enough to cover your nose and mouth, but not so large that it is difficult to breathe through it.
Next, you will need to sew the mask together using the needle and thread. To do this, you will need to sew the sides of the mask together and then attach the elastic to the top of the mask. This will help to hold the mask in place around your ears.
Once the mask is sewn together, you can wear it by pulling it up over your nose and mouth. You may need to adjust the elastic to ensure that the mask fits comfortably and securely.
With these simple steps, you can create your own DIY mask to protect yourself and others from the spread of germs and viruses.
- 2 layers of 100% cotton fabric (1 for the outer layer and 1 for the inner layer)
-
Optional: elastic string or ribbon for the ear loops
-
Cut the outer layer of the fabric into a rectangle shape that is 7 inches by 4 inches.
- Cut the inner layer of the fabric into a rectangle shape that is 6.5 inches by 3.5 inches.
- Hem the edges of both rectangles by folding them twice and sewing them in place.
- Place the inner layer of the fabric on top of the outer layer, with the hems aligned.
- Sew the two layers together along the sides and bottom of the mask, leaving the top open.
- Turn the mask right side out and insert a filter pocket by sewing a vertical line from the top of the mask to the bottom, leaving the top open.
- Optional: attach elastic string or ribbon to the top of the mask for a secure fit.
With these simple steps, you can create a mask that not only provides protection but also adds a touch of style to your outfit.
- Measure 3 inches across from the left and right edges of the paper towel and make a mark.
- Connect the dots to create a square with a 3-inch side length.
- Repeat the process on the cardstock, but make the square 1 inch larger in size.
- Cut out the paper towel square and the cardstock square using the scissors.
Step 3: Trace and Cut the Mask
- Lay the paper towel square on top of the cardstock square and trace around it with the pencil.
- Cut out the mask shape using the scissors.
-
Cut out a smaller rectangle from the center of the mask, leaving a border of about 1/2 inch around the edges.
-
Add details like eyes, a nose, and a mouth to make it more personalized.
Step 5: Add Elastic Bands
- Cut two 12-inch long pieces of elastic bands.
- Thread one end of each band through the top hem of the mask and tie a knot.
-
Slip the mask over your head and adjust the elastic bands for a comfortable fit.
-
Foam: Foam is a great material for creating a snug fit around the nose and mouth, which can help prevent air from leaking out.
- Elastic: Elastic bands are essential for keeping the mask securely in place on your face. Make sure to use durable elastic that won’t break easily.
- Filter: Consider adding a filter to your mask to help trap small particles like dust or pollen. You can use a layer of tissue or a coffee filter, or purchase a specialized filter made specifically for masks.
By choosing the right materials, you can create a mask that not only provides effective protection but also fits comfortably and looks stylish.
- Needle and thread (or fabric glue)
-
Optional: decorative materials such as beads, buttons, or ribbons
-
Cut out two rectangles of fabric, each measuring approximately 7.5 cm by 15 cm.
- Place the two rectangles on top of each other, with the hems aligned.
- Sew the rectangles together along the sides and bottom, leaving the top open.
- Turn the mask right-side out by pulling it through the opening at the top.
- Optional: add decorative elements by sewing them onto the mask.
Your mask is now complete! It’s important to wash your hands before and after handling the mask, and to avoid touching your face while wearing it. Remember to wear your mask whenever you’re in public or around other people, and to practice good hygiene to stay healthy.
- Fabric: Look for tightly woven fabrics like cotton or polyester, which will be more effective at blocking out particles. Avoid loosely woven fabrics like lace or mesh, which may not provide enough protection.
- Fit: The fit of your mask is also important. Look for materials that can be molded to the shape of your face for a more secure fit. Thicker materials may also be more effective at blocking out particles.
- Filter layer: Consider adding a filter layer to your mask for even more protection. You can use materials like HEPA filters or activated carbon filters, which can trap smaller particles and gases.
Sewing Your Mask
Once you have your materials, it’s time to start sewing your mask. Here are some tips for sewing a well-fitting mask:
- Cut out the shape: Cut out the shape of your mask using your chosen fabric and filter layer. The shape should cover your nose, mouth, and chin.
- Sew the sides: Sew the sides of your mask together, leaving the top open. This will allow you to put your mask on and take it off more easily.
- Add elastic: Add elastic to the top of your mask to help it stay in place. You can use a single piece of elastic for a simple mask, or multiple pieces for a more complex design.
- Test fit: Once you have finished sewing your mask, test the fit by putting it on and making sure it covers your nose, mouth, and chin. You may need to adjust the size or shape of your mask for a better fit.
Finally, it’s time to style your mask and make it your own. Here are some tips for adding style to your mask:
- Embellishments: Add embellishments like beads, sequins, or other decorations to make your mask more visually appealing.
- Colors and patterns: Choose colors and patterns that match your outfit or reflect your personal style.
- Accessories: Consider adding accessories like pom-poms or tassels to your mask for an extra pop of color and personality.
By following these tips, you can create a DIY mask that provides both protection and style. Whether you’re looking for a simple, functional mask or a more elaborate design, there are endless possibilities for creating a mask that suits your needs and style.
- Sewing pins
- Hand sewing needles and thread
- Hair elastics or rubber bands
Optional materials:
- Bias tape
- Ribbon or lace
- Decorative buttons or snaps
Once you have gathered all of your materials, follow these steps to create your mask:
- Cut out the pieces for your mask using the pattern provided by your healthcare provider or government agency.
- Iron the interfacing onto the back of one of the cotton layers, following the manufacturer’s instructions.
- Place the other cotton layer on top of the interfacing, wrong side facing up.
- Cut out the pieces for the elastic loops using the pattern provided by your healthcare provider or government agency.
- Hem the edges of the cotton layers by folding them twice and sewing them in place.
- Sew the sides and bottom of the mask together, leaving the top open.
- Slip the elastic loops over your head and secure them at the back of your neck.
- Tie the mask around your face using the hair elastics or rubber bands.
- Adjust the mask as needed for a secure fit.
- Repeat the process for any additional masks you may need.
By following these steps, you can create a functional and stylish mask that will protect you and others from the spread of illness.
- On the cardstock, draw a rectangle that is 8 inches wide and 6 inches tall.
- On one of the paper towel pieces, fold it in half vertically and then in half horizontally, so that you have a small square.
- Cut the square in half diagonally, so you have two triangles.
- Place the triangles on the top and bottom edges of the rectangle, aligning the tips of the triangles with the corners of the rectangle.
-
Cut out the rectangle, leaving a small border around the edges.
-
Place the cardstock rectangle on top of one of the paper towel triangles, aligning the edges.
- Use the ruler to mark the corners of the cardstock, so that you can cut them off later.
- Use the scissors to cut along the marked lines, leaving a small border around the edges.
- Use the pencil to mark the center of each triangle, so that you can cut them off later.
- Use the scissors to cut along the marked lines, cutting out the two triangles.
- Fold the two triangles in half, so that they stand up by themselves.
- Use the markers or colored pencils to decorate your mask.
Step 4: Cut Out the Nose Piece
- Cut out a small circle from the remaining paper towel square.
- Use the ruler to mark the center of the circle, so that you can cut it in half later.
- Use the scissors to cut along the marked line, cutting the circle in half.
- Use the pencil to mark the two sides of the circle, so that you can cut them off later.
- Use the scissors to cut along the marked lines, cutting out the two small triangles.
- Use the ruler to measure the width of your nose, and cut out a small rectangle from one of the triangles.
- Fold the rectangle in half, so that it forms a triangle.
- Use the ruler to measure the length of your nose, and cut out a small rectangle from the other triangle.
- Attach the two triangles to the top of the mask, using tape or glue.
- Attach the two small rectangles to the bottom of the mask, using tape or glue.
Step 5: Put on Your Mask
- Put on the mask, making sure it fits snugly over your nose and mouth.
- Adjust the nose piece as needed.
- Use the mask for protection or as a fashion statement.
Option 1: Sewn Masks
- Fabric: Cotton, cotton-blend, or flannel (these materials are breathable and washable)
- Elastic ear loops or ties
Option 2: No-Sew Masks
- Two layers of cotton or cotton-blend fabric
Option 3: Upcycled Materials
- Repurpose old t-shirts, scarves, or other soft fabric materials
- Use elastic ear loops or ties for a no-sew option
Once you have selected your materials, follow these steps to cut your mask:
- Cut two rectangular pieces of fabric, with one slightly larger than the other. The larger piece will be the back of the mask, while the smaller piece will be the front.
- Fold the larger piece in half, aligning the edges.
- Cut a curved line along the edges of the folded piece, creating a circular shape.
- Cut a small circle from the center of the front piece. This circle will be the opening for your face.
-
Cut two small, vertical slits on the sides of the front piece, near the bottom edge. These slits will allow you to bend and mold the mask to your face.
-
Slip the smaller, circular piece over the elastic ear loops or ties.
- Place the larger, rectangular piece over the smaller piece, aligning the edges.
- Slip the smaller piece through the opening in the larger piece, creating a secure fit around your face.
- Bend the vertical slits on the front piece, allowing the mask to mold to your face.
- Secure the ear loops or ties behind your ears.
Your mask is now complete, and you can wear it with style and confidence, knowing it provides protection as well as personal expression.
Cotton is a popular choice for mask-making because it is soft, breathable, and easily accessible. However, it is also less durable than other materials and may not provide as much protection.
Surgical masks are designed to provide more protection than cotton masks, but they are also more expensive and may not be as comfortable to wear.
N95 Respirators
N95 respirators are the most effective masks for protecting against airborne particles, but they can be difficult to find and may be uncomfortable for some people to wear.
How to Choose the Right Materials
When choosing materials for your mask, consider your personal preferences and the level of protection you need. If you are looking for a comfortable, breathable mask for everyday use, cotton may be the best choice. If you are in an environment where you are at a higher risk of exposure to airborne particles, a surgical mask or N95 respirator may be more appropriate.
Once you have chosen your materials, it’s time to move on to the next step in the mask-making process: cutting and shaping your mask.
- Thread snips
- Pencil or marker
- Elastic cord or ribbon (optional)
Once you have all the materials, you can start making your mask. Here’s a step-by-step guide:
- Cut the fabric: Cut two identical rectangles of fabric that measure 8 inches by 8 inches.
- Hem the edges: Fold the edges of the fabric rectangles twice, and then sew or glue them in place to create a hem.
- Create the ear loops: Fold the top corners of each rectangle down 1 inch, and then sew or glue them in place to create the ear loops.
- Place the filters (optional): If you want to add filters to your mask, cut them to the size you need and place them between the two layers of fabric.
- Assemble the mask: Sew the two rectangles together along the sides and bottom, leaving the top open. Insert filters if you added any.
- Add elastic cord or ribbon (optional): If you want to add elastic cord or ribbon to your mask, sew it onto the top edges of the mask so that it can be worn around the head.
- Test the mask: Before wearing the mask, test it to make sure it fits properly and is comfortable to wear.
That’s it! You’ve now made your own mask. Remember to wash your hands before and after handling the mask, and to follow proper hygiene practices when wearing it.
- 2 layers of 100% cotton fabric (at least 20cm x 20cm each)
- A cutting mat or ruler
- A stapler or pins (optional)
-
A face mask pattern (optional)
-
Cutting the fabric: Cut out two squares of fabric that are at least 20cm x 20cm in size. You can use a cutting mat or ruler to ensure straight edges.
- Piecing the fabric: Take one of the squares and place it on top of the other square with the right sides facing each other. Use pins to hold the fabric in place.
- Sewing the fabric: Use a sewing machine or manually sew the fabric together along the edges, leaving the top edge open.
- Cutting out the mask: Cut out the mask shape from the fabric using a face mask pattern or freehand. You can use scissors or a craft knife to cut out the shape.
- Adding elastic: Take two lengths of elastic (approximately 20cm each) and attach them to the top of the mask, placing them 2cm in from the edges. You can use a sewing machine or manually sew the elastic in place.
- Final inspection: Once you’ve completed the above steps, inspect your mask for any defects or imperfections. If you find any, you can repair them before using your mask.
By following these steps, you’ll have a custom-made mask that not only provides protection but also adds a touch of style to your outfit.
- Elastic bands or ribbon for the mask’s ties
- A sewing machine or needle and thread (optional)
Once you have your materials, you can begin by cutting the two layers of fabric into the shape of a triangle. The inside layer should be slightly smaller than the outside layer to create a snug fit around your face.
Next, you can either sew the two layers together using a sewing machine or use needle and thread to hand-sew the layers together. If you choose to sew the mask, make sure to leave a small opening at the bottom of the mask so that you can easily insert your elastic bands or ribbon.
If you’re using elastic bands, simply tie them around the back of your head and adjust them to fit snugly around your face. If you’re using ribbon, tie it in a bow at the back of your head and adjust the mask to fit comfortably on your face.
And that’s it! You now have a homemade mask that not only provides protection but also adds a touch of personal style to your outfit.
- Fabric: Fabric is a versatile and widely available material for making masks. Popular options include cotton, silk, and flannel.
- Sewing patterns: Sewing patterns can be used to create a custom fit and personalized style for your mask.
- Elastic: Elastic is a crucial component in holding the mask in place and ensuring a secure fit.
It is important to note that while these materials can provide protection, they may not offer the same level of protection as medical-grade masks.
Measuring and Cutting the Material
Before cutting the material for your mask, it is important to measure your face to ensure a proper fit. This can be done by measuring the distance from the top of your nose to the bottom of your chin, as well as the width of your face.
Once you have your measurements, you can cut the material to the appropriate size. It is important to cut the material in a way that will allow for a snug fit around the sides of your face, while also leaving room for breathing.
Adding Elastic
After cutting the material for your mask, it is time to add elastic. This can be done by sewing a band of elastic around the edges of the mask, or by sewing elastic onto the sides of the mask.
It is important to ensure that the elastic is securely attached to the mask, as this will help to hold it in place and prevent it from slipping.
Personalizing Your Mask
Once your mask is complete, you can personalize it to your liking. This can include adding decorative elements such as buttons, beads, or ribbons. You can also choose to add filters to your mask for added protection.
Remember, while creating your own mask can be a fun and personalized way to stay protected, it is important to follow proper guidelines for wearing and disposing of masks to ensure maximum effectiveness.
To make your own mask, you will need a few basic materials. These can include:
- Needle and thread (or a sewing machine)
- Rotary cutter or scissors (optional)
Measuring and Cutting
First, measure the circumference of your head and add 2-3 inches for a comfortable fit. Then, cut out two circles of fabric, one for the top of the mask and one for the bottom.
Next, cut the interfacing to the same size as the top circle of fabric. This will help give the mask structure and support.
If you want to add elastic to the mask, cut two lengths of elastic to the desired length (usually 7-8 inches).
Begin by attaching the interfacing to the top layer of fabric. Use a needle and thread or a sewing machine to fuse the interfacing to the fabric.
Next, place the bottom layer of fabric right side up, and the top layer right side down. Use pins to hold the layers together along the edges.
Sew the layers together along the edges, leaving the top edge open.
If you’re using elastic, attach it to the top edge of the mask by sewing it onto the fabric. This will create a casing for the elastic.
Once the mask is assembled, you can add any additional features you like. This might include decorative stitching, buttons, or even a filter pocket.
Finally, test your mask to make sure it fits comfortably and securely. You should be able to breathe easily through the mask while still feeling a slight resistance.
With these simple steps, you can create a mask that provides both protection and style.
- A piece of fabric (such as cotton or silk)
- Thread
- Needle
-
Optional: embellishments (such as beads or sequins)
-
Cut the fabric to the desired size and shape for your mask.
- Use scissors to make holes for your eyes and mouth.
- Use thread and needle to sew the edges of the mask together.
- If desired, add embellishments to the mask to add style and flair.
- Once the mask is complete, try it on to ensure it fits properly and feels comfortable.
It’s important to note that homemade masks should be washed regularly to maintain their effectiveness. Additionally, it’s recommended to consult with a medical professional before using a homemade mask as a protective measure against COVID-19.
Before you begin, gather the necessary materials for making your mask. These materials may include:
- 2-3 fabric layers (cotton, silk, or any other soft fabric)
- Elastic band or string for the ear loops
- Hair clips or bobby pins (optional)
Make sure to wash your hands thoroughly before handling the materials.
Step 2: Cut the Fabric
Cut the fabric into the shape of the mask. A rectangular shape with a length of about 10 inches and a width of about 6 inches works well. However, you can customize the size and shape of the mask according to your preference.
If you are using multiple layers of fabric, stack them together and cut them as one piece.
Step 3: Sew the Mask
Using a sewing machine or by hand, sew the sides of the mask together to create a tube. If you are using multiple layers of fabric, make sure to sew through all layers.
If you don’t have a sewing machine, you can use a needle and thread to sew the mask by hand.
Step 4: Add the Elastic Band
Add the elastic band or string to the ear loops of the mask. This will help the mask stay in place on your face.
If you don’t have an elastic band, you can use a string and tie it in a knot behind your head.
Step 5: Finishing Touches
Add any finishing touches to the mask, such as decorative stitching or embellishments. You can also add hair clips or bobby pins to hold the mask in place.
Your DIY mask is now complete! Make sure to wash your hands thoroughly before and after handling the mask, and wear it when you need protection from dust, pollen, or other airborne particles.
Fabric masks are a popular choice as they are easily accessible and can be made with materials such as cotton, polyester, or linen. These masks are washable and reusable, making them a cost-effective option.
Surgical masks are disposable and designed to provide protection from airborne diseases. They are available in various sizes and colors, and can be purchased online or at local pharmacies.
Option 3: Cloth and Disposable Paper Masks
Cloth and disposable paper masks are another option for DIY mask-making. These masks can be easily made at home using cotton or other soft fabrics, and can be decorated with various patterns and designs.
Measuring and Cutting the Mask
Before cutting the material for your mask, it’s important to measure your face to ensure a proper fit. Measure the length and width of your face from cheekbone to cheekbone, and then add an extra inch to the width measurement for a comfortable fit.
Once you have your measurements, cut out the material for your mask. The mask should cover your nose, mouth, and chin, and should extend up to the cheekbones.
Adding a Filter Pocket
Adding a filter pocket to your mask is recommended to increase its effectiveness. To do this, cut a small pocket into the material, using scissors or a craft knife. The pocket should be large enough to fit a filter, such as a coffee filter or a piece of cotton fabric.
Placing the Filter
Once the pocket has been added, place the filter inside. This will help to prevent the spread of airborne diseases and provide an extra layer of protection.
DIY mask-making is not only about protection, but also about style. There are many ways to customize your mask and make it your own. Here are some ideas to consider:
- Add embellishments such as beads, sequins, or ribbons to add a personal touch.
- Use different fabrics, such as lace or floral prints, to create a unique design.
- Add a cute nose wire to keep the mask in place and create a more defined shape.
Conclusion
DIY mask-making is a great way to protect yourself and express your personal style. By following these steps, you can create a mask that is both functional and fashionable.
It is important to use materials that are breathable and comfortable to wear, as well as washable and reusable. You may also want to consider adding a filter pocket to your mask for added protection.
Cutting the Fabric
Once you have gathered your materials, you can begin cutting the fabric for your mask. Start by cutting out two rectangles of cotton fabric, each measuring approximately 7 inches by 4 inches. These will be the main layers of your mask.
Next, cut out a smaller rectangle of interfacing, measuring approximately 4 inches by 4 inches. This will be the layer that provides structure and support to your mask.
Use a ruler or measuring tape to ensure that your rectangles are the correct size. You can also use a marker or pen to make any necessary measurements or markings on the fabric.
Once you have cut out the fabric for your mask, you can begin assembling it. Start by ironing the interfacing onto one of the rectangles of cotton fabric, following the manufacturer’s instructions for the type of interfacing you are using.
Next, use needle and thread or a sewing machine to sew the two rectangles of cotton fabric together along the sides and bottom, leaving the top open. This will create a tube-like structure for your mask.
Pin the interfacing to the top of the tube, lining up the edges carefully. Use needle and thread or a sewing machine to sew the interfacing onto the top of the tube, enclosing the raw edges and creating a secure seam.
If desired, you can also add a filter pocket to your mask by sewing a small pocket onto the inside of the mask using a separate piece of fabric. This can be a great way to add an extra layer of protection to your mask.
With your mask assembled, you can now add any additional features or decorations, such as strings for tying behind your head or embellishments for style. Your DIY mask is now complete and ready to wear!
Before you begin, it’s important to gather all the necessary materials for your mask. The materials you’ll need include:
- 2 layers of 100% cotton fabric (you can use old t-shirts or other soft, breathable fabric)
- A cloth or towel to use as a pattern
Step 2: Cut Out the Mask
Once you have your materials, you can begin cutting out the mask. To do this, lay the two layers of fabric on top of each other, with the wrong sides facing in. Using the cloth or towel as a pattern, trace the outline of the mask onto the fabric. Cut out the mask, making sure to leave a small amount of extra fabric around the edges for sewing.
Next, you’ll need to sew the mask together. If you have a sewing machine, you can use it to sew the mask closed. If not, you can sew it by hand. Sew around the edges of the mask, making sure to leave a small opening at the bottom for you to breathe through.
Step 4: Add Elastic
To make the mask more comfortable to wear, you can add elastic to the sides. To do this, take a piece of elastic (about 1 inch wide) and cut it to the desired length. Sew the elastic onto the sides of the mask, leaving the bottom open so you can put it on and take it off easily.
Step 5: Wear and Enjoy Your Mask
Once you’ve finished sewing your mask, you can wear it to protect yourself and add a touch of style to your outfit. Your mask is now complete and ready to use!
When making your own mask, it is important to choose the right materials to ensure both protection and style. The Centers for Disease Control and Prevention (CDC) recommends using masks made of breathable, washable materials such as cotton or linen. These materials allow for proper airflow while still providing a barrier against germs and other particles.
It is also important to consider the size and shape of the mask. A well-fitting mask will be more effective at preventing the spread of germs and will be more comfortable to wear. To achieve a good fit, you can try using elastic ear loops or ties instead of the more common hooks.
Once you have chosen your materials, it is time to cut the mask. Most masks are designed to cover the nose and mouth, with additional coverage for the chin and cheeks. You can use a template or simply trace a piece of cardboard to create the shape of the mask.
To ensure a proper fit, it is important to measure the width and length of your face. The mask should extend from the bridge of your nose to the chin and cover the cheeks.
Adding Features
To add style to your mask, you can incorporate features such as buttons, bows, or even pom-poms. These features can not only add a personal touch to your mask but can also serve as a way to add more coverage to the face.
When adding features, it is important to make sure they do not interfere with the functionality of the mask. The CDC recommends avoiding any materials that are difficult to clean or that can become loose over time.
Once you have cut out the shape of the mask and added any features, it is time to assemble it. You can use a sewing machine or simply use a needle and thread to sew the different pieces together. If you are using elastic ear loops or ties, you can attach them to the mask at this stage.
Before wearing the mask, make sure to wash it in hot water and detergent to remove any loose fibers or other debris. This will help to ensure that your mask is as effective as possible.
- 1 layer of interfacing (such as Pellon Shape-Flex or Peltex)
- Marker (optional)
You may also want to consider adding features such as filters or nose wires to your mask. These can be made from materials such as mesh or craft wire.
Cutting the Materials
Begin by cutting the cotton fabric into two identical squares. These will be the outer layers of your mask. Cut the interfacing into a shape that will fit over your nose and mouth. This will be the inner layer of your mask.
Begin by sewing the outer layers of the mask together along the sides and bottom. Leave the top open so that you can insert the inner layer. Next, sew the inner layer to the top of the outer layers, making sure to leave a small opening for your nose and mouth.
If you have chosen to add filters or a nose wire to your mask, you can attach these at this point.
Once your mask is complete, you can add any final touches such as binding the edges or adding elastic loops for ear loops. You can also add a filter pocket or a nose wire cover for added functionality.
Your homemade mask is now complete and ready to wear!
- 2 layers of 100% cotton fabric (flannel or quilter’s cotton)
- Sewing machine or hand sewing
- Cutting mat or ruler and rotary cutter (optional)
It’s recommended to use cotton fabric for your mask as it is breathable and comfortable to wear. Flannel or quilter’s cotton are great options as they are soft and provide a good layer of protection. Interfacing can be added for extra reinforcement, but it’s not necessary.
Once you have your materials, it’s time to start cutting. Cut two layers of cotton fabric to the same size, and if you choose to use interfacing, cut one layer to the same size as your cotton fabric layers.
Next, you’ll need to sew the layers together. If you’re using a sewing machine, make sure to use a needle designed for cotton fabric. Sew around the edges of the fabric, leaving a small opening for turning.
Once you’ve sewn the layers together, turn the mask right side out through the opening. Press the edges with a hot iron or by using a pressing cloth.
If you want to add a filter pocket to your mask, cut a small rectangle out of a cotton fabric and sew it onto the upper part of the mask. You can also add elastic loops to the mask for a more secure fit.
With your mask complete, you can now wear it for protection and style.
- Fabric: A variety of fabrics can be used to make masks, including cotton, linen, and silk. These materials are breathable and comfortable to wear, making them a popular choice for DIY masks.
- Sewing Patterns: Sewing patterns can be used to create a custom-fit mask that is both comfortable and effective.
- Elastic Bands: Elastic bands can be used to secure the mask to your face and ensure a snug fit.
When designing your mask, there are several factors to consider, including the type of fabric used, the shape of the mask, and the type of filter material used. Some popular design options include:
- Filter Pocket: A filter pocket can be added to the mask to allow for easy insertion of filter material, such as a coffee filter or a piece of cotton.
- Nose Wire: A nose wire can be added to the mask to provide a custom fit and reduce the amount of air flowing around the sides of the mask.
- Ties or Ear Loops: Ties or ear loops can be used to secure the mask to your face and ensure a snug fit.
Cutting Out Your Mask
Once you have chosen your materials and designed your mask, it is time to cut out the pieces. Follow the instructions for your chosen sewing pattern to ensure a proper fit.
Assembling Your Mask
After cutting out the pieces, it is time to assemble your mask. Follow the instructions for your chosen sewing pattern to ensure a proper fit. You may also want to add filter material to the filter pocket, if applicable.
Finishing Your Mask
Once your mask is assembled, it is time to finish it. This may include adding elastic bands or ties/ear loops, as well as any additional design elements, such as a nose wire.
By following these steps, you can create a custom-fit mask that provides both protection and style.
- Cut out two layers of 100% cotton fabric to the desired size. The mask should cover your nose and mouth and fit snugly over your face.
- If you’re using elastic ear loops, thread them through the mask’s side seams and tie them in a knot behind your ears. If you’re using a metal nose wire, bend it into an “L” shape and attach it to the mask’s top edge using pliers.
- Using a marker or fabric pen, draw a line where the two layers of fabric meet. This will be the point where you’ll fold the mask and secure it around your nose and chin.
- Using scissors, cut along the line you just drew.
- Take the two layers of fabric and fold them in half along the cut line. Press down firmly to secure the edges.
- Use the needle and thread to stitch the sides of the mask together, leaving the top open.
- Place the mask over your face, adjusting the elastic or metal nose wire as needed. Secure the mask around your nose and chin by tying the ear loops or using the metal nose wire.
Your homemade mask is now complete! With this step-by-step guide, you can create a functional and stylish mask that provides protection and personal flair.
Before you start making your mask, it’s important to gather the necessary materials. This includes a non-woven fabric, elastic string, a pair of scissors, and a ruler. Make sure to wash your hands thoroughly before starting the process to avoid any contamination.
The first step is to measure the length and width of the mask according to your face size. You can use the ruler to ensure the measurements are accurate. Cut out the fabric using the scissors and measure it against your face to make sure it fits comfortably.
Next, take the non-woven fabric and place it over your mouth and nose. Make sure the fabric is smooth and wrinkle-free. Then, take the elastic string and tie it around the back of your head, ensuring that it is secure and comfortable.
Once you have your mask on, make sure it fits snugly over your nose and mouth. If the mask is too loose, it may not be effective in protecting you from viruses and other pathogens.
In terms of style, you can choose to wear your mask with any outfit or costume to add a touch of personality to your look. Some people prefer to wear masks with their favorite sports team’s logo, while others choose to wear them with their favorite cartoon character. The possibilities are endless!
Remember, the purpose of wearing a mask is to protect yourself and others from viruses and other pathogens. By following these steps, you can create a DIY mask that not only protects you but also adds a touch of style to your look.
-
Rotary cutter or scissors
-
Prepare the fabric: Lay out the two layers of cotton fabric on a flat surface. Cut out the shapes for the front and back of the mask using a ruler and marker or pen.
- Cut the interfacing: Cut a piece of interfacing that is slightly larger than the front and back shapes of the mask.
- Fuse the interfacing: Place the interfacing on the wrong side of one of the cotton fabric pieces, following the manufacturer’s instructions for fusing the interfacing. Repeat with the other cotton fabric piece.
- Pin the layers together: Pin the two cotton fabric pieces together, wrong sides together, along the edges of the mask. Make sure the interfacing is in the center of the mask.
- Sew the mask: Using a needle and thread, sew the mask together along the edges, leaving the top open. Use a hand sewing needle if you find it easier to manipulate the corners.
- Add elastic: Cut two pieces of elastic to the desired length. Sew one piece onto the top of each ear loop.
- Iron the mask: Iron the mask on the wrong side to remove any wrinkles.
- Trim the edges: Trim the edges of the mask if needed.
- Wash the mask: Follow the manufacturer’s instructions for washing the mask.
With these simple steps, you can create a functional and stylish mask to protect yourself and others from COVID-19.
To make your own mask, you will need a few simple materials. Depending on your preference, you can choose to use cotton or polyester fabric for the outer layer, and a cotton or polyester lining for the inner layer. It is also important to include elastic bands to hold the mask in place around your ears. You can find these materials at your local fabric store or online.
Once you have gathered all of your materials, it’s time to start cutting the mask. To create the outer layer, cut a rectangular shape that is slightly larger than your face. The inner layer should also be a rectangular shape, but smaller than the outer layer. You can use a template or simply cut by hand.
Adding Elastic Bands
After cutting the mask, it’s time to add the elastic bands. Sew the elastic bands onto the outer layer of the mask, one on each side, just above the ears. This will hold the mask in place and make it easier to wear.
With the elastic bands in place, it’s time to assemble the mask. Take the outer layer and place it on top of the inner layer. Pin the layers together, making sure that they are aligned properly. Then, sew the layers together along the edges, leaving a small opening for your nose and mouth.
Once you have sewn the layers together, it’s time to finish the mask. Cut out a small rectangle for the nose and mouth opening, and sew it onto the mask. Make sure that the opening is large enough for you to breathe easily, but small enough to still provide protection. Finally, you can add any decorative touches or embellishments to make your mask both functional and stylish.
When it comes to creating your own mask, the materials you choose are crucial to the effectiveness of your protection. There are a variety of materials that can be used to make a mask, each with its own benefits and drawbacks.
- Fabric: Fabric is a popular choice for homemade masks as it is readily available and relatively inexpensive. However, it is important to choose a tightly woven fabric, such as cotton or flannel, to ensure maximum protection. One drawback of fabric masks is that they may not be as effective at filtering out small particles as other materials.
- Surgical Masks: Surgical masks are designed to filter out small particles and are therefore an effective choice for homemade masks. However, they can be more expensive than other materials and may not be as comfortable to wear for extended periods of time.
- Respirator Masks: Respirator masks are designed to provide maximum protection and are often used in industries such as construction and painting. They can be more expensive than other materials, but may be worth the investment for those who need maximum protection.
Choosing the Right Size
In addition to choosing the right materials, it is important to ensure that your mask fits properly. A mask that is too loose can allow particles to enter, while a mask that is too tight can be uncomfortable to wear. It is important to measure the circumference of your head and add a few inches to ensure a proper fit.
Cutting the Mask
Once you have chosen your materials and determined the size of your mask, it is time to cut it out. For a fabric mask, you will need to cut out two pieces of fabric that are the same size and shape. For a surgical or respirator mask, you will need to cut out the mask according to the manufacturer’s instructions.
Adding Elastic
Most masks will require some form of elastic to keep them in place. For a fabric mask, you can use elastic bands or ribbon to hold the mask in place. For a surgical or respirator mask, you will need to follow the manufacturer’s instructions for attaching the elastic.
Adding Style
While protection is the primary goal of a mask, it doesn’t mean you can’t add a little style to your DIY mask. You can add decorative elements such as buttons, fabric trim, or even embroidery to make your mask stand out. Just be sure that any decorative elements do not interfere with the mask’s effectiveness.
However, not all masks are created equal. Some materials may be more effective at blocking certain types of particles than others. For example, a study published in the journal Aerosol Science and Technology found that masks made of polyester were more effective at blocking both large droplets and smaller aerosol particles than masks made of cotton.
Another important factor to consider when choosing materials for your mask is the fit. A mask that fits snugly over your nose and mouth will be more effective at blocking particles than one that gaps at the sides. To ensure a snug fit, you can try using a mask with ear loops or ties, or even creating your own mask with a nose wire.
In addition to the materials and fit, you should also consider the style of your mask. While some people may prioritize function over fashion, there are many ways to make your mask both stylish and effective. For example, you can use bright colors or fun patterns to add a pop of personality to your mask, or even create a custom design that reflects your personal style.
By choosing the right materials, fit, and style, you can create a mask that not only protects you from COVID-19, but also reflects your personal style.
- Fabric: Fabric is a popular choice for homemade masks as it is readily available and relatively inexpensive. However, it is important to choose a tightly woven fabric, such as cotton or flannel, to ensure maximum protection. The downside to fabric masks is that they may not be as effective at blocking smaller particles as other materials.
- Surgical Masks: Surgical masks are designed to filter out airborne particles and are often used in medical settings. They are generally more effective at blocking smaller particles than fabric masks, but may not provide the same level of comfort.
- N95 Respirator Masks: N95 respirator masks are designed to filter out 95% of airborne particles, making them one of the most effective options for protection. However, they can be more expensive and may be more difficult to find than other materials.
Choosing the Right Materials for Your Needs
When choosing materials for your mask, consider your specific needs and preferences. If you are looking for maximum protection, an N95 respirator mask may be the best option. If you prefer a more comfortable fit, a fabric mask may be a better choice. Regardless of the material you choose, be sure to follow proper mask-wearing guidelines to ensure maximum protection.
Before you begin, make sure to wash and iron your fabric to remove any wrinkles or creases. It is also recommended to pre-wash your interfacing to prevent shrinkage.
- Cut out 2 identical pieces of fabric, using your ruler or measuring tape to ensure they are the same size.
- Fuse your interfacing to one of the pieces of fabric, following the instructions on the package. This will add structure and stability to your mask.
- Cut out a third piece of fabric to use as a ties. You can choose a different fabric or use the remaining piece of your main fabric.
- Using your marker or pen, draw a straight line across the top edge of your mask. This will be the line where your ear loops will be sewn.
- Sew the ear loops onto the top edge of your mask, using a sewing machine or by hand.
- Cut the ties to the desired length, and sew them onto the top of your mask, making sure they are long enough to loop around your ears.
- Try on your mask to make sure it fits comfortably and securely. If necessary, adjust the ties or ear loops.
Your homemade mask is now complete! It is important to note that while this mask will provide some protection, it is not a medical-grade mask and should not be used as a substitute for medical-grade personal protective equipment.
- Sewing thread
- Hair ties or rubber bands
It’s also important to wash your hands thoroughly before and after handling the fabric to prevent contamination.
Once you have your materials ready, follow these steps to create your mask:
- Cut the fabric: Lay one layer of fabric flat on a surface and cut it into a rectangle shape that is at least 20cm x 20cm. Repeat with the second layer of fabric.
- Hem the edges: Fold the edges of the fabric inwards twice and press down to create a hem. This will prevent fraying and ensure a neat finish.
- Sew the layers together: Place the two layers of fabric right sides together and sew along the sides and bottom edge, leaving the top edge open.
- Add elastic: Cut two 20cm lengths of elastic and insert them into the top edge of the mask, leaving enough room for a comfortable fit around your head. Sew the elastic in place.
- Cut out a filter: Cut out a piece of tissue paper or other breathable material that fits snugly over the mouth and nose. This will act as a filter to prevent the spread of droplets.
- Secure the filter: Use hair ties or rubber bands to secure the filter in place over the mouth and nose.
Your mask is now complete! Make sure to wash your hands thoroughly before and after handling the mask, and wear it properly over your nose and mouth when out in public.
- Fabric: Common materials for masks include cotton, linen, and silk. Each has its own benefits and drawbacks. Cotton is a popular choice because it is affordable and easy to work with, but it may not be as effective at blocking particles as other materials. Linen is another good option, as it is breathable and durable, but it may be more difficult to work with. Silk is a high-end option that is very effective at blocking particles, but it can be expensive and may not be as durable as other materials.
- Filters: In addition to the fabric of your mask, you may also want to consider adding a filter to help block particles. Common filters include cotton balls, tissue paper, and coffee filters.
- Elastic: The elastic band that holds your mask in place is also an important consideration. You may want to use a thicker elastic for a tighter fit, or a thinner elastic for a more comfortable fit.
Once you have chosen your materials, it’s time to start creating your mask.
Cotton is a popular choice for mask-making because it is soft, breathable, and easily accessible. However, it is also one of the least effective materials for filtering out particles, making it less suitable for use in areas with high levels of air pollution.
Surgical masks are designed to provide a higher level of protection than cotton masks, as they are made from non-woven fabric that is specifically engineered to filter out small particles. However, they can be more expensive and may not be as comfortable to wear as cotton masks.
Silk is a luxurious material that is known for its softness and breathability. It is also effective at filtering out small particles, making it a great choice for those looking for both style and protection. However, silk masks can be more difficult to sew and may not be as durable as other materials.
Cotton-Silk Blends
Cotton-silk blends offer the best of both worlds, providing both the softness and breathability of cotton and the filtering power of silk. These masks are often more durable than pure silk masks and can be just as comfortable to wear.
When choosing materials for your mask, consider the level of protection you need, your personal preferences, and the resources you have available. If you are looking for maximum protection, consider using a surgical mask or a cotton-silk blend. If you prioritize comfort and style, a cotton or silk mask may be the best choice for you.
Regardless of the materials you choose, be sure to wash your mask regularly to prevent the buildup of bacteria and to maintain its effectiveness.
Before you begin, gather the necessary materials for making your mask. Here’s a list of what you’ll need:
- 2 layers of 100% cotton fabric (preferably with a tight weave)
- 1 layer of interfacing or fusible fleece
- Scissors or fabric shears
- Rotary cutter or X-Acto knife (optional)
- Ruler or yardstick
- Iron and ironing board
Make sure you have all the materials before you start, as you won’t want to pause mid-way through the process to run to the store.
Next, you’ll need to cut the fabric according to the pattern you’ve chosen. To make things easier, you can use a rotary cutter or X-Acto knife to cut the fabric into the shape you want. Alternatively, you can use scissors or fabric shears to cut the fabric by hand.
If you’re using a pattern, make sure to follow the instructions carefully to ensure that your mask fits properly. If you’re making a mask from scratch, you can use a ruler or yardstick to measure and mark the fabric.
Once you’ve cut the fabric, move on to the next step.
Step 3: Add the Interfacing
The interfacing is an important component of the mask, as it helps the fabric to hold its shape and provides additional protection. To add the interfacing, follow these steps:
- Iron the interfacing onto one of the layers of cotton fabric, following the manufacturer’s instructions.
- Cut the interfaced layer of fabric into the shape of the mask.
- Place the other layer of cotton fabric on top of the interfaced layer, right sides together.
- Pin the layers together along the edges.
Now that you’ve added the interfacing, you’re ready to start sewing the mask together.
Fabric masks are a popular choice due to their versatility and affordability. They can be made from materials such as cotton, polyester, or linen, and can be easily customized with different patterns and designs. The key to making a fabric mask is to use a tight-weave fabric that will filter out particles, while still allowing for breathability. A good rule of thumb is to use a fabric with a thread count of at least 60.
Surgical masks are another option for making a DIY mask. These masks are designed to filter out airborne particles and are often used in medical settings. To make a surgical mask, start by cutting out a rectangular piece of tissue paper, and then folding it in half to create a triangle shape. Tie the two ends of the mask together behind your ears, and you’re ready to go.
Option 3: Craft Store Masks
Craft store masks are another option for making a DIY mask. These masks are often pre-made and can be found in a variety of materials, including cotton, felt, and fabric. They can be easily customized with different designs and patterns, and are a great option for those who want a more polished look.
Once you have selected your materials, it’s time to cut the mask to size. The shape of the mask should be a rectangle with a rounded bottom, and should cover the nose and mouth. To get the perfect fit, use a ruler or a template to guide your cutting.
A filter pocket is a small pouch that is added to the mask to hold a filter. This filter can be made from a variety of materials, including cotton, paper towels, or even coffee filters. Adding a filter pocket to your mask is a great way to add an extra layer of protection.
To assemble the mask, simply fold the edges of the mask together and secure them with a few stitches. For a more professional look, you can use a sewing machine to sew the edges together.
Tips and Tricks
- Experiment with different materials to find the perfect combination of style and protection.
- Make sure to wash your mask regularly to maintain its effectiveness.
- Don’t forget to add a filter pocket to your mask for an extra layer of protection.
With these steps, you’re on your way to creating a stylish and effective DIY mask. Whether you’re looking for protection from airborne particles or just want to add a touch of style to your outfit, making your own mask is a great option.
- Hair ties or clips
- Measuring tape
You can also add additional features to your mask, such as filters or a pocket for a filter, depending on your personal preference and the guidelines provided by health officials.
To begin, measure the length and width of your face using the measuring tape. This will help you determine the size of your mask. Cut out the 2 layers of fabric using these measurements.
Next, thread the needle and use it to sew the 2 layers of fabric together along the edges, leaving the top open. You can also use pins to hold the layers together if you prefer.
Once the layers are securely attached, use the scissors to cut out a hole for your nose and mouth. This hole should be large enough for you to breathe easily, but small enough to prevent the mask from coming off your face.
Finally, use the hair ties or clips to hold the mask in place around your ears. You can also add filters or a pocket for a filter, if desired.
Now that your mask is complete, you can wear it to protect yourself and others from the spread of illness.
- 2 pieces of elastic cord (or ribbon)
- Thread scissors
Once you have your materials, you can begin by cutting out the shape of your mask. You can either trace a pattern onto the fabric or simply cut out a rectangle that is large enough to cover your face. It’s important to ensure that the fabric is smooth and free of wrinkles, as this will help the mask fit more snugly against your face.
Next, you’ll need to add the elastic cords. You can either sew them onto the mask by hand or use a sewing machine. If you’re using a sewing machine, you’ll need to use a zigzag stitch to prevent the elastic from fraying. If you’re sewing by hand, you can use a simple whipstitch.
Once the elastic cords are in place, you can test your mask to make sure it fits properly. Hold the mask up to your face and make sure it covers your nose and mouth completely. If it doesn’t fit well, you can adjust the elastic cords or try using a different size of fabric.
Finally, you can add any decorative touches to your mask. You can use fabric paint or markers to add designs, or you can attach beads or other embellishments. Just be sure that any embellishments don’t interfere with the mask’s ability to protect your face.
And that’s it! You’ve now completed your DIY mask-making project. Remember to wash your mask regularly to prevent the buildup of bacteria, and always wear it when you’re in public to protect yourself and others from COVID-19.
- 2 hair ties or rubber bands
-
2 pipe cleaners or straws (optional)
-
Cut out two circles of fabric, each measuring about 10cm in diameter.
- Fold each circle in half and sew around the edges, leaving a small opening at the bottom.
- Turn the mask right-side out and press the edges flat.
- Slip the hair ties or rubber bands onto the top of the mask, positioning them about 2cm apart.
- Use the pipe cleaners or straws (if using) to shape the mask, curving the top edges upwards and outwards.
- Tie the hair ties or rubber bands around the back of your head, securing the mask in place.
Remember to wash your hands before and after handling the mask materials, and to wear the mask properly, covering your nose and mouth to help prevent the spread of germs.
- 2-3 fabric layers (cotton, silk, or any other soft, breathable fabric)
- A measuring tape
- Hair elastics or string
Make sure you have all the materials required before starting the process.
Once you have gathered all the materials, start by cutting the fabric according to the pattern you have chosen. The fabric should be cut into two identical rectangles, each measuring approximately 10 inches by 6 inches. You can use the measuring tape and scissors to cut the fabric accurately.
After cutting the fabric, you can iron it to remove any wrinkles or creases. This will ensure that the fabric lies flat and forms a good base for your mask.
Once the fabric is cut and ironed, it’s time to sew the mask. Use the sewing machine or needle and thread to sew the fabric together along the sides and bottom edges. Make sure to leave the top edge open, as you will be adding the elastic or string later.
Sew the two rectangles together along the sides and bottom edges, leaving the top edge open. Make sure to use a thread color that matches or complements the fabric you are using.
Step 4: Add the Elastic or String
After sewing the mask, it’s time to add the elastic or string to the top edge. Use the hair elastics or string to form a loop that goes around your head. Make sure the elastic or string is tight enough to keep the mask in place but not too tight that it causes discomfort.
Once you have formed the loop, attach it to the top edge of the mask by sewing it in place. This will ensure that the mask stays in place and doesn’t slip off.
Step 5: Add Any Additional Designs or Patterns
Finally, if you want to add any additional designs or patterns to your mask, you can do so now. You can use fabric paint or embroidery to add designs or patterns to your mask. Make sure to let the paint or embroidery dry before wearing the mask.
That’s it! Your DIY mask is complete. Make sure to wash your hands before and after handling the mask, and follow any other guidelines recommended by healthcare professionals to ensure proper use and protection.
- Measure 8 inches from the left side of the paper towel and make a mark.
- Connect the dots to create a rectangle.
- Cut out the rectangle using the scissors.
- Repeat this process on the other piece of paper towel.
Step 3: Trace and Cut the Cardstock
- Place the paper towel rectangle on top of the cardstock.
- Use the pencil to trace the outline of the paper towel onto the cardstock.
-
Cut out the cardstock shape using the scissors.
-
If desired, use markers or colored pencils to decorate the cardstock mask.
- Let the decorating process be a fun and creative outlet for personal expression.
Step 5: Cut Out the Mask Opening
- Cut out a small circle in the center of the cardstock mask.
- This opening will allow you to see while wearing the mask.
Step 6: Put It All Together
- Glue the paper towel rectangles to the back of the cardstock mask.
- Allow the glue to dry completely.
- Once dry, the paper towel rectangles will form the filters for your mask.
- Cut out additional pieces of paper towel to fit over the filters.
- These additional pieces will serve as the filter replacements.
- When the filters become dirty or clogged, simply replace them with the additional pieces.
By following these steps, you can create a functional and stylish mask that provides protection and expression.
Before you start making your mask, it’s important to gather the necessary materials. This includes a fabric or cloth, a pair of scissors, a needle and thread, and a marker or pen. You may also want to consider adding elastic to the sides of your mask for a more secure fit.
Once you have all of your materials, the first step is to cut out the shape of your mask from your chosen fabric. You can either use a pattern or trace around a plate or bowl to create a circle. Cut out two identical circles for the outer layer of your mask.
Next, cut out a smaller circle for the inner layer of your mask. This will be the layer that will come into contact with your face.
Once you have all of your layers, it’s time to start sewing. Use your needle and thread to sew the outer layers together, leaving the inner layer unsewn.
Next, take the inner layer and use your scissors to cut it into the shape of a “V.” This will create a pocket for your nose.
Now, take the inner layer and sew it to the outer layer, using the needle and thread. Be sure to sew the inner layer to the top of the outer layer, creating a “V” shape that will fit comfortably over your nose.
Finally, take your elastic and sew it to the sides of your mask, creating a secure fit. You can now wear your mask with pride, knowing that you’ve created a stylish and functional piece of cloth that will protect you from harmful particles in the air.
- Cotton: This is a lightweight, breathable fabric that is easy to work with and can be found in most fabric stores.
- Flannel: This is a heavier, warmer fabric that is great for colder weather or for people who want more insulation in their mask.
- Linen: This is a natural, absorbent fabric that is great for people who want a more natural option.
Another important factor to consider when choosing materials for your mask is the shape of the fabric. Some people prefer a rectangular shape, while others prefer a more fitted shape. You can also choose from a variety of shapes, such as triangular, circular, or heart-shaped.
Additional Features
There are many additional features you can add to your mask to enhance its functionality and style. For example, you can add pockets for filters, or use a specialized fabric that is designed to filter out airborne particles. You can also add beads, sequins, or other embellishments to add some extra style to your mask.
Cutting and Sewing Your Mask
Once you have chosen your materials, it’s time to start cutting and sewing your mask. Here are some steps to follow:
Step 1: Cut Out Your Mask
The first step is to cut out your mask. You can use scissors or a craft knife to cut out the shape of your mask from your fabric. Be sure to leave enough extra fabric around the edges to sew your mask together.
Step 2: Sew Your Mask
The next step is to sew your mask together. You can use a sewing machine or do it by hand. If you are using a sewing machine, be sure to use a straight stitch and sew along the edges of your mask. If you are doing it by hand, you can use a whipstitch or a backstitch to sew your mask together.
Step 3: Add Additional Features
If you are adding any additional features to your mask, such as pockets for filters, you can add them at this stage. Simply sew the additional feature onto your mask using a straight stitch or a whipstitch.
Step 4: Finishing Touches
Finally, you can add any finishing touches to your mask. This could include adding beads, sequins, or other embellishments to add some extra style to your mask.
Tips for Making a Stylish and Effective Mask
Making your own mask can be a fun and rewarding experience, but it’s important to remember that the goal is to create a stylish and effective mask. Here are some tips to help you achieve this:
Use High-Quality Materials
One of the most important factors in creating a stylish and effective mask is to use high-quality materials. This will ensure that your mask is durable, comfortable, and effective at filtering out airborne particles.
Choose a Fitted Shape
Another important factor to consider is the shape of your mask. A fitted shape will fit more comfortably on your face and will be more effective at filtering out airborne particles.
Add Additional Features
Adding additional features to your mask can enhance its functionality and style. For example, you can add pockets for filters, or use a specialized fabric that is designed to filter out airborne particles. You can also add beads, sequins, or other embellishments to add some extra style to your mask.
Making your own mask can be a fun and rewarding experience, and it’s a great way to protect yourself and your loved ones from airborne particles. By following the steps outlined in this guide and using high-quality materials, you can create a stylish and effective mask that will provide you with the protection you need.
- Marker (permanent or dry-erase)
It is recommended to use natural fibers such as cotton, linen, or silk for your mask. These materials are breathable and comfortable to wear. Synthetic fabrics like polyester or nylon can make it harder to breathe and may not be as comfortable.
Before starting, pre-wash your fabrics to prevent shrinkage. You can also add a layer of filter fabric between the two cotton layers for added protection. The filter fabric should be a non-woven, melt-blown material that is designed to capture particles. This layer can be placed between the two cotton layers, or you can cut the filter fabric into smaller pieces and place them in between the cotton layers in specific areas.
To create the mask, you will need to follow these steps:
- Cut the filter fabric into smaller pieces if using.
- Place the filter fabric between the two cotton layers, making sure it is centered.
- Place the interfacing on top of the cotton layers, aligning the edges.
- Use a rotary cutter or X-Acto knife to cut the mask shape, following the marker lines.
- Use the iron to press the edges together, creating a finished edge.
- Use the needle and thread to sew the edges together by hand or machine.
- If you are using a sewing machine, make sure to use a walking foot to keep the layers together.
- Once the mask is complete, use the iron to set the seams and create a crisp edge.
You can add a nose wire to the mask to help it fit more snugly over your nose and chin. To do this, you can use a piece of stiff wire or a bendable nose wire that you can find at a craft store. Place the wire along the top edge of the mask, bending it to fit the shape of your nose. Use the iron to set the wire in place.
You can also add decorative details to your mask to make it more personalized and stylish. You can use embroidery, applique, or fabric paint to add designs and patterns to your mask. This can be a fun way to express your creativity while also protecting yourself and others.
When it comes to creating your own mask, the materials you choose are crucial to the effectiveness of your mask. The Centers for Disease Control and Prevention (CDC) recommends using materials that are breathable, easy to clean, and durable.
Here are some materials you can use to make your mask:
- Fabric: You can use cotton, silk, or other breathable fabrics to make your mask. The CDC recommends using multiple layers of fabric to increase the effectiveness of your mask.
- Surgical masks: You can also use surgical masks to make your mask. These masks are designed to filter out small particles and can be effective in preventing the spread of illness.
- Paper towels: Paper towels can also be used to make your mask. Simply cut out a shape for your mask and secure it around your face with elastic or rubber bands.
Once you have chosen your materials, it’s time to cut and shape your mask. Depending on the shape of your face, you may want to choose a mask that covers your nose and mouth or one that covers your entire face.
Here are some tips for cutting and shaping your mask:
- Use scissors: Use scissors to cut out your mask shape. Make sure to cut along the grain of the fabric to prevent fraying.
- Shape your mask: Use your hands to shape your mask. You can use a marker or a ruler to help you create a symmetrical shape.
- Add elastic or rubber bands: Once you have shaped your mask, add elastic or rubber bands to hold it in place. Make sure the elastic is stretchy and fits comfortably around your head.
Finishing Your Mask
After you have cut and shaped your mask, it’s time to finish it. Depending on the materials you used, you may need to add a filter or other layers to your mask.
Here are some tips for finishing your mask:
- Add a filter: If you are using a surgical mask or other material that doesn’t have a filter, you can add a filter to your mask. You can use a coffee filter or a piece of tissue paper as a filter.
- Add more layers: You can also add more layers to your mask to increase its effectiveness. Simply cut out additional shapes and add them to your mask.
-
Add decorations: Finally, you can add decorations to your mask to make it your own. You can use ribbons, buttons, or other embellishments to add style to your mask.
-
Elastic cord or ribbon for the mask ties
- Needle (optional)
Once you have your materials, you can start making your mask by following these steps:
- Cut out two squares of fabric, each measuring approximately 10 inches by 10 inches.
- Take one of the squares and place it on top of the other, so that the edges match up.
- Sew the two squares together along the edges, leaving the corners unsewn.
- Turn the mask right-side out by pulling the fabric through the unsewn corners.
- Use scissors to trim the edges of the mask, so that it has a neat, finished look.
- Take the elastic cord or ribbon and tie it around the back of your head, so that it forms a loop.
- Insert the mask loops over your ears and adjust the elastic so that the mask fits snugly over your nose and mouth.
And that’s it! You now have a homemade mask that provides both protection and style.
When it comes to creating your own mask, the materials you choose are crucial to the effectiveness of your mask. The Centers for Disease Control and Prevention (CDC) recommends using materials that are breathable, easy to clean, and can be worn for an extended period of time. Here are some materials to consider:
- Fabric: Materials like cotton, silk, and flannel are great options for your mask. They are breathable, comfortable to wear, and can be easily washed.
- Foam: Foam materials like polyurethane foam can also be used to create a mask. These materials are lightweight and flexible, making them comfortable to wear for extended periods of time.
- Non-woven fabric: Non-woven fabrics like polypropylene are another option for creating a mask. These materials are lightweight, breathable, and can be easily sterilized.
No matter what materials you choose, it’s important to ensure that your mask fits snugly over your nose and mouth to prevent air leakage. A well-fitting mask can reduce the amount of virus particles that are released into the air and help protect others from infection.
Once you have chosen your materials, it’s time to cut and shape your mask. The shape of your mask should be conical or cuboid, with a rounded edge along the bottom. This shape is designed to fit snugly over your nose and mouth while allowing you to breathe easily.
To cut your mask, use scissors or a craft knife to cut out the shape of your mask from your chosen material. You can use a ruler or a template to ensure that your mask is the correct size. If you’re using foam or non-woven fabric, you may need to use a craft knife to cut out the shape of your mask.
Once you have cut out your mask, you can shape it by using a hot iron or a hair dryer to mold it to the shape of your face. This will help ensure that your mask fits snugly over your nose and mouth.
Adding Features to Your Mask
Finally, you can add features to your mask to make it more comfortable and effective. Some options include:
- Nose wire: A nose wire can help your mask fit more snugly over your nose and prevent air leakage. You can use a bendable wire or a piece of stiff plastic to create a nose wire.
- Filter pocket: Adding a filter pocket to your mask can help you replace the filter in your mask easily. You can use a piece of fabric or a plastic sleeve to create a filter pocket.
- Comfort features: Adding comfort features like a soft inner lining or adjustable straps can make your mask more comfortable to wear for extended periods of time.
Remember, the key to creating an effective mask is to use breathable materials, fit it snugly over your nose and mouth, and add features that make it more comfortable and effective. With these tips, you can create a mask that provides both protection and style.
- Cut out the fabric pieces:
- Cut 2 rectangles of fabric, each measuring approximately 10 inches by 6 inches.
- Cut the interfacing into 2 smaller rectangles, each measuring approximately 6 inches by 6 inches.
- Iron the interfacing onto the fabric:
- Fuse the interfacing onto the wrong side of each fabric rectangle, following the manufacturer’s instructions for your chosen interfacing.
- Trace and cut out the mask shape:
- Trace the outline of a mask onto one of the fabric rectangles. You can use a stencil or template, or freehand draw the shape.
- Cut out the mask shape, leaving a 1/2-inch seam allowance around the edges.
- Repeat this step for the second fabric rectangle.
- Sew the mask together:
- Using a sewing machine or by hand, sew the sides and bottom of the mask together, leaving the top open.
- Slip the elastic band through the top opening and tie it into a knot, positioning it at the back of your head.
- You can also add a filter pocket to your mask by sewing a small opening at the top and attaching a piece of mesh or nylon screen over it.
- Add any additional features:
- If desired, you can add embellishments such as ribbons, buttons, or lace to your mask for added style.
With your mask complete, you can now wear it for protection and style. Remember to wash your mask regularly in cold water and let it air dry to prevent damage to the fabric.
When it comes to creating your own mask, the materials you choose are crucial to the effectiveness of your mask. The Centers for Disease Control and Prevention (CDC) recommends using materials that are breathable, easy to breathe through, and durable. Some materials that are great for mask-making include:
- 100% cotton fabrics
- Cotton-blend fabrics
- Quilter’s cotton
- Flannel
- Silk
- Linen
- Microfiber cloths
It’s important to avoid materials that are rough, difficult to breathe through, or made of synthetic materials like polyester or nylon. These materials can irritate your skin and make it harder to breathe.
Cutting Your Mask
Once you’ve chosen your materials, it’s time to cut your mask. You can use a scissors or a craft knife to cut out the shape of your mask. The CDC recommends cutting out a shape that is at least 6 inches by 6 inches to ensure that your mask fits properly over your nose and mouth. You can also add a seam allowance around the edges of your mask to make it easier to sew.
After you’ve cut out your mask, it’s time to sew it together. You can use a sewing machine or by hand. If you’re using a sewing machine, use a needle that is designed for sewing fabric. If you’re sewing by hand, use a needle that is blunt at the tip. This will help prevent the needle from tearing through the fabric.
When sewing your mask, be sure to follow the contours of your face. This will ensure that your mask fits properly over your nose and mouth. You can also add elastic to the sides of your mask to help it stay in place. This is especially important if you have a beard or if you’re wearing glasses.
Once you’ve sewn your mask, it’s time to finish it. You can add a filter pocket to your mask by sewing a small pouch on the inside of your mask. This will give you a place to put a filter that will help protect you from airborne particles. You can also add a nose wire to the top of your mask to help it fit more snugly over your nose.
With these simple steps, you can create a mask that is both stylish and effective. Remember to wash your mask regularly to ensure that it stays clean and effective.
- Fabric: A variety of fabrics can be used to make masks, including cotton, polyester, and silk. Each fabric has its own unique properties that can affect the fit, breathability, and durability of your mask.
- Filter layer: A filter layer can be added to your mask to provide an extra layer of protection. Common materials for filter layers include cotton, polyester, and microfiber.
- Elastic: Elastic is used to create a secure fit around the face. Different types of elastic can be used, including spandex, lycra, and rubber.
- Nose wire: A nose wire can be added to the top of the mask to help create a better seal around the nose. Common materials for nose wires include wire, plastic, and metal.
It’s important to choose materials that are comfortable to wear and that you feel confident will provide the level of protection you need. Experiment with different fabrics and configurations to find the combination that works best for you.
When it comes to creating your own mask, the materials you choose can make a big difference in the effectiveness of your mask and how comfortable it is to wear. Here are some things to consider when choosing materials for your mask:
- Fabric: Common materials for masks include cotton, cotton-blend fabrics, and synthetic fabrics like polyester. Cotton is a good choice because it’s breathable and absorbent, which can help keep your face dry and comfortable. Polyester is a good choice if you want a material that’s more durable and washable.
- Filter layer: To make your mask more effective at blocking viruses and other particles, you can add a filter layer to your mask. Common filter materials include HEPA filters, vacuum bag filters, and coffee filters.
- Nose wire: Adding a nose wire to your mask can help it fit more snugly on your face and prevent air from leaking out. You can use a piece of wire from a clothes hanger or a piece of pipe cleaner.
Measuring and Cutting Your Mask
Once you’ve chosen your materials, it’s time to measure and cut your mask. Here’s how:
- Measure the circumference of your head just above your ears. This will give you an idea of how much material you’ll need for the mask.
- Cut out two rectangles of fabric that are at least 10 inches by 6 inches. If you’re using a filter layer, cut out a rectangle that’s slightly smaller than the one for the mask body.
- Cut a 12-inch piece of elastic cord or ribbon for the ear loops.
- Fold the top edge of each rectangle in half and sew along the fold to create a tube.
- Slip the elastic cord or ribbon over your head and adjust it to fit comfortably.
- Slip the mask tubes over your ears and adjust them to fit snugly.
- Sew the ear loops to the mask tubes using a sewing machine or by hand.
- If you’re using a filter layer, place it over the mask body and sew it in place.
- If you’re using a nose wire, shape it into an “L” shape and insert it into the top edge of the mask, positioning it above the nose. Sew the nose wire in place.
And that’s it! You’ve now created your own mask that’s both stylish and effective at protecting you from viruses and other particles.
- Cut out 2 squares of fabric, each measuring approximately 7×7 inches.
- Sew the 2 squares together along the sides and bottom, leaving the top open.
- Insert a hair tie or clip into each of the top corners of the mask, using these to hold the mask in place around your ears.
- Use the marker or pen to draw a line down the middle of the mask, from the top to the bottom.
- Cut the mask in half along this line, so that you have 2 smaller rectangles.
- Take one of the rectangles and place it over your nose and mouth, tying the hair tie or clip to hold it in place.
- Use the other rectangle to cover the rest of your face, tying the hair tie or clip to hold it in place.
- Trim any excess fabric, if necessary.
By following these steps, you can create a mask that provides both protection and style. The breathable fabric will allow you to breathe easily, while the design will help to prevent the spread of germs.
- Cut the fabric and interfacing to the desired size for your mask. The dimensions will depend on the size of your face and the amount of fabric you have available.
- Iron the interfacing to the wrong side of one of the fabric layers. This will give the mask more structure and make it more durable.
- Use the rotary cutter or x-acto knife to cut the fabric into the shape of the mask. Make sure to cut the fabric in both layers, so that you have two identical pieces.
- Use the needle and thread to sew the edges of the mask together, leaving the top open.
- Insert the mask onto your face and adjust the fit as needed.
- Use the hand sewing needle and thread to finish the edges of the mask, creating a neat and professional look.
- You can add features such as a nose wire or filter pocket if desired.
-
Wear your mask with pride and enjoy the satisfaction of knowing you created it yourself!
-
Cutting mat or other flat surface
- Hair tie or elastic band
Once you have all the materials, you can begin by measuring and cutting the fabric. Here’s how:
- Lay one of the fabric layers flat on a cutting mat or other flat surface.
- Use a ruler or measuring tape to measure the length and width of the fabric. Make sure the measurements are at least 20cm x 20cm.
- Cut the fabric into a rectangle that is the desired size for your mask.
- Repeat the process with the second layer of fabric.
- Lay the two rectangles of fabric on top of each other, with the right sides of the fabric facing each other.
- Use a sewing machine or by hand, sew the two layers of fabric together along the sides and bottom of the mask.
- Leave the top of the mask open, so that you can easily pull it over your head.
- Once the mask is sewn, you can add a hair tie or elastic band to the top to keep it securely in place.
And that’s it! You now have a homemade mask that is both stylish and functional.
Choosing the right materials for your mask is crucial to ensure both style and protection. Here are some tips to consider:
- Fabric: Common materials for masks include cotton, polyester, and linen. It’s essential to choose a fabric that is breathable and easy to work with. Avoid using materials that are too thin or too thick, as they may not provide adequate protection.
- Filter: The filter is the part of the mask that comes into contact with your face. You can use a coffee filter, a layer of tissue paper, or a cotton pad soaked in a solution. Make sure the filter is not too loose or too tight, as it may cause discomfort.
- Elastic: The elastic is used to hold the mask in place. You can use rubber bands or elastic strings. Choose a color that matches your mask’s fabric.
Measuring and Cutting the Materials
Before you start cutting the materials, measure your face’s circumference to determine the size of the mask. Use a measuring tape or a piece of string to measure the distance around your face, just below your ears and above your cheekbones. This measurement will help you cut the right size for your mask.
To cut the mask, lay the fabric flat on a table and place the measuring tape or string around it. Cut out the shape of the mask, leaving enough fabric to wrap around your ears. Then, cut the filter to the size of the mask’s opening.
Once you have cut the materials, it’s time to assemble the mask. Place the filter on top of the fabric, and secure it with pins. Then, place the elastic around your head, and wrap the excess fabric around your ears. Make sure the elastic is not too tight or too loose, as it may cause discomfort.
Testing the Mask
Before wearing the mask, test it to make sure it fits properly and is comfortable. Hold the mask against your face, and make sure it covers your nose and mouth. Breathe in and out to ensure there are no gaps between the mask and your face. If the mask feels uncomfortable or doesn’t fit properly, adjust it as needed.
Congratulations! You have just made your own mask. Remember to wash your hands before and after handling the materials, and follow the guidelines for wearing masks to protect yourself and others.
- Fabric: The type of fabric you choose can impact the breathability and durability of your mask. Natural fibers like cotton and linen are popular choices, but synthetic materials like polyester and nylon can also be effective. Avoid materials that are too thin or too thick, as they may not provide enough protection or be uncomfortable to wear.
- Filter: The filter you use can also impact the effectiveness of your mask. The Centers for Disease Control and Prevention (CDC) recommends using filters with a minimum rating of “95” for optimal protection. Some materials, like HEPA filters, can capture even smaller particles, but may not be as breathable.
- Elastic: The elastic used to secure the mask can also impact the comfort and fit of your mask. Thicker elastic may be more durable, but can also be less comfortable. Thinner elastic may be more comfortable, but may not hold the mask in place as well.
Once you have chosen your materials, it’s time to start sewing your mask. Here are some tips for sewing a basic mask:
- Cut out the fabric: Cut out two rectangles of fabric, one for the top of the mask and one for the bottom. The top rectangle should be slightly larger than the bottom rectangle.
- Sew the sides: Sew the sides of the top and bottom rectangles together, leaving the top and bottom edges open.
- Add the filter: Place the filter in the top rectangle, making sure it is centered.
- Sew the top: Sew the top edges of the top and bottom rectangles together, making sure to seal the filter in place.
- Add the elastic: Attach elastic to the top and bottom edges of the mask, making sure it is the right size for your face.
With these simple steps, you can create a basic mask that provides protection and style. Just remember to wash your mask regularly and follow proper hygiene practices to ensure it stays effective.
Before you begin, it’s important to gather all the necessary materials for your mask. This will ensure that you have everything you need to create a high-quality, protective mask. Here’s a list of materials you’ll need:
- 2 layers of 100% cotton fabric (at least 600mm wide)
- Nose wire (optional)
- Elastic cord or rubber bands (optional)
It’s important to use 100% cotton fabric for your mask, as this material is breathable, washable, and comfortable to wear. The fabric should also be at least 600mm wide to ensure that you have enough material to create a mask that fully covers your face.
Once you’ve gathered all the necessary materials, it’s time to start cutting out the mask. You’ll need to cut out two layers of fabric, each measuring approximately 15cm by 24cm. This will give you enough material to cover your nose, mouth, and chin.
To cut out the mask, you can use a rotary cutter or scissors. Be sure to cut out two identical layers of fabric, so that you can sandwich them together later.
Step 3: Sew the Mask Together
With the two layers of fabric cut out, it’s time to sew the mask together. You can use a sewing machine or hand needle and thread to sew the layers of fabric together. Be sure to sew around the entire edge of the mask, leaving a small opening at the bottom for your nose.
If you’d like to add a nose wire to your mask, you can do so now. Simply insert the nose wire into the opening at the top of the mask, and then sew the opening shut. This will help the mask fit more snugly over your nose and mouth.
Step 4: Add Elastic or Rubber Bands
Finally, you can add elastic cord or rubber bands to the mask to help it stay in place. Simply tie the elastic cord or rubber bands around the back of your head, and then tuck the ends of the mask into the elastic or rubber bands. This will help the mask stay in place without being too tight or uncomfortable.
With these simple steps, you can create a homemade mask that provides both protection and style. By using 100% cotton fabric and adding a nose wire and elastic or rubber bands, you can create a mask that fits comfortably and securely over your face.
Cotton is a popular choice for mask-making because it is soft, breathable, and widely available. However, it is not as effective at blocking particles as other materials, such as polyester or nylon.
Polyester
Polyester is a synthetic material that is highly effective at blocking particles. It is also washable, making it a good choice for reusable masks. However, it can be less breathable than cotton, and may cause irritation for some wearers.
Nylon
Nylon is another synthetic material that is highly effective at blocking particles. It is also lightweight and breathable, making it a good choice for people who wear masks for extended periods of time. However, it can be prone to stretching or warping over time.
Choosing the Right Material for You
When choosing materials for your mask, consider your own needs and preferences. If you prioritize breathability and comfort, cotton may be the best choice for you. If you want maximum protection, polyester or nylon may be a better option. It’s also a good idea to choose materials that are easy to clean and maintain, so you can use your mask repeatedly without worrying about bacteria or odors.
- Using the ruler, measure 6 inches from the top of the paper towel and make a mark.
- Repeat this process on the other paper towel, aligning the marks to ensure symmetry.
- Cut along the marks using the scissors, creating two equal rectangles.
- Repeat this process on the cardstock, cutting two rectangles that are slightly larger than the paper towel rectangles.
Step 3: Fold and Tape the Rectangles
- Fold each paper towel rectangle in half, aligning the short edges.
- Tape the two short edges together along the fold line, using the scissors to trim any excess paper.
- Do the same for the cardstock rectangles, ensuring that they are slightly larger than the paper towel rectangles.
Step 4: Add Design Elements (Optional)
- If desired, use markers or colored pencils to add design elements to the cardstock rectangles.
- Be creative and have fun with this step!
Step 5: Apply the Filters
- Using the pencil, draw a line down the center of each cardstock rectangle.
- Place one of the paper towel rectangles on top of the cardstock rectangle, aligning the edges.
- Carefully cut along the pencil line, applying the filters to the paper towel.
- Repeat this process with the other paper towel rectangle.
Step 6: Sew the Mask
- Lay one of the cardstock rectangles on top of the paper towel rectangle, aligning the edges.
- Use a needle and thread to sew along the edges, creating a border around the paper towel rectangle.
- Repeat this process with the other cardstock rectangle.
Step 7: Cut Out the Opening
- Using the ruler and scissors, cut a small opening in the center of the top cardstock rectangle.
Step 8: Add Elastic Bands
- Cut two pieces of elastic, each measuring approximately 12 inches in length.
- Thread one end of each elastic band through the opening at the top of the mask.
- Tie the elastic bands together at the back of your head, securing the mask in place.
Congratulations, you have now completed your DIY mask-making project!
Before you begin, it’s important to gather all the necessary materials for your mask. This will ensure that you have everything you need to create a sturdy and effective mask. Here’s a list of materials you may need:
- 2 layers of 100% cotton fabric (preferably breathable and washable)
- Elastic bands or hair ties for the ear loops
- Scissors or a craft knife
It’s also important to consider the size and shape of your mask. Make sure it covers your nose and mouth completely and fits snugly around your face.
Once you have all your materials, it’s time to start cutting the fabric. To make a basic mask, you’ll need to cut two rectangles of fabric. One rectangle will be the front of the mask, and the other will be the back. The front rectangle should be slightly larger than the back rectangle.
To cut the rectangles, fold the fabric in half lengthwise and then cut along the fold. This will give you two rectangles that are the same size. Cut one rectangle in half diagonally, so you have four triangles.
Now it’s time to sew the mask together. Start by sewing the two shorter sides of the front triangle together, forming a tube. Then, insert the back triangle inside the front tube, matching the raw edges.
Sew the longer sides of the back triangle together, creating a loop. Slip the loop over your head and adjust it to fit comfortably around your ears.
Finally, sew the two shorter sides of the back triangle together, enclosing the elastic loop. This will create a secure fit around your head.
Step 4: Add Features (Optional)
If you want to add features to your mask, such as filters or exhalation valves, you can do so at this stage. Simply attach the feature to the front of the mask using thread and needle.
Once you’ve added any features, you can decorate your mask with fabric markers or paint. This is a great opportunity to add some personality and style to your mask.
Congratulations, you’ve just made your own mask! Remember to wash your mask regularly and follow proper hygiene practices to keep yourself and others safe.
Before you start making your mask, it’s important to gather the necessary materials. You will need two pieces of cloth, string or elastic, and a needle and thread. If you have a sewing machine, you can use that instead of a needle and thread. It’s also a good idea to have some scissors on hand.
Once you have all of your materials, you can start by cutting one of the pieces of cloth into a rectangular shape. This will be the main body of your mask. The other piece of cloth should be cut into two smaller rectangles, which will be used to make the ties for your mask.
Next, you will need to sew the two smaller rectangles onto the top of the main rectangular piece of cloth. You can do this by folding the edges of the smaller rectangles over and sewing them onto the main piece of cloth. Make sure to leave a gap in the center so that you can insert your face through the mask.
Once you have sewn the smaller rectangles onto the main piece of cloth, you can insert your face through the gap and tie the mask behind your head. Make sure the mask fits snugly around your face, covering your nose and mouth. If the mask doesn’t fit properly, you can adjust the ties or try using a different size of cloth.
Now that you have created your mask, you can wear it to protect yourself and others from the spread of germs. In addition to providing protection, wearing a mask can also be a stylish accessory. Experiment with different colors and patterns to find a mask that fits your personal style.
- 1 piece of cotton fabric
- 1 piece of elastic rubber band
Step 2: Cut the Materials
- Cut the paper towel into two rectangles, each measuring 8.5 x 7 inches.
- Cut the cotton fabric into a rectangle, measuring 8.5 x 6 inches.
-
Cut the elastic rubber band into two pieces, each measuring about 8 inches long.
-
Place one of the paper towel rectangles on the cotton fabric.
- Fold the cotton fabric over the paper towel rectangle, so that the paper towel is sandwiched between the two layers of cotton fabric.
- Place the elastic rubber band around the mask, positioning it at the back of the head.
- Sew the mask together along the sides and bottom, leaving the top open.
- Slip the mask over the head, tying the elastic rubber band at the back.
Step 4: Add Optional Features
- If desired, use needle and thread to add features such as pleats, lace, or other decorative elements to the mask.
By following these steps, you can create a customized mask that provides both protection and style. The cotton fabric provides a breathable layer, while the paper towel layer acts as a filter to trap particles. With the addition of optional features, you can make your mask both functional and fashionable.
- Fabric: A tightly woven cotton or linen fabric is a good choice for a mask. These materials are breathable and can be easily sewn into a mask shape.
- Filter layer: A layer of non-woven fabric or a coffee filter can be used as a filter layer in your mask. This layer will help to trap particles and droplets, making your mask more effective at protecting you from viruses and other pathogens.
- Elastic: An elastic band or string can be used to hold the mask in place on your face. Make sure the elastic is stretchy but still able to hold the mask firmly in place.
By carefully selecting the right materials for your mask, you can create a stylish and effective protection solution.
- Repeat this process every 3 inches until you reach the top of the paper towel.
- Connect the dots with a pencil line to create a triangle shape.
- Cut out the triangle along the pencil line.
-
Repeat this process with the cardstock, but only cut out one triangle.
-
Fold the paper towel triangle in half, creating a crease.
- Open the fold and place the cardstock triangle on top of the paper towel triangle, aligning the edges.
- Carefully cut along the edges of the cardstock triangle, using the paper towel as a guide.
- Fold the cut edges of the cardstock triangle backward, creating a flap.
- Use the pencil to mark the position of the flap on the paper towel triangle.
- Fold the paper towel triangle in half, aligning the marked line with the crease.
- Use the pencil to mark the position of the flap on the other side of the paper towel triangle.
- Carefully cut along the edges of the paper towel triangle, using the cardstock as a guide.
- Fold the cut edges of the paper towel triangle backward, creating a flap.
-
Apply glue to the flaps and press them together.
-
Use markers or colored pencils to draw designs on the mask.
- Add embellishments such as ribbons or buttons to enhance the style of the mask.
With these simple steps, you can create your own DIY mask that provides protection and style. Remember to wear it properly and practice good hygiene to maximize its effectiveness.
- Pins or clips
-
Optional: elastic bands or ribbon for the ear loops
-
Cut the fabric into two rectangles, each measuring approximately 8 inches by 12 inches.
- Layer the two rectangles and pin or clip them together along the sides and bottom.
- Using a needle and thread, sew the layers together along the sides and bottom, leaving the top open.
- Cut two 12-inch lengths of elastic bands or ribbon for the ear loops.
- Attach the ear loops to the top of the mask, positioning them just below the ears.
- Try on the mask to ensure it fits properly and comfortably.
Now that you’ve made your mask, it’s important to remember to wash it regularly and dispose of it properly after use.
-
Thimble (optional)
-
Cut the fabric and interfacing to the desired size for your mask. A rectangular shape is recommended, with dimensions of 8 inches by 8 inches.
- Place the interfacing on top of one of the fabric layers, aligning the edges. Sew around the edges of the interfacing, leaving a small opening to turn the mask right side out.
- Cut the interfacing into the shape of the mask, leaving a 1/2 inch seam allowance around the edges. Press the edges of the mask with a hot iron, then trim any excess fabric.
- Turn the mask right side out through the opening, and press it again to make sure the edges are smooth.
- Use the needle and thread to hand-sew the opening closed, making sure to stitch the fabric together on all four sides.
- Once the opening is closed, you can use the hand sewing needle to add decorative stitches or embellishments to your mask. This can include things like beads, sequins, or embroidery.
- Your mask is now complete and ready to wear!
Before you start making your mask, it’s important to gather the necessary materials. You will need two pieces of cloth, scissors, a needle, and thread. You can also add some elastic bands to make the mask more comfortable to wear.
Once you have all the materials, the first step is to cut out the two pieces of cloth. One piece should be larger than the other. The larger piece will be the front of the mask, and the smaller piece will be the back.
Next, you will need to sew the two pieces together along the sides and bottom. Make sure to leave the top open so that you can insert your head and wear the mask.
After the pieces are sewn together, you can add the elastic bands to the top of the mask. This will help keep it in place on your face.
Now that your mask is complete, you can add any decorative touches you like. You can use fabric paint or markers to draw on designs, or you can add beads or other embellishments.
Remember, the goal of this DIY mask-making guide is not only to create a protective mask, but also to add some personal style to your face covering. So have fun and get creative!
- Fabric: Look for tightly woven fabrics like cotton or polyester, which will help prevent airborne particles from passing through.
- Filter: A filter is essential for adding an extra layer of protection to your mask. You can use a coffee filter, which is readily available and affordable, or you can purchase a specialized filter made for masks.
- Elastic: Elastic is necessary for securing the mask around your ears. Make sure it is strong and stretchy to ensure a secure fit.
Measuring and Cutting Your Materials
Before you start cutting your materials, measure the dimensions of your mask to ensure that it will fit comfortably on your face. A typical mask should be at least 7 inches wide and 4 inches tall. Cut your fabric to the desired size, leaving extra fabric at the top for tying around your head.
Cut your filter to the same size as your fabric mask, and place it in the center of the fabric.
Using a needle and thread, sew the edges of your mask together, leaving the top open. Use a zigzag stitch to reinforce the edges and prevent fraying. Once you have sewn the edges, tie the top of your mask around your head, securing it in place with the elastic.
Now that you have created your mask, it’s time to add some style to it. You can choose to decorate your mask with beads, sequins, or even paint. The options are endless, so get creative and have fun with it!
Remember, the most important thing is that your mask fits comfortably and provides adequate protection. Don’t sacrifice style for safety, but don’t sacrifice safety for style either. With a little creativity and some basic sewing skills, you can create a stylish and effective DIY mask that will keep you protected during these uncertain times.
- Durability: The material should be durable enough to withstand frequent wear and washing without breaking down.
- Breathability: A breathable material will allow you to wear the mask for extended periods without feeling uncomfortable.
- Style: The material should align with your personal style and preferences.
There are various materials to choose from, including cotton, cotton-blends, polyester, and nylon. Each material has its own unique benefits and drawbacks, so it’s essential to consider your priorities when making a decision.
Once you’ve selected your materials, it’s time to cut the mask. Here’s a step-by-step guide:
- Measure your face: Use a measuring tape or a piece of string to measure the length and width of your face. This will help you determine the size of the mask.
- Cut the fabric: Cut out two rectangles of fabric, one for the front of the mask and one for the back. The front rectangle should be slightly larger than the back rectangle to allow for folding.
- Pin the fabric: Pin the two rectangles together along the sides and bottom, leaving the top open.
- Sew the mask: Using a sewing machine or by hand, sew the two rectangles together along the sides and bottom.
- Add elastic: Attach elastic to the top of the mask to create a secure fit around your head.
Personalizing Your Mask
Now that you’ve created your mask, it’s time to personalize it and make it your own. Here are some ideas:
- Add a filter pocket: Add a pocket to your mask to hold a filter, making it more effective at protecting you from airborne particles.
- Embellish with fabric: Use scraps of fabric to add patterns or designs to your mask.
- Add a name tag: Add a name tag to your mask to personalize it and make it easier to identify when worn in public.
By following these steps, you can create a DIY mask that not only protects you but also reflects your personal style.
- Rotary cutter (optional)
You can also add personal touches to your mask by incorporating additional materials such as ribbon, lace, or buttons.
To begin, measure the dimensions of your face and add a seam allowance of 1-2 inches to each side. Cut out 2 rectangles of fabric using the measurements and add the seam allowance.
Next, place the 2 rectangles right sides together and sew along the sides and bottom. Leave the top open so that you can insert the elastic.
Insert the elastic by folding it in half and placing it at the top of the mask, where the 2 sides meet. Sew along the top to secure the elastic in place.
Cut out a circle of fabric for the nose wire, which should be slightly smaller than the opening of the mask. Sew the nose wire onto the inner layer of the mask, placing it in the center and securing it with a few stitches.
Finally, test your mask by wearing it to ensure that it fits comfortably and securely. If necessary, adjust the size or shape of the mask before using it for protection.
Before you start making your mask, it’s important to gather the necessary materials. You will need two pieces of cloth, elastic, and a needle and thread. The cloth should be made of a tightly woven fabric such as cotton or polyester. The elastic should be at least 12 inches long and should be threaded through the two pieces of cloth to form the band that goes around your head.
To make the mask, you will first need to sew the two pieces of cloth together along the sides and bottom to form a tube. Then, you will need to sew the elastic onto the top of the mask so that it can be stretched over your head. Finally, you can add any decorative touches or embellishments to the mask, such as ribbons or beads.
Once you have completed your mask, it’s important to wash your hands thoroughly before putting it on. The mask should cover your nose and mouth and fit snugly against your face. If the mask doesn’t fit properly, it may not provide the necessary protection. It’s also important to avoid touching the mask while wearing it, as this can contaminate the fabric and reduce its effectiveness.
By following these simple steps, you can create a mask that not only provides protection against airborne illnesses but also adds a touch of style to your outfit.
- 2 cotton ear loops
-
Optional: decorative fabric or materials for personalization
-
Cut the cotton fabric into a rectangle shape that is large enough to cover your face and tie around your head. The fabric should be 2 layers thick.
- Fold the fabric in half lengthwise and sew along the sides and bottom, leaving the top open.
- Slip the hair ties or rubber bands onto your hair to hold your hair back and out of the way while sewing.
- Use the needle and thread to sew the sides and bottom of the fabric together, creating a tube that fits around your head.
- Turn the mask right-side out by pulling the fabric through the open top and pushing the corners out.
- Sew the open top closed by sewing a straight line from one corner to the other, leaving a small opening for your nose.
- Insert the cotton ear loops into the top corners of the mask, securing them in place with a few stitches.
- Optional: Decorate your mask with embroidery, patches, or other personalized touches.
Congratulations, you’ve made your own mask! Make sure to wash your hands before and after handling the mask, and wear it over your nose and mouth when you’re out in public to help prevent the spread of germs.
- A cotton t-shirt or other lightweight, breathable fabric
- Thread or yarn
- A needle
-
A stapler or safety pins (optional)
-
Cut the fabric into a rectangular shape that will cover your face. The fabric should be large enough to wrap around your nose and mouth and tie at the back of your head.
- Use scissors to make two holes for your eyes, one on either side of the rectangle. These holes should be large enough to see through, but small enough to prevent the fabric from slipping down.
- Use a needle and thread to sew the holes closed, or use safety pins to hold them in place.
- Take the rectangle of fabric and tie it around your head, with the bottom of the rectangle covering your nose and mouth.
-
Adjust the mask as needed to ensure it fits snugly and securely around your face.
-
Sewing ruler or rotary cutter and mat
- Optional: decorative ribbon or elastic for the ties
The first step in making your mask is to measure and cut the fabric. To do this, you will need to:
- Lay the interfacing flat on a work surface.
- Place the two layers of cotton fabric on top of the interfacing, with the right sides of the fabric facing up.
- Use a sewing ruler or rotary cutter and mat to cut the fabric into the shape of the mask, leaving a small border around the edges.
- Turn the fabric right-side out and press the edges to remove any wrinkles.
Adding the Ties
Once the fabric is cut and pressed, you can add the ties to your mask. To do this, you will need to:
- Fold the edges of the mask where the ties will be attached, so that they form a triangle shape.
- Sew the edges together along the sides and bottom of the triangle, leaving the top open.
- Insert the ends of the ribbon or elastic into the open top of the triangle, and sew them in place to secure the ties.
Final Steps
The final steps in making your mask include:
- Cutting out the filter pocket: To do this, cut a small rectangle out of the interfacing, about 3 inches by 2 inches.
- Ironing the mask: Use a medium heat setting on your iron to iron the mask, pressing down on the edges and corners to smooth out any wrinkles.
- Adding a filter: Place the filter pocket over the nose and mouth area of the mask, and insert a filter into it. The filter should fit snugly, but not be so tight that it’s uncomfortable.
Your homemade mask is now complete and ready to wear! Remember to wash it regularly and replace the filter as needed.
- 1 layer of non-woven fabric (such as interfacing or batting)
- 1 layer of muslin or lightweight cotton fabric for the lining
- 4mm elastic (optional)
- Rotary cutter and mat (optional)
It is important to choose fabrics that are comfortable to wear and washable, as you will need to launder your mask regularly to maintain its effectiveness. The non-woven fabric provides an additional layer of protection by acting as a filter, while the cotton fabrics and muslin provide a soft and breathable surface against your skin.
- Cut out the pieces for the front and back of the mask using the rotary cutter and mat, or simply cut them out by hand with scissors.
- Place the non-woven fabric in between the two layers of cotton fabric, with the wrong sides facing each other.
- Sew the three layers together along the edges, using a straight stitch on a sewing machine or by hand.
- If you are using elastic, sew it onto the top and bottom edges of the mask, placing it under the seam allowance.
- Turn the mask right side out and press it with a hot iron or by using a steam iron.
- Hem the edges of the mask by folding them twice and sewing them in place.
- Add a filter pocket to the upper portion of the mask, using a separate piece of non-woven fabric that has been cut to size.
- Add a nose wire to the upper portion of the mask, using a piece of stiff wire that has been bent into an “L” shape.
- Finally, launder the mask according to the instructions on the care label of the fabrics used.
With these simple steps, you can create a homemade mask that provides both protection and style. Remember to choose breathable fabrics and to launder the mask regularly to maintain its effectiveness.
Cotton is a popular choice for mask-making because it is soft, breathable, and easily accessible. However, it is also prone to ripping and does not provide as much protection as other materials.
Surgical masks are designed to protect against airborne diseases and are made of a tightly woven fabric that is more durable than cotton. However, they can be more difficult to breathe through and are not as customizable as homemade masks.
Filters
Filters, such as those used in air purifiers, can be added to a homemade mask to increase its effectiveness. However, they can be expensive and may not be as comfortable to wear as other materials.
When choosing materials for your mask, consider your priorities. If you prioritize comfort and breathability, cotton may be the best choice for you. If you prioritize protection, surgical masks or filters may be a better option.
No matter which materials you choose, it is important to wash your mask regularly to prevent the buildup of bacteria and to ensure it remains effective.
You can choose any design or pattern that you like for your mask. For this guide, we will be using a simple rectangle shape.
First, place the two layers of cotton fabric on top of each other, with the wrong sides facing together. Then, place the layer of interfacing on top of the fabric layers. Use your ruler to mark the edges of the rectangle shape.
Next, use your scissors or rotary cutter to cut out the rectangle shape from the fabric and interfacing layers. If you have a sewing machine, you can use it to sew the edges of the rectangle together. Otherwise, you can use needle and thread to sew the edges by hand.
Once you have sewn the edges, you can trim any excess fabric or interfacing. Then, you can use elastic or rubber bands to secure the mask around your head.
With this simple guide, you can create your own mask for protection and style. Remember to wash your mask regularly and follow any local guidelines for mask-wearing.
- Filter layer: A filter layer can be added to your mask to provide an extra layer of protection. Common materials for filter layers include cotton, polyester, and melt-blown fabric.
- Elastic: Elastic is used to create a secure fit around the edges of your mask. Different types of elastic, such as spandex and rubber, can provide different levels of stretch and tension.
- Nose wire: A nose wire can be added to the top of your mask to help form a better seal around the nose. Common materials for nose wires include metal and plastic.
It’s important to choose materials that are both effective and comfortable to wear. Consider trying out different fabrics and materials to find the perfect combination for your mask.
When it comes to creating your own mask, the materials you choose can make a big difference in the effectiveness of your protection and the style of your mask. Here are some factors to consider when choosing materials for your mask:
- Breathability: The material should allow for proper airflow while still providing adequate protection.
- Durability: The material should be able to withstand repeated washing and wear without breaking down.
- Style: The material should fit your personal style and preferences.
Material Options
- Fabric: Fabric is a popular choice for homemade masks. Cotton, silk, and flannel are all good options.
- Sewing Supplies: Sewing supplies such as thread, elastic, and bias tape can also be used to create a mask.
- Repurposed Materials: Old t-shirts, scarves, and other materials can be repurposed to create a unique and personalized mask.
Tips for Choosing Materials
- Consider the color and pattern of the material for a pop of personal style.
- Avoid materials that are too thin or too thick, as they may not provide adequate protection.
- Choose materials that are easy to clean and care for.
By carefully considering these factors and choosing the right materials, you can create a mask that not only protects you but also reflects your personal style.
- 1 layer of non-woven fabric (such as interfacing or fleece)
- A sewing machine (optional)
Once you have gathered all of the materials, follow these steps to create your mask:
- Cut out 2 pieces of cotton fabric that are 7 inches by 9 inches each.
- Cut out 1 piece of non-woven fabric that is 7 inches by 9 inches.
- Lay the non-woven fabric on top of one of the cotton fabric pieces and cut around it to create a circle.
- Lay the other cotton fabric piece on top of the non-woven fabric and cut around it to create a second circle.
- Take one of the cotton fabric circles and fold it in half vertically, then fold it in half again horizontally.
- Use needle and thread or fabric glue to attach the edges of the cotton fabric together along the fold lines.
- Take the other cotton fabric circle and fold it in half vertically, then fold it in half again horizontally.
- Attach the edges of the cotton fabric together along the fold lines.
- Cut a piece of elastic or ribbon that is 22 inches long.
- Attach one end of the elastic to the top of the mask and the other end to the back of the mask.
- Sew the edges of the mask together along the sides and bottom.
- Use the sewing machine (optional) to sew a straight line across the top of the mask, leaving a small opening.
- Cut the opening open and slide the mask onto your face.
That’s it! You have now created your own DIY mask. Make sure to wash the mask regularly and replace it when it becomes dirty or worn out.
N95 respirator masks are designed to filter out 95% of airborne particles, making them ideal for use in environments with high levels of pollution or during pandemics. They are available in various sizes and shapes to fit different face types.
Once you have selected your materials, it’s time to measure and cut the mask. This is a crucial step in ensuring a proper fit and maximum protection.
Step 1: Measure Your Face
To determine the size of your mask, measure the distance from the bridge of your nose to the bottom of your chin. This will give you an idea of how long the mask should be.
Step 2: Cut the Mask
Cut out two pieces of your chosen material, one for the top half of the mask and one for the bottom half. You can either use a pattern or freehand cut the pieces to your desired shape.
Step 3: Fold and Secure the Mask
Fold the top piece of the mask in half, and then fold the bottom piece in half. Use thread or elastic to secure the two halves together at the sides of your face.
Adding Style and Personality
Now that you have created a functional mask, you can add your own personal touch by decorating it with patterns, colors, and accessories.
Option 1: Embellish with Ribbons and Bows
Add a touch of elegance to your mask with a simple ribbon or bow. This is a quick and easy way to add some flair to your mask without compromising its functionality.
Option 2: Create a Custom Pattern
Get creative and design your own mask pattern using your favorite fabrics, patterns, and colors. This is a great way to express your personality and add some fun to your mask.
Option 3: Accessorize with Buttons and Charms
Add some whimsy to your mask with buttons, charms, or other small accessories. These can be purchased or made from scratch, and can be attached with thread or glue.
DIY mask-making is a fun and practical way to protect yourself while expressing your unique style. With the right materials and a little creativity, you can create a mask that not only keeps you safe but also makes a statement.
- 1 piece of elastic string
Step 2: Cut the Paper Towel
- Cut one of the paper towel pieces in half to create two smaller rectangles.
- Cut the other piece of paper towel into a circular shape that is slightly larger than the elastic string.
Step 3: Cut the Fabric
-
Cut the cotton fabric into a rectangle that is slightly larger than the circular paper towel.
-
Place the circular paper towel on one side of the cotton fabric.
- Place the other rectangle of paper towel on the other side of the cotton fabric.
- Place the elastic string around the back of your head and tie it to hold the mask in place.
- Optionally, you can use needle and thread to sew the edges of the mask together for a more secure fit.
By following these simple steps, you can create a homemade mask that provides both protection and style. The cotton fabric provides a comfortable fit, while the paper towel acts as a filter to prevent the spread of germs. Additionally, the mask can be customized with various colors and patterns to match your personal style.
Before you begin, it’s important to gather all the necessary materials for your mask. The Centers for Disease Control and Prevention (CDC) recommends using masks made of multiple layers of breathable fabric, such as cotton, that are tightly woven. You’ll need the following materials:
- 2 layers of 100% cotton fabric (such as a t-shirt or cotton sheets)
- 1 layer of cotton flannel or fleece (optional)
- Elastic ear loops or elastic hair ties
Next, you’ll need to cut the fabric to the appropriate size for your mask. The CDC recommends using masks that fit snugly over the nose and mouth, with no gaps. To make sure your mask fits properly, you can try wearing a fabric mask while sewing to check for any gaps. Cut two layers of cotton fabric to the same size, and optionally, one layer of cotton flannel or fleece for the middle layer.
Now it’s time to sew the mask together. Use a needle and thread to sew the layers of cotton fabric together, leaving the sides open. If you’re using cotton flannel or fleece, sew this layer to the middle of the cotton fabric layers. Then, insert a filter pocket into the top layer of the mask. This filter pocket can be made from a coffee filter or other fine-mesh material, and it should be placed over the nose and mouth area of the mask.
Finally, add elastic to the mask. You can either use elastic ear loops or elastic hair ties. Sew the elastic onto the top of the mask, leaving enough length to wrap around your ears. Make sure the elastic is tight, but not too tight, so that the mask fits snugly over your nose and mouth.
Once you’ve completed these steps, you’ll have a homemade mask that fits snugly over your nose and mouth, providing protection from airborne particles and droplets. And with a little creativity, you can even make your mask stylish and unique to your personal taste.
When creating your mask, it is important to choose the right materials to ensure both protection and style. Consider the following options:
- Fabric: A variety of fabrics can be used to make masks, including cotton, polyester, and silk. Consider the level of protection you need and the type of fabric that will work best for your desired style.
- Non-woven fabric: This type of fabric is often used in medical masks and can provide a high level of protection. It is important to note that non-woven fabric should be used in conjunction with other materials, such as cotton, to create a more breathable mask.
- Sewing machine: A sewing machine can be used to create a more professional-looking mask. It can also be used to add elastic to the mask, making it easier to wear.
Before you begin sewing your mask, it is important to measure and cut the material to the appropriate size. This will ensure that the mask fits properly and provides the desired level of protection.
- Measure your face: Use a measuring tape to determine the circumference of your face. This will help you determine the size of the mask you need to create.
- Cut the fabric: Cut the fabric to the appropriate size, based on your measurements. Be sure to allow for some extra fabric around the edges to ensure a snug fit.
Once you have measured and cut the material, you can begin assembling your mask. Follow these steps:
- Sew the sides: Sew the sides of the mask together to create a tube.
- Add elastic: Use a sewing machine to add elastic to the mask. This will make it easier to wear and ensure a snug fit.
- Add filters: If desired, add filters to the mask. These can be made from materials such as cotton or non-woven fabric.
- Try it on: Try on the mask to ensure it fits properly and provides the desired level of protection. Make any necessary adjustments.
By following these steps, you can create a DIY mask that provides both protection and style.
- Binder clips
- Thin cotton thread
- A bobby pin or hair clip
Step-by-Step Guide
- Take one of the pieces of tissue paper and place it on a flat surface with the patterned side facing up.
- Using scissors, cut the tissue paper into a desired shape for your mask. This can be a simple rectangle or a more intricate design, depending on your preference.
- Repeat the same process with the second piece of tissue paper, making sure to cut it to the same size as the first piece.
- Using binder clips, attach the two pieces of tissue paper together along the edges, leaving a small opening for your face.
- Take the thin cotton thread and use it to create a tie for your mask. Tie the thread around the back of your head, ensuring that the mask is securely in place.
- If desired, use a needle and thread to add embellishments to your mask, such as beads or sequins.
- Finally, use a bobby pin or hair clip to attach a piece of tissue paper to the top of your mask, creating a decorative point.
The Importance of Wearing a Mask
Wearing a mask is an essential part of protecting yourself and others from the spread of viruses and other harmful pathogens. Not only does it help prevent the spread of illness, but it also serves as a fashion statement, allowing you to express your unique style while staying safe.
- Fabric: The type of fabric you choose can impact the breathability and durability of your mask. Consider using materials like cotton, linen, or silk for a comfortable and stylish option.
- Filter: To ensure that your mask provides adequate protection, choose a filter that is designed for this purpose. You can purchase filters online or make your own using materials like coffee filters or nylon mesh.
- Elastic: Elastic is a crucial component of any mask, as it helps the mask stay securely in place. Choose a type of elastic that is both comfortable and durable, such as spandex or elastic thread.
Once you have chosen your materials, it’s time to measure and cut them to the right size. Here are some tips for getting the perfect fit:
- Face Mask Template: You can find a face mask template online or create your own using a piece of paper. Use this template to trace the shape of your mask onto your fabric.
- Measuring Tape: Use a measuring tape to measure the length and width of your face, including your nose and jawline. Use these measurements to adjust the size of your mask template as needed.
- Scissors: Cut out your mask shape using scissors or a craft knife.
Now that you have your materials cut to the right size, it’s time to assemble your mask. Here are the steps to follow:
- Place Filter: Place your filter in the center of your mask shape.
- Add Elastic: Attach elastic to the top and bottom of your mask, securing it in place with stitches or glue.
- Adjust Fit: Try on your mask and adjust the fit as needed. Make sure it is snug but comfortable, and that there are no gaps around the edges.
Once you have assembled your mask, you can add some finishing touches to make it even more stylish and effective. Here are some ideas:
- Embellishments: Consider adding embellishments like buttons, lace, or sequins to add some flair to your mask.
- Filters: Depending on the type of filter you are using, you may need to replace it periodically. Be sure to follow the manufacturer’s instructions for proper care and disposal of your filter.
- Storage: When not in use, store your mask in a safe place where it will not be damaged or contaminated. Consider using a mask case or storing it in a plastic bag.
You may also want to consider adding personal touches to your mask, such as decorative stitching or embellishments.
Cutting Your Mask
Once you have gathered your materials, you can begin cutting your mask. To do this, follow these steps:
- Lay one layer of cotton fabric on a flat surface.
- Place the interfacing on top of the cotton fabric, with the shiny side facing up.
- Cut out two rectangles of fabric, each measuring approximately 7.5 inches by 5 inches.
- If desired, use scissors to cut out decorative shapes or patterns from one of the rectangles.
- Place the other rectangle of fabric on top of the first one, with the wrong sides facing together.
- Use needle and thread to sew the two rectangles together along the sides and bottom, leaving the top open.
Adding Decorative Touches (Optional)
If you wish to add decorative stitching or embellishments to your mask, you can do so after the basic shape has been sewn together. This could include:
- Hand-stitching or machine-stitching decorative patterns or shapes onto the mask
- Adding beads, buttons, or other embellishments for added flair
- Using fabric paint or markers to create designs or add words
Remember to always follow the guidelines and recommendations for mask-making set forth by your local health authorities.
When it comes to creating your own mask, the materials you choose can make a big difference in the effectiveness of your mask and how comfortable it is to wear. Here are some key considerations to keep in mind when choosing materials for your mask:
- Fabric: Common materials for masks include cotton, cotton blends, and synthetic fabrics like polyester. Cotton is a popular choice because it’s breathable and absorbent, but it’s also prone to tearing and may not be as effective at blocking small particles. Synthetic fabrics can be more durable and effective at blocking particles, but they may be less comfortable to wear.
- Filter: To improve the effectiveness of your mask, you can add a filter layer made of materials like coffee filters, vacuum bags, or surgical masks. These materials can help capture small particles and improve the fit of your mask.
- Elastic: The elastic band used to hold the mask in place is an important component of the mask’s effectiveness. A tight fit is essential for maximizing the mask’s ability to block particles, so choose elastic that is the right size for your head and won’t stretch out over time.
Making Your Mask
Once you’ve chosen your materials, it’s time to start making your mask. Here’s a step-by-step guide to help you get started:
- Cut out two rectangular pieces of fabric, one for the front of the mask and one for the back. The front piece should be slightly larger than the back piece to create a pleated effect.
- Hem the edges of the fabric by folding them twice and sewing them in place.
- Place the filter material between the two rectangular pieces of fabric, aligning the edges.
- Sew the sides of the mask together, leaving the top open.
- Insert the elastic band by tying it in a knot and slipping it over the top of the mask, positioning it around your head.
- Adjust the fit of the mask by tying the elastic band in a bow or tucking the ends into the mask.
- Once you’re happy with the fit, you can add decorative details like ribbons or embroidery to add style to your mask.
Remember, while making your own mask can be a fun and creative project, it’s important to prioritize safety and effectiveness. Be sure to choose materials that are appropriate for mask-making and follow the guidelines for creating a safe and effective mask.
- Elastic band or ribbon for the mask’s ties
Before you start, make sure to wash and iron your fabric to prevent any wrinkles or creases. You can choose any pattern or color for your mask, as long as it is made of breathable fabric.
To begin, trace the shape of your face onto one of the fabric layers. You can use a mirror or a ruler to ensure the shape is symmetrical. Cut out the shape, leaving about 1 inch of extra fabric around the edges.
Next, sew the two layers of fabric together along the edges, leaving the bottom open. This will be the mask’s opening.
To attach the elastic band or ribbon, sew the ends of the elastic to the top of the mask, leaving enough slack for the mask to fit over your head. Alternatively, you can hand-sew the elastic onto the mask.
Finally, try on the mask and adjust the ties as needed to ensure a comfortable fit. Your homemade mask is now ready to use!
Once you have all the materials, you can start by cutting out the fabric for your mask. The Centers for Disease Control and Prevention (CDC) recommends using a square or rectangular shape with pleats at the top. Cut two squares of fabric that are the same size, with one for the outside of the mask and one for the lining.
Next, you’ll need to add a nose wire to the top of the mask to help it conform to your nose and prevent air from leaking in. You can either use a pre-made nose wire or make your own by bending a piece of wire into an “S” shape and attaching it to the top of the mask.
If you want to add a filter pocket to your mask, you can do so by sewing a small pocket onto the side of the mask using a non-absorbent thread. You can then insert a filter, such as a coffee filter or a vacuum bag filter, into the pocket to provide an extra layer of protection.
Finally, you can attach the lining to the outside of the mask using pins or clips, and sew the edges together using a sewing machine or by hand. Be sure to follow any additional recommendations from the CDC or other health organizations when making your mask.
You may also want to add a filter layer to your mask for added protection. This can be made from a coffee filter or a layer of tissue paper.
- Cut the fabric: Use the cutting mat or ruler to cut two squares of fabric that are large enough to cover your face and nose.
- Create the pattern: Place the two squares of fabric on top of each other, and use the marker or pen to trace around the outer edges. This will create a template for your mask.
- Cut out the mask: Cut out the mask using the scissors, making sure to follow the lines you have drawn.
- Add the filter layer (optional): If you are using a filter layer, place it in between the two layers of fabric.
- Sew the mask: Use the needle and thread to sew the mask together along the edges. Make sure to sew through all layers of fabric.
- Pin the mask: Use the pins to pin the mask to your face, making sure it covers your nose and mouth.
- Wear the mask: Once you have pinned the mask in place, you can wear it for protection and style.
Remember to wash your mask regularly to maintain its effectiveness.
- A non-woven fabric or other suitable material for the outer layer
- A filter fabric or other suitable material for the inner layer
- A metal nose wire
-
A sewing machine or needle and thread
-
Cut the outer layer material to the desired size and shape.
- Cut the inner layer material to the same size and shape as the outer layer.
- Place the two layers together, with the edges aligned, and use the sewing machine or needle and thread to sew the edges together.
- Use the scissors to cut the nose wire into a curved shape, and attach it to the top of the mask using needle and thread.
- Test the mask by wearing it and ensuring that it fits comfortably over your nose and mouth, and that you can breathe easily through it.
Remember, the most important part of making a mask is choosing suitable materials that will provide adequate protection. The filter fabric should be made of a tightly woven material that is difficult for particles to pass through, while the outer layer should be made of a material that is comfortable to wear and easy to breathe through. By following these steps, you can create a mask that will provide both protection and style.
- Fabric: A tightly woven cotton or linen fabric is an excellent choice for your mask. These materials are breathable, durable, and easy to clean.
- Surgical masks: If you’re a healthcare worker or have access to surgical masks, they can be a good option. However, they are typically disposable and may not be as effective as homemade masks made with multiple layers of fabric.
- Non-woven fabric: Non-woven fabric is another option to consider. It is often used in disposable masks and is designed to be lightweight and breathable.
Once you have chosen your materials, it’s time to cut your mask. Here’s what you’ll need to do:
- Pattern: Cut out a pattern for your mask. The pattern should include two layers of fabric for the outside and inside of the mask, as well as a filter layer in between. You can find patterns online or create your own using a piece of paper or cardboard.
- Filter layer: The filter layer is a crucial component of your mask. It should be made of a non-woven fabric or a dense cotton or linen material. This layer will catch droplets and particles that may be harmful.
- Sewing: Once you have your pattern and materials, it’s time to sew your mask. Use a sewing machine or by hand. Make sure to sew the outside and inside layers together, leaving the filter layer open.
While a basic mask is effective, there are some features you can add to make it even more effective and comfortable. Here are some options to consider:
- Nose wire: A nose wire can help your mask fit more snugly over your nose and chin. This can help prevent air from leaking out of the top of your mask.
- Filter pocket: Adding a filter pocket to your mask can make it easier to change out the filter. Simply slide the filter into the pocket and secure it with a rubber band or elastic.
- Comfort features: Depending on the materials you choose, you may want to add additional comfort features to your mask. This could include adding a foam layer to the inside of the mask or using a soft, stretchy fabric for the ear loops.
Before you start wearing your mask, it’s important to test it to make sure it fits properly and is effective. Here’s what you can do:
- Fit test: Put on your mask and make sure it covers your nose and mouth completely. Check that there are no gaps around the edges of the mask.
- Filter test: Place a tissue or piece of paper towel inside the filter pocket of your mask. Breathe out forcefully and check to see if any particles are captured on the tissue or paper towel.
- Comfort test: Wear your mask for a short period of time and check for any discomfort or irritation. If you experience any discomfort, try adjusting the fit or adding additional comfort features.
By following these steps, you can create an effective and stylish mask that will protect you and those around you.
- Optional: embellishments (such as ribbon, lace, or buttons)
To begin, lay out the two layers of cotton fabric and the layer of interfacing on a flat surface. Trace the outline of your face onto the interfacing using a marker or pen. Cut out the shape using scissors.
Next, place the interfacing on top of one of the cotton layers and the other cotton layer on top of the interfacing. Pin the layers together around the edges.
Using a needle and thread, sew the layers together along the edges, leaving the top open.
To add embellishments, you can sew them onto the mask before or after it is assembled. For example, you could sew a ribbon into the shape of a loop for a handle, or attach a button to the center of the mask.
Once the mask is complete, you can wear it by placing the open edge over your head and tying the strings in the back. You can also wash the mask by hand or machine, but be sure to remove any embellishments before washing.
- Optional: fabric paint, glitter, beads, or other embellishments
Before you start, make sure to wash and iron your fabric to ensure it is clean and wrinkle-free.
- Cut out two rectangles of fabric, each measuring approximately 7.5 inches by 5 inches.
- Sew the two rectangles together along the sides and bottom, leaving the top open.
- Insert a layer of cotton batting or other filling material in between the two layers of fabric.
- Sew the top of the mask closed, using a zigzag stitch or other strong stitch to reinforce the mask.
- Cut two pieces of elastic measuring approximately 20 inches long. Attach one piece to each side of the mask, positioning them at the back of your head.
- Optional: if you want to add embellishments to your mask, do so after the mask is fully assembled.
Once your mask is complete, wear it over your nose and mouth when you are in public places or around other people. Remember to wash your mask regularly to maintain its effectiveness and to prevent the spread of germs.
- 2 layers of 100% cotton fabric (cut to size)
- Thread for sewing machine (optional)
- Pins or masking tape
Once you have all the materials, you can begin making your mask. Here are the steps:
- If using interfacing, iron it onto one of the layers of fabric. This will give the mask more structure and make it more durable.
- Use scissors or a craft knife to cut out the mask shape from the fabric.
- Use pins or masking tape to hold the two layers of fabric together along the edges.
- Use a needle and thread or fabric glue to sew the edges of the mask together. If using a sewing machine, use a straight stitch and make sure to sew along the entire edge of the mask.
- Once the mask is sewn together, you can try it on to make sure it fits properly. If it’s too loose, you can add more interfacing or use a thicker fabric.
- You can also add features like filters or nose wires to your mask for added protection.
By following these steps, you can create a functional and stylish mask that will keep you protected during the COVID-19 pandemic.
When it comes to creating your own mask, the materials you choose are crucial to the effectiveness of your protection. The Centers for Disease Control and Prevention (CDC) recommends using materials that are breathable, easy to breathe through, and made of multiple layers of fabric. This will help prevent the spread of germs and viruses while still allowing you to breathe easily.
One popular option for creating a mask is to use a cotton-flannel fabric. This type of fabric is both breathable and durable, making it a great choice for a homemade mask. Other options include cotton T-shirt material, quilting fabric, and even old t-shirts. It’s important to choose materials that are washable, as you’ll want to regularly clean your mask to prevent the buildup of germs and bacteria.
In addition to the fabric, you’ll also need some elastic or ribbon to help secure the mask around your face. This will ensure that the mask stays in place and doesn’t come loose while you’re wearing it. You can use regular old elastic bands or purchase some specifically designed for mask-making.
Once you have your materials, it’s time to start putting your mask together. Follow the next section for step-by-step instructions on how to create your very own mask.
- Fabric: Fabric is a popular choice for homemade masks as it is readily available and easy to work with. However, it is important to choose a tightly woven fabric that will not allow particles to pass through. Cotton and cotton-blend fabrics are good options, as they are breathable and washable.
- Surgical Masks: Surgical masks are designed to filter out particles and are a more effective option for protection than fabric masks. However, they are typically only single-use and can be difficult to find in some areas.
- Paper Towels: While not a traditional material for mask-making, paper towels can be effective in blocking particles. They are also disposable, making them a convenient option for those who want to avoid reusing materials.
When choosing materials for your mask, consider the level of protection you need and the materials that are available to you. If you are concerned about the spread of airborne illnesses, opt for a surgical mask or a fabric mask made from tightly woven fabric. If you are simply looking for a fashionable way to protect yourself from dust and pollen, a paper towel mask may be a good option.
- A pattern or template for the shape of your mask
- Fabric or other material for the exterior of the mask
- Lining fabric or paper towel for the interior of the mask
- Elastic or string for the ties or loops that go around your head
- Sewing machine or hand sewing needle and thread
Once you have your materials, you can begin the process of making your mask. Here are the steps you can follow:
- Cut out the exterior and interior pieces of your mask according to your pattern or template.
- Cut the elastic or string into two equal pieces that will be used to tie the mask around your head.
- Sew the exterior and interior pieces together along the edges, leaving the bottom open.
- Insert the lining fabric or paper towel into the mask, leaving a small opening at the top.
- Sew the bottom of the mask closed.
- Attach the elastic or string to the inside of the mask, positioning it so that it will go around your head when you wear the mask.
- Sew the elastic or string to the mask, ensuring that it is securely attached.
- Test your mask by wearing it and making sure it fits properly and is comfortable to wear.
Remember to wash your hands before and after handling your mask materials, and to clean your mask regularly to prevent the buildup of bacteria and germs.
Once you have all the materials, you can begin by cutting the fabric into the shape of the mask. The World Health Organization (WHO) recommends using a rectangular shape with a hanging loop at the top for the best fit and protection. To make the mask, simply fold the fabric in half lengthwise and cut out two rectangles. Then, sew the sides and bottom of each rectangle together to create a tube. Next, sew the two tubes together along the sides and top, leaving the bottom open. Finally, tie a knot and loop the hanging string through the knot to complete the mask.
If you prefer a more customized fit, you can use a cutting mat and pins to create a pattern that fits your face. Simply trace the shape of your face onto the cutting mat, then cut out the pattern using scissors. Then, use the pattern to cut out the fabric for your mask.
No matter which method you choose, make sure to wash your hands before and after handling the fabric to prevent contamination. And remember, the key to making an effective mask is to use high-quality materials and to follow the instructions carefully. With a little time and effort, you can create a stylish and protective mask that will keep you safe and looking great.
- 2 layers of 100% cotton fabric (at least 20 x 20 cm each)
- A pair of scissors (for cutting out the mask shape)
- A ruler or straight edge
- A mask pattern (you can find one online or create your own)
- A hair tie or elastic band for the ear loops
Once you have all the materials, you can start by laying out the two layers of fabric and cutting them to the same size and shape as your mask pattern. Make sure to leave an extra 1-2 cm around the edges for sewing.
Next, sew the two layers of fabric together along the sides and bottom, leaving the top open. This will form the main body of your mask.
To add the ear loops, place a hair tie or elastic band around the upper edge of each ear loop, then sew them onto the top of the mask.
Finally, you can add any personal touches to your mask, such as embroidery, sequins, or beads. This not only adds style but also provides additional protection by adding more layers to the mask.
With your mask complete, you can now wear it with confidence, knowing that you’ve created a stylish and effective barrier against harmful particles in the air.
To make your own mask, you will need a few simple materials. A cotton t-shirt or other lightweight, breathable fabric will serve as the base of your mask. You will also need some scissors or a craft knife to cut the fabric, as well as some thread or fabric glue to hold the pieces together. Additionally, you may want to include a filter layer in your mask to provide an extra layer of protection. A coffee filter or a layer of cheesecloth can be used for this purpose.
To begin, cut the t-shirt or other fabric into a rectangular shape that will cover your nose and mouth. The fabric should be doubled, with the edges aligned and the sides overlapping slightly. This will create a layer of fabric that is thicker and more durable than a single layer of fabric.
Once the fabric is cut, you can use scissors or a craft knife to cut a small hole in the center of the fabric. This hole should be large enough to fit your nose, but small enough to prevent the fabric from gaping open.
Adding a Filter Layer
If you choose to include a filter layer in your mask, you can do so by placing the coffee filter or cheesecloth between the two layers of fabric. This will provide an extra layer of protection against airborne particles.
To sew the mask, you can use a needle and thread to stitch the two sides of the fabric together around the edges. Alternatively, you can use fabric glue to hold the pieces together. Once the mask is sewn, you can trim any excess fabric or threads.
Wearing the Mask
To wear the mask, simply place it over your nose and mouth, and adjust the straps as needed to keep it in place. The mask should fit snugly over your face, but not so tightly that it is uncomfortable.
Customizing Your Mask
Finally, you can customize your mask by adding embellishments or patterns to the fabric. This can make your mask more stylish and personalized, while still providing the protection you need. You can add beads, sequins, or other decorative elements to the fabric, or you can use a fabric marker or paint to add patterns or designs.
Step 1: Cutting the Fabric
- Cut 2 rectangles of fabric that measure 10 inches by 6 inches.
- Cut a circle of fabric that measures 5 inches in diameter.
- Cut a small rectangle of fabric that measures 4 inches by 6 inches.
Step 2: Fusing the Interfacing
- Place the small rectangle of interfacing on one of the rectangles of fabric, aligning the edges.
- Place the other rectangle of interfacing on the other rectangle of fabric, aligning the edges.
- Using an iron set to medium heat, fuse the interfacing to the fabric by applying pressure with the iron for 10-15 seconds.
Step 3: Sewing the Mask Together
- Starting at the bottom hem, sew the 2 rectangles of fabric together along the sides and bottom.
- Stop sewing about 1 inch from the top of the mask.
- Insert the elastic or rubber band into the top hem of the mask, and sew the top closed.
- Sew the circle of fabric onto the center front of the mask, about 1/2 inch below the top edge.
- Sew the small rectangle of fabric onto the center back of the mask, aligning it with the top edge.
Step 4: Adding Filter Pocket
- Cut a rectangle of nylon mesh or other non-stretchy fabric that measures 4 inches by 6 inches.
- Place the rectangle of mesh onto the top of the mask, centered.
- Pin the mesh in place, then sew it onto the mask by sewing along the sides and bottom.
Step 5: Wearing Your Mask
- Slip the elastic or rubber band over your head, then tuck the mask’s sides into your ears.
- Tie the mask’s strings behind your head or neck.
-
Admire your handiwork and feel good knowing you are protecting yourself and others.
-
Pencil
-
Using the ruler, measure and mark the paper towels into 2 rectangles, each measuring 7.5 x 10.5 inches.
-
Cut the marked paper towels along the lines.
-
Measure and cut the cotton fabric into a rectangle, measuring 7.5 x 10.5 inches.
Step 4: Create the Mask
- Place one of the paper towel rectangles on top of the cotton fabric.
- Use the pencil to trace the shape of the paper towel onto the fabric.
- Cut the fabric along the traced lines.
- Take one of the paper towel rectangles and fold it in half vertically.
- Fold the bottom half of the paper towel up and over the top half, so that the two halves meet in the center.
- Apply glue to the top edge of the fabric mask and attach it to the folded paper towel.
- Tie the elastic string around the back of your head and wear your mask.
When making your own mask, it is important to choose the right materials to ensure both protection and style. There are several options to choose from, each with its own benefits and drawbacks.
- Cotton Fabric: Cotton fabric is a popular choice for homemade masks. It is breathable, washable, and comfortable to wear. However, it may not provide as much protection as other materials.
- Surgical Masks: Surgical masks are designed to protect against viruses and bacteria. They are disposable and can be easily replaced when soiled. However, they may not be as fashionable as other materials.
- N95 Respirators: N95 respirators are designed to filter out 95% of airborne particles. They are often used in industrial settings but can also be used for personal protection. They are disposable and should be replaced when soiled.
It is important to choose a material that is both effective and comfortable to wear. You may want to try different materials to find the one that works best for you.
Once you have chosen your materials, it is time to cut the mask. Most masks are made by cutting a rectangular piece of fabric and then folding it to create a triangle shape. This shape helps the mask fit snugly over the nose and mouth.
To cut the mask, simply lay the fabric out on a flat surface and cut a rectangular shape that is large enough to cover your face. Then, fold the rectangular shape in half vertically and cut along the fold to create a triangle shape. This will leave you with two identical triangle shapes, which can be worn on either side of the face.
After cutting the mask, it is important to add elastic to help it fit snugly over the face. Elastic can be added to the top and bottom of the mask to create a secure fit. Simply sew the elastic onto the mask using a sewing machine or by hand.
Once the mask is complete, you can personalize it to your liking. This can include adding decorative stitching, embellishments, or even painting designs onto the fabric. You can also choose to add filters to the mask to provide additional protection.
Creating your own mask is a fun and rewarding experience. It allows you to protect yourself while also expressing your personal style.
- Folded tissues: Using folded tissues as a filter can provide a simple and effective way to create a mask. Simply fold the tissue into a triangle and place it over your nose and mouth.
- Paper towels: Similar to folded tissues, paper towels can be used as a filter. However, they may not be as effective as tissues since they are thicker and may not allow as much airflow.
- N95 respirator masks: If you are looking for the highest level of protection, N95 respirator masks are the way to go. These masks are designed to filter out 95% of airborne particles, making them ideal for people who work in environments with high levels of pollution or who are at risk of exposure to infectious diseases.
Once you have chosen your materials, it’s time to start assembling your mask. In the next section, we’ll go over the steps for creating a simple mask using folded tissues.
- Filters: If you’re looking for added protection, consider adding a filter to your mask. Filters can be made from a variety of materials, including cotton, paper, or even old t-shirts. Look for filters that are at least two layers thick for maximum protection.
- Elastic: The elastic used to hold your mask in place is another important consideration. Look for elastic that is both comfortable and durable, and consider using a variety of colors to add a pop of style to your mask.
With these materials in hand, you’re ready to start crafting your own mask. Follow the steps below to create a stylish and protective mask that suits your needs.
- Cut the fabric: Using scissors or a craft knife, cut the fabric into the shape of your mask. Make sure to leave enough extra fabric around the edges to be able to sew it together later.
- Cut the filter: If you’re using a filter, cut it to the size of your mask. You can either use one large filter or several smaller ones.
- Sew the mask together: Using a sewing machine or by hand, sew the edges of the mask together, leaving an opening at the bottom for your face. If you’re using a filter, insert it between the layers of fabric before sewing.
- Add elastic: Sew elastic onto the top and bottom edges of the mask, leaving enough slack to be able to pull it over your head. If you’re using multiple layers of elastic, make sure they are all the same length.
- Iron the mask: Use an iron to smooth out any wrinkles in the mask.
- Try it on: Before wearing your mask, make sure it fits comfortably and doesn’t irritate your skin. If necessary, adjust the elastic or make any other adjustments to the fit.
With your mask complete, you’re ready to add your own personal style to your face covering while still staying protected. Whether you’re using basic materials or adding a filter for extra protection, your DIY mask will be a unique and personalized accessory that you can wear with pride.
- Cut out the mask pieces: Cut out two layers of cotton fabric that are the same size. The size will depend on your preference, but it should cover your nose and mouth and fit snugly around your face. If you want to add interfacing for extra support, cut out one layer of interfacing the same size as your cotton fabric.
- Iron the interfacing (if using): If you chose to use interfacing, iron it onto the wrong side of one of your cotton fabric layers. This will give your mask more structure and support.
- Sew the mask together: Use your sewing machine or hand needle and thread to sew the two cotton fabric layers together around the edges, leaving the top open. If you used interfacing, make sure to sew it in as well. If you prefer a more rustic look, you can also sew the mask by hand.
- Add elastic: Cut two pieces of elastic that are the same length and attach them to the top of your mask, securing them in place with a few stitches. This will keep your mask in place on your face.
- Test fit: Before you wear your mask, test fit it to make sure it’s the right size and comfortable to wear. You can also add additional details like filters or a filter pocket if you wish.
And that’s it! You’ve now made your own mask that not only provides protection, but also adds a touch of personal style to your outfit.
- Scraps: If you don’t have any fabric or surgical masks on hand, you can use scraps of fabric to make your mask. This is a great way to repurpose old clothing or fabric that you no longer need.
Once you have your materials, you can begin to create your mask. Follow the steps below to create a simple mask:
- Cut out the fabric: Cut out two rectangles of fabric that are the same size. The CDC recommends using rectangles that are at least 6 inches by 6 inches.
- Fold the fabric: Fold each rectangle in half to create a smaller rectangle.
- Pin the fabric: Pin the two rectangles together along the sides and bottom to create a triangle.
- Add elastic: Cut two pieces of elastic that are the same length. Attach one piece to each side of the mask, about 1 inch from the top.
- Wear your mask: Place the mask over your nose and mouth and secure it with the elastic.
With these simple steps, you can create a mask that is effective in protecting you from illness and style.
- Fabric: Look for tightly woven fabrics like cotton or polyester to help prevent the spread of droplets.
- Filter layer: A filter layer can be made from materials like HEPA filter material or coffee filters.
- Nose wire: A nose wire can be made from wire coat hangers or craft wire.
- Elastic: Elastic bands can be made from cotton or nylon elastic.
Once you have your materials, you can start assembling your mask. Here are the steps to follow:
- Cut out two identical rectangles of fabric, one for the outer layer and one for the inner layer.
- Cut out a filter layer that is slightly smaller than the rectangles.
- Place the filter layer between the two rectangles and secure them together using straight pins.
- Sew the edges of the rectangles together, leaving a small opening for the nose wire.
- Cut a piece of elastic to fit around the back of your head and attach it to the top of the mask.
- Insert a nose wire into the opening and sew it in place.
- Wash your hands and put on your mask.
Now that you have created your mask, it’s time to think about how you want to style it. Here are some tips for adding personal flair to your mask:
- Embellishments: Add buttons, sequins, or other decorations to your mask for a personal touch.
- Colors: Choose a color that reflects your personality or matches your outfit.
- Patterns: Consider using patterns like polka dots or stripes to add interest to your mask.
Remember, while you can have fun with the design of your mask, it’s important to prioritize function over fashion. Choose materials that offer effective protection and ensure that your mask fits securely over your nose and mouth.
When it comes to creating your own mask, the materials you choose are crucial to the effectiveness of your mask. The Centers for Disease Control and Prevention (CDC) recommends using materials that are breathable, easy to clean, and can be worn for an extended period of time. Some popular materials for homemade masks include:
- Cotton
- Cotton-flannel blend
- Surgical masks
- N95 respirator masks
It’s important to note that not all masks are created equal. According to a study published in the journal Aerosol Science and Technology, some commonly used materials for homemade masks, such as T-shirt material, are not effective at blocking virus particles. Therefore, it’s important to choose materials that have been proven to be effective at blocking virus particles.
Creating Your Mask
Once you have chosen your materials, it’s time to start creating your mask. Here is a step-by-step guide:
- Cut out two rectangular pieces of fabric. One will be the front of the mask, and the other will be the back. The front piece should be slightly larger than the back piece.
- Place the front and back pieces of fabric right sides together. Sew along the sides and bottom of the mask, leaving the top open.
- Cut a piece of elastic or ribbon to fit around your head. Attach it to the top of the mask, making sure it’s secure but not too tight.
- Place the mask on your face, with the front of the mask covering your mouth and nose. Tie the elastic or ribbon behind your head, making sure the mask is secure.
- Wash your hands before and after wearing the mask. Avoid touching your face while wearing the mask.
By following these steps, you can create a homemade mask that provides both protection and style.
To make your own mask, you will need a few simple materials. Depending on your preference, you can choose between a fabric mask or a mask made from paper. Both types of masks are effective in preventing the spread of viruses and bacteria.
Fabric Mask
A fabric mask is a versatile option that can be customized to fit your personal style. To make a fabric mask, you will need the following materials:
- 2 layers of cotton fabric
- Elastic ear loops or a headband
To make the mask, follow these steps:
- Cut out 2 rectangles of cotton fabric, each measuring 10 x 6 inches.
- Place the rectangles of fabric on top of each other, with the wrong sides facing out.
- Use a sewing machine or needle and thread to sew the edges of the rectangles together, leaving a small opening at the bottom.
- Turn the mask right side out and insert the elastic ear loops or headband.
- Use a needle and thread to close the opening at the bottom of the mask.
Paper Mask
A paper mask is a quick and easy option that can be used as a temporary solution. To make a paper mask, you will need the following materials:
- 1 sheet of A4 paper
-
Tape or glue
-
Cut out a rectangle of paper, measuring 8 x 6 inches.
- Fold the rectangle in half, creating a triangle.
- Use scissors to cut along the two edges of the triangle, from the top point to the bottom point.
- Fold the two top corners down to create a triangle shape.
- Use tape or glue to secure the mask to your face.
Regardless of which type of mask you choose to make, it is important to wear it properly. Make sure to cover your nose and mouth, and avoid touching the mask while wearing it. By following these simple steps, you can protect yourself and others from the spread of viruses and bacteria.
- Fabric: Choose a tightly woven fabric that is breathable but still provides a good seal around your face. Cotton, flannel, and linen are all good options.
- Filter material: A filter material is needed to prevent particles from getting through your mask. Common options include cotton batting, coffee filters, or a commercial filter insert.
- Nose wire: A nose wire can help your mask fit more closely to your face and prevent air from leaking out. It can be made from wire or stiff plastic.
- Elastic: Elastic is used to secure the mask around your head. Make sure it is thick and durable to ensure a secure fit.
Before you start cutting your materials, measure your face to determine the size of your mask. The mask should cover your nose, mouth, and chin, and fit snugly against your face. Cut out two identical pieces of fabric for the outside and lining of your mask. Then, cut out a smaller circle for the filter material.
Once you have your materials cut out, it’s time to assemble your mask. First, sew the two pieces of fabric together around the edges, leaving the top open. Then, insert your filter material and nose wire into the top opening. Finally, sew the top of the mask closed, leaving a small opening for your nose.
Trying on Your Mask
Before you start wearing your mask, try it on to make sure it fits properly and is comfortable. If it doesn’t fit well, you may need to adjust the size or shape of your mask. You can also add more layers of fabric or filter material to increase the effectiveness of your mask.
In addition to providing protection, your mask can also be a fashion statement. Choose fabrics and colors that match your outfit or personal style. You can also add embellishments like beads or ribbons to make your mask stand out.
- Elastic cord or ribbon for the ear loops
Once you have your materials, you can begin the mask-making process by following these steps:
- Cut the fabric: Measure the length and width of your mask, using the ruler or measuring tape. Cut the two layers of fabric to the desired size.
- Hem the edges: To prevent fraying, hem the edges of the fabric by folding them twice and sewing them in place.
- Sew the layers together: Use a sewing machine or by hand, sew the two layers of fabric together along the sides and bottom.
- Add the elastic cord: Insert the elastic cord into the top hem of the mask, attaching it to the fabric with a few stitches. This will ensure that the mask fits snugly around your ears.
-
Optional embellishments: If desired, you can add embellishments such as buttons, lace, or beads to give your mask a personal touch.
-
Cut the fabric: Cut two layers of 100% cotton fabric to the same size. If you want to add interfacing for extra stiffness, cut one layer of interfacing to the same size as the fabric layers.
- Iron the interfacing (if using): If you’re using interfacing, iron it onto one of the fabric layers. This will give the mask more structure.
- Sew the fabric layers together: Use a sewing machine or by hand, sew the two fabric layers together along the edges. If you’re using interfacing, make sure to sew it in as well.
- Cut out the mask shape: Use scissors or fabric shears to cut out the mask shape. You can use a template or freehand it. The mask should cover your nose and mouth, and fit snugly around your face.
- Add elastic: Cut two pieces of elastic to the same length. Sew one piece onto the top of the mask, and the other piece onto the bottom. This will create a loop that you can slip over your head to keep the mask in place.
- Add filters (optional): If you want to add filters to your mask, you can use a layer of fine mesh or nylon screen. Cut it to the same size as the mask, and sew it onto the inside of the mask, between the two layers of fabric.
- Mark and cut the filter slots: Use a marker or pen to mark where the filter slots will be. Then, use scissors or fabric shears to cut the slots out. Make sure they’re big enough for the filters to fit through.
- Hem the edges: Use scissors or pinking shears to hem the edges of the mask. This will prevent fraying and give the mask a finished look.
- Test fit: Put on the mask and make sure it fits snugly over your nose and mouth. If it’s too loose, you can add more elastic or use a different size mask.
And that’s it! You’ve now made your own mask. With a little creativity and some basic sewing skills, you can create a mask that not only protects you, but also adds a touch of style to your outfit.
- Fabric: Look for tightly woven fabrics like cotton or polyester to help filter out particles in the air. Thicker fabrics like denim or fleece can also be effective, but may be more difficult to breathe through.
- Filter: Consider adding a filter to your mask for added protection. Filters can be made from materials like activated carbon or HEPA filters, which can trap smaller particles in the air.
- Elastic: Use elastic or rubber bands to hold your mask in place. Be sure to choose materials that are comfortable and won’t cause irritation on your skin.
-
Style: Choose materials that match your personal style and preferences. You can make your mask more fun and creative by adding decorative elements like beads or ribbons.
-
Filtering ability: The materials you choose should be able to filter out particles in the air, which is the main purpose of wearing a mask. Different materials have different filtering abilities, so it’s important to choose ones that are effective at filtering out particles.
Here are some materials that are commonly used for making masks:
- Cotton: Cotton is a popular choice for mask-making because it’s breathable and easy to work with. It’s also a durable material that can be washed and reused multiple times.
- Polyester: Polyester is another popular choice for mask-making because it’s also breathable and durable. It’s also easy to sew with, making it a good choice for beginners.
- Nylon: Nylon is a strong and durable material that’s often used for outdoor activities like hiking and camping. It’s also a good choice for mask-making because it’s breathable and can be washed and reused multiple times.
- Fleece: Fleece is a soft and warm material that’s often used for clothing. It’s also a good choice for mask-making because it’s breathable and can be used to make masks with a fluffy, cloud-like appearance.
By choosing the right materials for your mask, you can ensure that it’s effective at filtering out particles in the air while also being comfortable to wear.
Cloth
Cloth masks can be made from a variety of materials, including cotton, silk, and flannel. These masks are generally more durable than cotton masks and can be washed and reused. However, they may not provide as much protection as surgical masks.
When choosing materials for your mask, consider your priorities. If you prioritize comfort and affordability, cotton may be the best choice for you. If you prioritize protection, surgical masks or cloth masks made from thicker materials may be a better option.
- A face mask pattern or template
- Fabric (cotton, flannel, or other breathable material)
- Optional: additional materials for decoration or added functionality (such as filters or a nose wire)
Once you have your materials, you can begin the process of making your mask. The steps will vary depending on the type of mask you are making, but the general process is as follows:
- Cut out the face mask pattern or template from the fabric.
- Use the sewing machine or needle and thread to sew the sides of the mask together, leaving the top open.
- Use scissors to cut a small hole in the top of the mask for your nose.
- Optional: add additional materials for decoration or added functionality.
- Put on the mask and make sure it fits properly.
- Repeat the process for any additional masks you want to make.
By following these steps, you can create a homemade mask that provides protection and style. Whether you’re looking to make a functional mask for everyday use or a decorative mask for a special occasion, this guide will help you create a mask that is both effective and fashionable.
- Elastic bands or strings for the mask’s ear loops
- A ruler or a straight edge
- A pen or a marker
Before you start making your mask, it is important to understand the recommended size and shape of the mask. The mask should cover your nose and mouth, and it should fit snugly against your face. You can use a ruler or a straight edge to measure the size of the mask, and you can use a pen or a marker to draw the outline of the mask on the fabric.
To make the mask, you will need to cut out the outer layer of the mask from one of the pieces of fabric. You can use the ruler or the straight edge to cut out the mask, and you can use the scissors to cut around the edges of the mask.
Next, you will need to cut out the inner layer of the mask from the other piece of fabric. You can use the same method as before to cut out the inner layer of the mask.
Once you have cut out both layers of the mask, you can take the outer layer of the mask and place it on a flat surface. You can then use the pen or the marker to draw the outline of the mask on the inner layer of the mask.
After you have drawn the outline of the mask on the inner layer of the mask, you can cut out the inner layer of the mask using the same method as before.
Now that you have both layers of the mask, you can take the outer layer of the mask and place it on top of the inner layer of the mask. You can then use the scissors to cut along the edges of the mask, leaving a small border around the edges of the mask.
Next, you can take the ear loops of the mask and tie them behind your ears. The mask should fit snugly against your face, covering your nose and mouth.
That’s it! You have now made your own mask. Remember to wash your hands before and after making the mask, and make sure to wear the mask when you are in public or around other people.
Cotton is a popular choice for mask-making because it is soft, breathable, and widely available. However, it is not as effective at blocking particles as other materials, such as cotton-flannel blends or melt-blown fabric.
Cotton-Flannel Blends
Cotton-flannel blends offer a good balance between breathability and particle blocking. They are also warm and comfortable to wear, making them a good choice for colder weather.
Melt-Blown Fabric
Melt-blown fabric is a non-woven material that is specifically designed to filter out particles. It is often used in medical masks and is highly effective at blocking viruses and other pathogens. However, it can be more expensive than other materials and may not be as comfortable to wear.
When choosing materials for your mask, consider the following factors:
- Effectiveness: How well does the material block particles? This is especially important if you are making a mask to protect yourself or others from viruses or other pathogens.
- Breathability: How easy is it to breathe through the material? A mask that is too dense or tight can be uncomfortable to wear, while a mask that is too loose may not be effective.
- Comfort: How comfortable is the material to wear? A mask that is uncomfortable or irritating to wear may not be worn consistently, reducing its effectiveness.
Before you start making your mask, it’s important to gather the necessary materials. You will need two pieces of cloth, a pair of scissors, a needle, and thread. You can also add elastic to the sides of the mask to make it easier to wear.
To begin, cut one of the pieces of cloth into a rectangular shape that will cover your face. The other piece of cloth can be used to create ties for the mask.
Next, take the needle and thread and sew the two pieces of cloth together along the sides. This will create a tube that will fit over your face.
Once you have finished sewing the sides, you can add elastic to the top of the mask. This will help the mask stay in place on your face.
Now that your mask is complete, you can wear it to protect yourself and others from the spread of germs. You can also add personal style to your mask by adding decorations or choosing a color that matches your outfit.
Remember to wash your mask regularly to prevent the spread of germs.
- Cotton: This is a lightweight, breathable fabric that is great for hot weather or for people who want a more relaxed fit.
- Flannel: This is a warm, cozy fabric that is perfect for colder weather. It can also be a good choice for people who want a tighter fit around their face.
- Polyester: This is a durable, moisture-wicking fabric that is great for people who want a mask that will last a long time.
Another important consideration when choosing materials for your mask is the type of filter you will use. Filters can help to prevent the spread of germs and other particles, and they can also help to protect you from allergens and other irritants. Some popular options include:
The shape of your mask can also affect its effectiveness and style. Some popular shapes include:
- Rectangular: This is a simple, classic shape that is great for people who want a more traditional look.
- Triangular: This is a fun, playful shape that is perfect for people who want a mask that stands out.
- Circular: This is a trendy, modern shape that is great for people who want a mask that is both stylish and functional.
Size
The size of your mask can also affect its effectiveness and style. Some popular sizes include:
- Small: This is a compact, discreet size that is great for people who want a mask that is easy to carry around.
- Medium: This is a versatile size that is perfect for people who want a mask that can be worn in a variety of settings.
- Large: This is a spacious, comfortable size that is great for people who want a mask that is perfect for wearing all day.
Once you have chosen the materials for your mask, it’s time to start assembling it. Here are the steps you can follow to create your own mask:
- Cut out the fabric for your mask according to the pattern you have chosen.
- Add the filter material to the center of the mask, if desired.
- Sew the edges of the mask together, using a sewing machine or by hand.
- Add any additional features, such as strings for tying the mask behind your head, if desired.
- Try on the mask to make sure it fits comfortably and securely.
By following these steps, you can create a custom, DIY mask that provides both protection and style.
- Sewing machine or hand sewing needles and thread
- Optional: filter fabric, elastic or ribbon for ties, or decorative embellishments
Here are the steps to make your own mask:
- Cut the fabric: Measure and cut out two layers of fabric, using a cutting mat or ruler to ensure they are the same size. The recommended size for a mask is approximately 7 inches by 4 inches.
- Sew the layers together: Using a sewing machine or hand sewing needles and thread, sew the two layers of fabric together along the edges, leaving the top and bottom raw edges open.
- Add filter fabric (optional): If desired, add a layer of filter fabric between the two layers of cotton fabric. This can help add an extra layer of protection.
- Attach ties (optional): If you plan to wear your mask around your neck when not in use, attach some elastic or ribbon to the top of the mask for easy handling.
- Decorate (optional): If you want to add some personal style to your mask, you can use decorative embellishments such as beads, buttons, or lace.
-
Wear and wash: Once your mask is complete, wear it when you need to, and wash it regularly to maintain its effectiveness.
-
Use the cardstock to trace the shape of your face, starting at the top of your forehead and tracing down to the bottom of your chin.
- Place the paper towel inside the cardstock shape and trace around it with the pencil, leaving a border of about 1 cm.
- Cut out the paper towel shape using the scissors.
Step 3: Decorate Your Mask
- Use markers or colored pencils to decorate your mask with patterns or designs.
- Cut out any extra pieces of paper towel that stick out from the sides of the mask.
Step 4: Fold and Secure Your Mask
- Fold the cardstock in half, so that it forms a triangle.
- Fold the paper towel in half, so that it forms a triangle.
- Place the cardstock triangle on top of the paper towel triangle, aligning the edges.
- Use the ruler to measure and mark the spots where the straps will go.
- Use the scissors to cut the straps out of the extra paper towel.
- Fold the straps in half and secure them to the back of your head using bobby pins or hair ties.
Now that you have created your mask, you can wear it to protect yourself and others from the spread of germs. Remember to wash your hands before and after handling the mask, and to dispose of it properly after use. You can also use this opportunity to express your style and creativity by decorating your mask with unique designs and patterns.
- Measuring tape or ruler
Once you have all the materials, you can start making your mask. Here are the steps:
- Cut out two rectangles of cotton fabric, each measuring 10 inches by 6 inches. If you want to add interfacing for extra stiffness, cut out a third rectangle that is 10 inches by 6 inches.
- Place the two rectangles of cotton fabric on top of each other, with the right sides facing out. Sew along the sides and bottom of the rectangles, leaving the top open.
- Cut out a circle of cotton fabric that is slightly larger than the hole you just created. This will be the center of your mask.
- If you’re using interfacing, place it between the two layers of cotton fabric and sew around the edges.
- Sew the center circle to the top of the mask, using a sewing machine or by hand.
- Sew on some bias tape or a fabric border to finish the edges and give your mask a professional look.
That’s it! You now have a homemade mask that is both stylish and functional.
- Cut out the pieces for your mask. You’ll need to cut out two layers of cotton fabric in the shape of a rectangle, with the measurements of 8 inches by 8 inches. You’ll also need to cut out one layer of interfacing in the same shape and size.
- Hem the edges of the cotton fabric. To do this, fold the edges of the fabric twice and sew them in place. This will help prevent fraying and give your mask a finished look.
- Attach the interfacing to one of the layers of cotton fabric. To do this, iron the interfacing onto the wrong side of the cotton fabric, following the manufacturer’s instructions. This will add stability and structure to your mask.
- Sew the layers of the mask together. You can either sew the layers together by hand or use a sewing machine. If you’re using a sewing machine, make sure to use a needle that’s suitable for cotton fabric.
- Add elastic to the mask. To do this, cut two pieces of elastic that are 22 inches long. Sew one end of each piece of elastic to the top of the mask, positioning them 4 inches apart. This will create a loop that you can slip over your head to keep the mask in place.
- Try on your mask and make any necessary adjustments. Once you’ve finished sewing your mask, try it on to make sure it fits properly and is comfortable to wear. If you need to make any adjustments, you can trim the elastic or adjust the shape of the mask.
By following these steps, you’ll be able to create a DIY mask that provides both protection and style. Whether you’re using it to prevent the spread of illness or to make a fashion statement, your homemade mask will be a practical and personalized accessory.
- Fabric: A variety of fabrics can be used to make masks, including cotton, linen, and silk. These materials are breathable, washable, and comfortable to wear.
- Surgical masks: These masks are disposable and designed for single use. They are effective at filtering out airborne particles and are widely available.
- Cotton balls: Cotton balls can be used as a filter layer in homemade masks. They are soft and gentle on the skin, but may not provide as much protection as other materials.
- N95 respirator masks: These masks are designed to filter out 95% of airborne particles. They are more effective at protecting against viruses and other particles than other masks, but may be less comfortable to wear.
It is important to note that no mask can provide 100% protection against viruses and other particles. However, wearing a mask can significantly reduce the risk of transmission and is an important part of preventing the spread of infectious diseases.
Once you have chosen your materials, it is time to cut the mask. Follow these steps:
- Measure the dimensions of the mask according to the materials you have chosen.
- Cut out two identical pieces of fabric for the outer layers of the mask.
- Cut out one piece of cotton balls or other filter material for the middle layer.
- Cut out two pieces of elastic or ribbon for the ear loops.
Once you have cut out the pieces for your mask, it is time to assemble it. Follow these steps:
- Place the filter material in the middle of one of the outer layers.
- Place the outer layer with the filter material on top of the other outer layer, with the filter material in the middle.
- Tie the ear loops around your ears.
- Adjust the mask as needed for comfort and fit.
It is recommended to pre-wash and pre-shrink your fabric before beginning. This will ensure that your mask is the correct size and fits properly. To do this, simply wash the fabric according to the care instructions and let it dry before proceeding.
To begin, measure and cut out the pieces for your mask. You will need two layers of cotton fabric that are the same size, as well as one layer of interfacing. The dimensions of the mask will depend on your personal preference and the size of the fabric you have available. However, a common size for a mask is 7.5 inches by 4.5 inches.
Once you have your pieces cut out, it’s time to assemble your mask. First, place the interfacing on top of one of the cotton layers, making sure to align the edges. Then, using a rotary cutter or X-Acto knife, cut around the edges of the interfacing to create a sewn edge.
Next, using a sewing machine or needle and thread, sew the interfacing onto the cotton layer. Be sure to sew along the entire edge of the interfacing, leaving a small opening at the bottom for turning.
Once the interfacing is attached, turn the mask right side out by inserting your hand into the opening and gently pressing the fabric outward. Use pins to secure the edges and prevent them from unraveling.
Finally, use a needle and thread to sew the opening closed. You can also add additional features to your mask, such as a filter pocket or adjustable straps, depending on your personal preference.
When it comes to creating your own mask, the materials you choose are crucial to the effectiveness of your mask. The Centers for Disease Control and Prevention (CDC) recommends using materials that are breathable, easy to clean, and durable. Some popular materials for homemade masks include:
- Sewing patterns
- Elastic ear loops or rubber bands
It’s important to note that while any fabric can technically be used to make a mask, certain materials may not be as effective at blocking particles. For example, loosely woven fabric like silk or lace may not provide as much protection as tighter woven materials like cotton or flannel.
Additionally, when selecting materials for your mask, it’s important to consider the size of the fabric. Masks should be large enough to cover both the nose and mouth, but not so large that they become cumbersome to wear. A good rule of thumb is to cut the fabric to fit your face and then add an extra inch or two for comfort.
Measuring and Cutting Your Mask Material
Once you’ve selected your materials, it’s time to start cutting. The CDC recommends cutting your mask material into a rectangle that is at least 6 inches by 6 inches. This will give you enough fabric to cover your nose and mouth while still being able to breathe comfortably.
To cut your material, simply lay it out on a flat surface and use a ruler or measuring tape to mark the desired dimensions. Then, use scissors or a craft knife to cut along the marked lines.
If you’re using elastic ear loops or rubber bands, you’ll want to cut these to the desired length as well. A good rule of thumb is to measure the distance from the top of your ears to the center of your head and cut the elastic to that length.
Now that you have your mask material and ear loops or rubber bands, it’s time to assemble your mask. Start by laying the material out flat and placing the ear loops or rubber bands on either side of the mask.
Next, fold the mask in half so that the ear loops or rubber bands are on the outside of the fold. Then, bring the edges of the mask up to meet the ear loops or rubber bands and secure them in place with a few stitches.
Finally, try on your mask to make sure it fits properly and is comfortable to wear. If you notice any gaps around the edges of the mask, you may need to adjust the size or try a different material.
By following these steps, you can create a mask that not only provides protection but also adds a touch of personal style to your outfit.
- Choose your fabric: Select two layers of breathable fabric that you will use to make your mask. Common materials include 100% cotton, silk, or chiffon.
- Cut the fabric: Cut both layers of fabric into the shape of the mask you want to make. The standard shape for a mask is rectangular with rounded edges.
- Prepare the fabric: Iron the fabric to remove any wrinkles and to make it easier to sew.
- Sew the mask: Using a sewing machine or by hand, sew the two layers of fabric together along the edges of the mask.
- Add elastic: Sew a strip of elastic to the top of the mask so that it can be worn over the head.
- Finish the edges: Hem the edges of the mask to prevent fraying.
- Clean the mask: Wash the mask in cold water and let it air dry before wearing it.
With these simple steps, you can create a functional and stylish mask that provides protection against COVID-19 and other respiratory illnesses.
- Using the ruler, measure 1 inch from the top and bottom edges of the paper towel and make a mark.
- Connect the marks with a line using the pencil.
- Cut along the line to create a rectangle that is 6 inches by 10 inches.
- Fold the cardstock in half, making sure the fold is parallel to the shorter side.
- Place the rectangle on the folded cardstock, aligning the top edge with the fold.
- Trace around the rectangle onto the cardstock, making sure to extend the lines 1 inch beyond the rectangle on each side.
-
Cut out the shape using scissors.
-
Fold the mask in half, along the line that was traced onto the cardstock.
- Place the mask on your face, adjusting the straps as needed to fit comfortably.
-
When you’re finished wearing the mask, dispose of it properly.
-
Optional: elastic ear loops or ties for a secure fit
Here are the steps to create your own mask:
- Cut the fabric: Cut two rectangles of fabric, each measuring approximately 7.5 x 5 inches (19 x 13 cm).
- Fold and hem the fabric: Fold each rectangle in half along the shorter side, then fold the edges of the rectangle in towards the fold by about 1/4 inch (0.5 cm) twice. This will create a clean edge and prevent fraying.
- Sew the sides: Use your needle and thread to sew the sides of the rectangle together, leaving the top open. Be sure to sew along the folded edge, so that the stitching forms an “X” shape.
- Insert filter layer (optional): If you want to add a filter layer to your mask, cut a rectangle of non-woven fabric or a cotton tee shirt, slightly larger than the rectangle you just sewed. Insert this layer between the two cotton rectangles.
- Add elastic loops (optional): To add elastic loops to your mask, sew them onto the top edges of the rectangle before attaching the filter layer. This will allow the mask to fit securely around your ears.
- Assemble the mask: Once you have completed the previous steps, you can assemble your mask by bringing the two rectangles together and attaching them at the top edges. Be sure to insert the filter layer if you added one, and adjust the fit of the mask as needed.
That’s it! You have now created your own mask using simple materials and a few basic sewing skills. Remember to wash your mask regularly and replace it when it becomes dirty or damaged.
When making your own mask, it is important to choose the right materials to ensure both protection and style. The Centers for Disease Control and Prevention (CDC) recommends using masks made of breathable, water-resistant fabric, such as cotton or linen, with multiple layers of fabric for added protection. It is also important to choose a mask that fits well over your nose and mouth, without gaps, to prevent the spread of germs.
To begin, measure the dimensions of your face, taking into account the area that will be covered by the mask. Cut out the fabric according to these measurements, making sure to allow for extra material around the edges for a snug fit. You can also choose to add elastic loops or ties to the mask to ensure a secure fit.
Adding a Filter
Consider adding a filter to your mask for added protection. You can use a piece of fine mesh or a cotton filter, which can be made by layering several sheets of cotton together. This will help to trap any small particles or droplets that may be released when you breathe.
Finally, you can add your own personal touch to your mask by decorating it with fabric paint, beads, or other embellishments. This can not only make your mask more stylish, but it can also add a fun and creative element to your DIY project. Just be sure to avoid using any materials that may interfere with the mask’s ability to filter particles, such as glitter or other small materials.
Before you start making your mask, it’s important to gather the necessary materials. You will need two pieces of fabric, a pair of scissors, a needle, and thread. You may also want to add some elastic or ribbon to the mask to make it easier to wear.
Once you have gathered your materials, you can begin by cutting out two rectangles of fabric. One rectangle will be used for the front of the mask, and the other will be used for the back. The front rectangle should be slightly larger than the back rectangle.
Next, you will need to sew the two rectangles together along the sides and bottom, leaving the top open. This will form a tube that you can then insert your needle and thread through to create the strings for tying the mask around your head.
Once you have completed the basic construction of the mask, you can add any additional features you desire. This might include adding layers of fabric for extra protection, or adding decorative elements such as beads or sequins.
Finally, you can attach the elastic or ribbon to the mask, which will allow you to tie it securely around your head. With your mask complete, you can now use it to protect yourself and express your personal style.
- Optional: embellishments (such as ribbon, buttons, or lace)
To begin, place the interfacing on top of one of the layers of cotton fabric, and place the other layer of cotton fabric on top of the interfacing. Pin the layers together along the edges, leaving the top edge open.
Sew the layers together along the edges, using a straight stitch or serger. Leave the top edge open.
Next, press the seam allowances towards the interfacing using your iron. This will help the mask keep its shape and provide a smooth surface for embellishments.
If you wish to add embellishments, such as ribbon or lace, do so at this time.
Finally, cut the top edge of the mask to your desired length, and tie it behind your head using a bow or ties.
With just a few simple materials and some basic sewing skills, you can create a custom mask that not only provides protection, but also adds a touch of personal style to your outfit.
When making your own mask, it is important to choose the right materials to ensure both protection and style. Some popular materials for homemade masks include:
- Cotton Fabric: Cotton is a soft, breathable fabric that is also durable and easy to work with. It is a great option for those who want a comfortable, stylish mask that still provides adequate protection.
- Scarves: Scarves are a quick and easy option for those who want a simple, no-sew mask. They can be made from a variety of materials, including cotton, silk, and linen.
- Old T-Shirts: Old t-shirts can be cut up and repurposed to make masks. They are soft and comfortable, and can be easily washed and reused.
- Fashion Fabric: For those who want to make a more fashionable statement, fashion fabric can be used to create unique and colorful masks. This can include materials like lace, sequins, and metallic thread.
It is important to note that while any of these materials can be used to make a mask, they may not all provide the same level of protection. It is important to consider the material’s breathability, thickness, and ability to filter out particles when choosing which material to use.
Sizing and Shaping Your Mask
Once you have chosen your materials, it is time to start cutting and shaping your mask. When sizing your mask, it is important to consider the size of your face and the length of the elastic band. A mask that is too small may be uncomfortable to wear, while a mask that is too large may not fit snugly around your face.
When shaping your mask, it is important to ensure that it covers your nose and mouth completely. You can do this by folding the fabric or by using a template to cut out the shape of your mask. It is also important to ensure that the mask has a flat surface that fits against your face, rather than a bunched-up or wrinkled surface.
Adding an Elastic Band
Most masks will require an elastic band to keep them in place on your face. This can be made from a variety of materials, including cotton rope, ribbon, or even rubber bands. To add an elastic band to your mask, simply sew it onto the edges of the mask, making sure it is long enough to go around your head comfortably.
By following these steps, you can create a mask that not only protects you from harmful particles, but also adds a touch of style to your outfit.
- Elastic or ribbon for the ties
Once you have your materials, you can start making your mask. Here’s a step-by-step guide:
- Cut out two rectangles of fabric, each measuring approximately 7″ by 4″.
- Place the two rectangles together, with the right sides facing each other.
- Sew around the edges of the rectangles, leaving a small opening at the bottom.
- Turn the mask right-side out through the opening, and press it flat.
- Add elastic or ribbon to the top of the mask, securing it in place.
- Tie the elastic or ribbon behind your head, securing the mask in place.
That’s it! You now have a homemade mask that you can wear to protect yourself and others from COVID-19.
Once you have all the materials, you can start by cutting out the two layers of fabric. The outside layer should be slightly larger than the lining layer. You can then sew the two layers together along the edges, leaving the top open. Next, use the hair elastics or rubber bands to create the loops for your ears. Finally, use the pins or masking tape to shape the mask and ensure it fits snugly on your face.
- Fabric: Look for tightly woven fabrics like cotton or polyester, which will help prevent droplets from passing through. Avoid loosely woven fabrics like lace or mesh, which can allow droplets to pass through.
- Fit: The fit of your mask is crucial for maximum protection. Make sure your mask fits snugly over your nose and mouth, with no gaps. You can try wearing a mask with a filter or an exhalation valve to see if it feels more comfortable.
- Filters: If you want to add an extra layer of protection, consider using a filter with your mask. You can find filters that are specifically designed for masks, or you can use a coffee filter or other fine-mesh filter.
- Style: If you’re looking to make a statement with your mask, consider using fun fabrics or patterns. You can also add embellishments like beads or sequins to add some flair to your mask.
Once you’ve chosen your materials, it’s time to start creating your mask. Here’s a step-by-step guide:
- Cut out two pieces of fabric, one for the top of the mask and one for the bottom. The top piece should be slightly larger than the bottom piece, so that it can be folded over and secured around the edges.
- Place the two pieces of fabric right sides together and sew along the edges, leaving the top edge open.
- Cut out a circle of filter fabric (if using) and place it over the top hole of the mask. Sew around the edges of the filter to secure it in place.
- Place elastic or ribbon around the back of your head, just above your ears. Attach the ends of the elastic to the top edges of the mask, creating a loop that goes over your ears.
- Slip the mask over your head and adjust it so that it fits snugly over your nose and mouth. You can trim any excess fabric or filter as needed.
Repeat these steps for the second mask, if needed. And there you have it! You’ve just made your own mask that offers both protection and style.
-
Optional: fabric paint, sequins, beads, or other embellishments
-
Cut the fabric: Cut two identical layers of fabric to the same size. A standard size is about 8 inches by 8 inches, but you can adjust the size based on your face shape and preference.
- Hem the edges: Fold the edges of the fabric twice and sew or glue them in place to prevent fraying.
- Sew the layers together: Use a needle and thread or fabric glue to attach the two layers of fabric together along the edges. Make sure to leave an opening for your face.
- Add ear loops or a nose wire: Choose either elastic ear loops or a metal nose wire to hold the mask in place. If using ear loops, sew them onto the top edges of the mask. If using a nose wire, sew it onto the inside of the mask, and then bend it into a U-shape to fit over your nose.
- Add embellishments (optional): If desired, add some personality to your mask by using fabric paint, sequins, beads, or other embellishments. Let your creativity shine!
- Put it on: Once your mask is complete, put it on and make sure it fits snugly over your nose and mouth. You can adjust the ear loops or nose wire for a more comfortable fit.
With your homemade mask, you’ll not only be protecting yourself and others from harmful particles, but you’ll also be adding a touch of personal style to your face covering.
- 2 layers of 100% cotton fabric (you can use any other breathable fabric as well)
- 1 layer of non-woven fabric (this is the layer that will come in contact with your skin)
-
A needle and thread (optional, if you want to add a nose wire)
-
Lay the non-woven fabric on a flat surface, with the shiny side up.
- Place one of the cotton layers on top of the non-woven fabric, with the wrong side facing up.
- Pin the edges of the cotton layer to the non-woven fabric, making sure they are aligned.
- Sew the edges of the cotton layer to the non-woven fabric using a sewing machine or by hand.
- Cut out the excess fabric around the edges, leaving a small border around the sides and bottom.
- Fold the top edge of the mask down and press it in place.
- Insert a nose wire (optional) and secure it to the sides of the mask.
- Wear your mask and enjoy the protection and style it offers!
It’s important to note that while homemade masks can provide some protection against COVID-19, they may not be as effective as medical-grade masks. However, wearing any mask is better than wearing no mask at all. So, if you’re unable to get a medical-grade mask, making your own is a great alternative.
- If you’re using elastic ear loops, thread them through the mask’s top corners and tie them in a knot behind your head. If you’re using a metal nose wire, bend it into an “L” shape and attach it to the top of the mask.
- If you want to add a filter pocket to your mask, cut a small rectangle out of the non-fabric side of one of the layers. This will allow you to insert a filter (such as a coffee filter or vacuum bag) between the two layers of fabric.
- Use a marker or fabric pen to write your name on the mask, so you don’t forget which one is yours.
- Put on your mask and make sure it fits snugly over your nose and mouth. If it doesn’t, try adjusting the ear loops or nose wire.
By following these steps, you’ll be able to create a customized mask that provides both protection and style.
- Cut out two layers of 100% cotton fabric to the desired size. The Centers for Disease Control and Prevention (CDC) recommends a mask size of at least 6 inches by 6 inches.
- Sew the two layers of fabric together along the edges, leaving the top and bottom unsewn. This will create a tube for your mask.
- If you’re using elastic ear loops, attach them to the top of the mask by sewing them onto the fabric. If you’re using a metal nose wire, insert it into the top of the mask and sew it in place.
- If you want to add some personal style to your mask, you can use fabric markers or paint to add designs or patterns.
-
Once you’ve finished creating your mask, wear it and practice wearing it to make sure it’s comfortable and secure.
-
1 layer of non-woven fabric (cut to the desired size)
- 4 hair ties or rubber bands
-
2 pieces of cardboard or stiff paper (cut to the desired size)
-
Cut the 2 layers of cotton fabric to the desired size. The fabric should be large enough to cover your nose and mouth and fit snugly around your face.
- Cut the non-woven fabric to the same size as the cotton fabric. This layer will be the inner layer of the mask.
- Place the non-woven fabric on top of the cotton fabric and secure it with hair ties or rubber bands. This will help the cotton fabric conform to the shape of your face.
- Place the cardboard or stiff paper on top of the mask and trace around it with a marker or pen. This will create a stencil for cutting out the mask.
- Cut out the mask using scissors, following the traced outline.
- If you have a sewing machine, you can use it to sew the edges of the mask together. Alternatively, you can use needle and thread to sew the edges by hand.
- Once the mask is sewn, you can add any desired embellishments, such as decorative stitching or fabric paint.
That’s it! You now have a homemade mask that provides protection and style.
Flannel is another popular choice for mask-making, as it is warm and cozy, and can be layered for added protection. However, it is also prone to absorbing moisture, which can make it less comfortable to wear over time.
Surgical masks are designed to be disposable, and are made from a non-woven fabric that is effective at blocking particles. However, they are not as comfortable to wear as cloth masks, and can be more difficult to breathe through.
Filter paper is a thin, porous material that is effective at blocking particles. However, it is not as comfortable to wear as cloth or flannel, and can be difficult to shape into a mask.
Finding the Right Materials for You
When choosing materials for your mask, consider your personal preferences and needs. If you prioritize comfort and breathability, cotton or flannel may be the best choice for you. If you prioritize protection, surgical masks or filter paper may be more effective. It’s also a good idea to experiment with different materials to find the best combination for your needs.
- A piece of cloth or other material that can be used as the mask itself
- String or ribbon to tie the mask around your head
- Scissors or a craft knife to cut the material to size
-
A needle and thread (optional) if you want to add decorative stitching
-
Cut out a rectangle of material that is large enough to cover your face and ties. You can use scissors or a craft knife to cut the material to size.
- Hem the edges of the material by folding them twice and sewing them in place. This will prevent fraying and make your mask more durable.
- Tie the mask around your head using string or ribbon. You can tie it behind your head or under your chin, depending on your preference.
- If you want to add decorative stitching, use a needle and thread to sew designs onto the mask. You can also add beads, buttons, or other embellishments to make your mask more unique.
By following these steps, you can create a customized mask that not only provides protection but also adds a touch of style to your outfit.
- 1 layer of non-woven fabric (such as interfacing or fusible fleece)
- Cutting mat and ruler (optional)
You can choose any design or pattern that you like, or simply create a simple mask with rectangular pieces. To create a mask with a filter pocket, you will also need to include a layer of tissue paper or a non-woven fabric layer in the filter pocket.
To begin, place the non-woven fabric layer on top of one of the cotton layers. This layer will serve as the middle layer of the mask and help with filtering. Then, sew the two cotton layers together along the sides and bottom, leaving the top open.
Next, place the elastic bands around your head and mark where you want the mask to sit on your face. Use this as a guide to mark where the top of the mask should be. Sew the top of the mask closed, making sure to leave a small opening for your nose.
If you are adding a filter pocket, sew the non-woven fabric layer to the inside of the mask, placing it over the top of the cotton layer. Then, cut a piece of tissue paper or non-woven fabric to fit inside the pocket. This layer will help with filtering and can be replaced as needed.
Once your mask is complete, you can add any personal touches you like, such as ribbons or buttons. And that’s it! You now have a custom-made mask that not only provides protection, but also adds a touch of style to your outfit.
When it comes to creating your own mask, the materials you choose are crucial to the effectiveness of your mask. The Centers for Disease Control and Prevention (CDC) recommends using materials that are breathable, easy to breathe through, and tight-fitting.
Here are some options for materials that you can use to make your mask:
- Cotton Fabric: Cotton is a great option for your mask because it is breathable and comfortable to wear. It is also a readily available material that is easy to work with.
- Surgical Masks: Surgical masks are another option that you can use to make your mask. These masks are designed to filter out small particles and are effective at preventing the spread of respiratory illnesses.
- Fleece Fabric: Fleece fabric is another option that you can use to make your mask. This material is soft and comfortable to wear, and it is also effective at filtering out small particles.
Once you have chosen your materials, you can start working on creating your mask.
Once you have your materials, you can start sewing your mask. Here are the steps you can follow to sew your mask:
- Cut out two pieces of your chosen material, one for the top of the mask and one for the bottom.
- Place the two pieces together, with the right sides facing each other.
- Sew the two pieces together along the sides and bottom, leaving the top open.
- Cut a piece of elastic or ribbon to fit around your head, and attach it to the top of the mask.
Creating a Filter for Your Mask
Another option for creating your mask is to use a filter. Filters are effective at blocking out small particles and can be easily added to your mask. Here are the steps you can follow to create a filter for your mask:
- Cut out a piece of tissue paper or cotton batting to fit the size of your mask.
- Place the filter in the center of the top of your mask.
- Sew the filter in place using a needle and thread.
By adding a filter to your mask, you can increase the effectiveness of your mask and provide an extra layer of protection.
While the effectiveness of your mask is important, you can also make your mask a fashion statement. Here are some tips for styling your mask:
- Choose a Pattern: Choose a pattern that you like and that matches your outfit.
- Add a Trim: Add a trim to your mask to add some extra flair.
- Match Your Mask to Your Outfit: Coordinate your mask with your outfit to make a statement.
By adding a personal touch to your mask, you can make it your own and show off your style.
- Cut out two layers of 100% cotton fabric to the desired size. The CDC recommends masks be at least 6 inches long and 4 inches wide.
- Sew the two layers together along the sides and bottom, leaving the top open.
- Insert the elastic ear loops or metal nose wire into the top opening of the mask.
- If you’d like to add some style to your mask, you can use fabric markers or paint to add designs or patterns.
- Put on your mask and make sure it fits snugly over your nose and mouth.
By following these simple steps, you can create a functional and stylish mask to protect yourself and others from the spread of germs.
Cotton is a popular choice for homemade masks due to its affordability and accessibility. It is also a breathable material, which can be beneficial for people who wear masks for extended periods of time. However, cotton is not as effective at blocking particles as other materials, so it may not provide as much protection.
Polyester is a synthetic material that is known for its durability and resistance to shrinking. It is also a good choice for people who wear glasses, as it does not stretch as much as cotton. However, polyester can be less breathable than cotton, which can make it uncomfortable to wear for extended periods of time.
Silk is a soft and lightweight material that is known for its ability to repel water. It is also a good choice for people who wear glasses, as it does not stretch as much as cotton. However, silk can be expensive and may not be as effective at blocking particles as other materials.
Factors to Consider When Choosing Materials
When choosing materials for your mask, there are several factors to consider. The most important factor is the effectiveness of the material at blocking particles. Other factors to consider include the material’s breathability, durability, and comfort.
It is also important to consider any allergies or sensitivities you may have to certain materials. For example, if you have a latex allergy, you may want to avoid masks made with rubber bands.
Once you have chosen your materials, it is time to move on to the next step in the mask-making process: cutting and shaping your mask.
To make your own mask, you will need the following materials:
- Rotary cutter or sharp scissors (optional)
It is important to use 100% cotton fabric for your mask, as this is a breathable material that will allow you to breathe easily while still providing protection. Interfacing is necessary to add structure and stability to the mask. Scissors, needle and thread, and a ruler or measuring tape are necessary for cutting and sewing the mask together. A rotary cutter or sharp scissors can be used to cut the fabric quickly and accurately, but a hand sewing needle is needed for the final stitches.
To cut the fabric for your mask, follow these steps:
- Cut two layers of 100% cotton fabric to the same size. The size will depend on the size of the mask you want to make.
- Cut one layer of interfacing to the same size as the two layers of cotton fabric.
- Place the interfacing on top of one of the layers of cotton fabric, with the shiny side facing up.
- Cut the fabric and interfacing together to create a single layer with the interfacing in between.
- Repeat this process with the other layer of cotton fabric and the interfacing.
You should now have two layers of cotton fabric with interfacing in between.
To sew the mask together, follow these steps:
- Place the two layers of cotton fabric with interfacing in between on top of each other.
- Pin the edges together along the sides and bottom of the mask.
- Sew the mask together using a needle and thread. Be sure to backstitch at the beginning and end of each seam to reinforce them.
- Once the mask is sewn together, you can add any additional features you like, such as elastic loops for the ears or a nose wire.
You can also use a rotary cutter or sharp scissors to cut the fabric more quickly and accurately, but a hand sewing needle is needed for the final stitches.
FAQs
1. What materials do I need to make a mask?
To make a mask, you will need the following materials: two layers of 100% cotton fabric (preferably tightly woven), a sewing machine or needle and thread, a cutting mat, ruler, pins, and scissors. You can also add elastic or ribbon for the ear loops, depending on your preference.
2. How do I make the mask?
To make the mask, start by cutting the two layers of fabric into the shape of a triangle with a straight edge. Then, sew the two layers together along the sides, leaving the top open. Next, insert a filter pocket by cutting a hole in the top layer of fabric and inserting a filter, such as a coffee filter or tissue paper. Finally, add elastic or ribbon to the top of the mask for a secure fit.
3. Can I use any type of fabric to make a mask?
It is recommended to use 100% cotton fabric to make a mask, as it is a tightly woven fabric that provides good protection. However, you can also use other fabrics such as silk or linen, as long as they are tightly woven. Avoid using loosely woven fabrics like muslin or lace, as they may not provide adequate protection.
4. How do I know if my mask is effective?
Your mask should fit snugly over your nose and mouth, with no gaps or openings. The filter pocket should be positioned over your nose and mouth, and the filter should be made of a tightly woven material like cotton. If you can see light through the mask, it is not effective. Additionally, you can test the filtration ability of your mask by holding it up to a light source and observing whether the light passes through.
5. Can I reuse my mask?
Yes, you can reuse your mask by washing it in hot water and drying it thoroughly. It is recommended to wash the mask after each use to ensure it remains effective. You can also add a filter to the mask each time you wear it, to provide additional protection.
6. Can I make a mask for someone else?
Yes, you can make a mask for someone else by following the same steps as outlined above. However, it is important to consider the other person’s preferences and needs when selecting fabric and filters. If you are making a mask for someone with allergies or sensitivities, for example, you may want to use hypoallergenic or organic materials.